
Material Plastic
Quantity 3 pcs
Price Range $1-100
Lead Time 1 workdays
Gallery

About Project
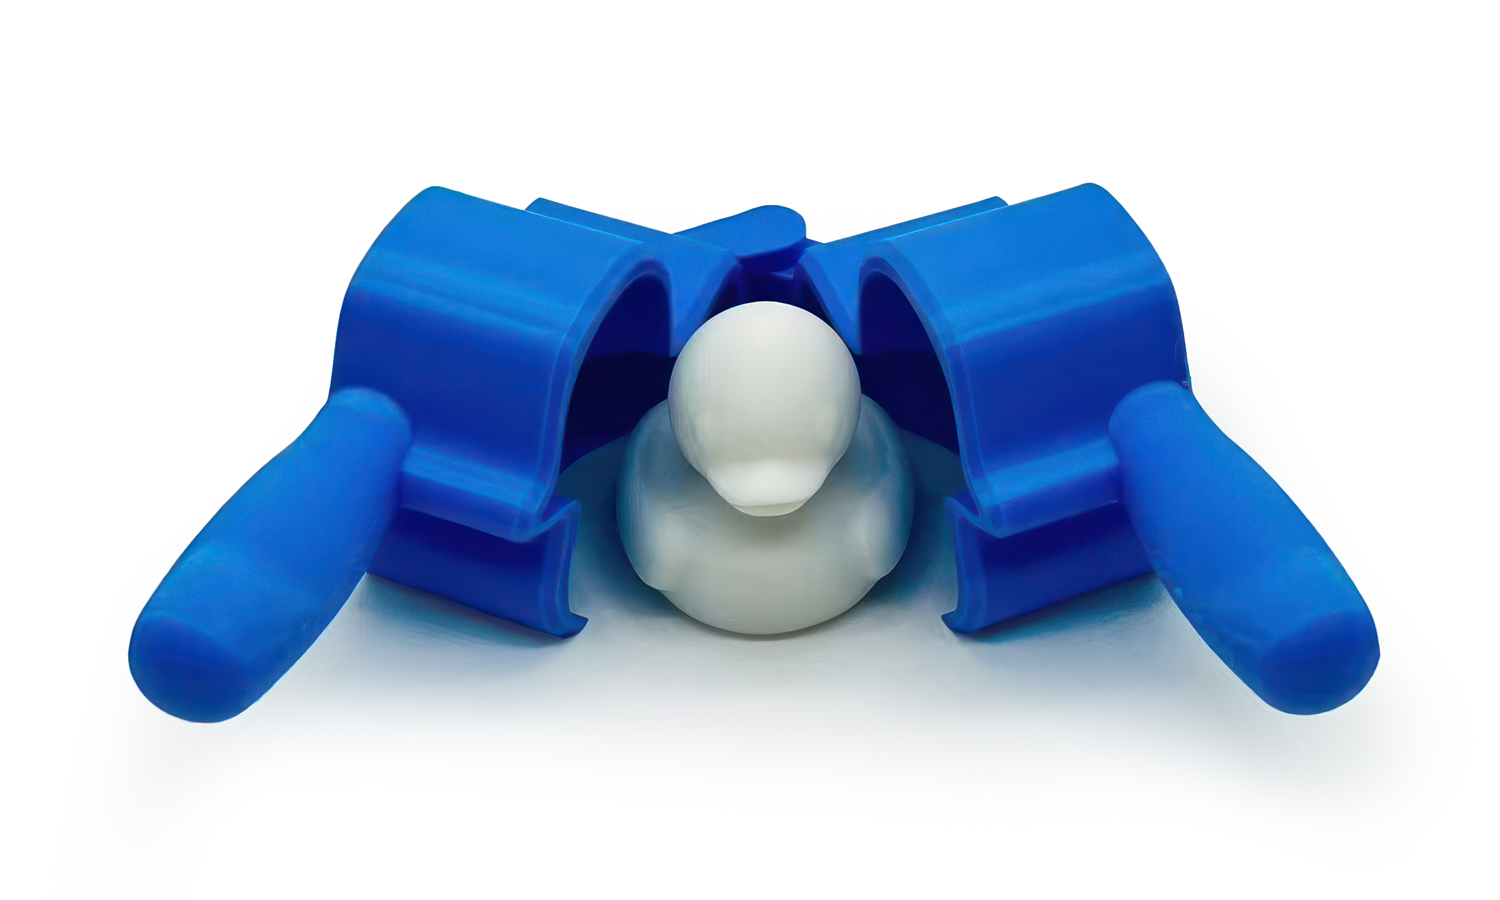
Tired of basic snowballs? Want to add a splash of whimsy to your winter wonderland? Check out these awesome FDM 3D-printed snowball maker rubber duck mold clamps!
These clever clamps are designed with two interlocking halves that perfectly form the iconic shape of a rubber duck. Simply pack snow (or even wet sand!) into the mold, press the halves together, and voila! You’ve got a whole flock of adorable snow ducks ready for snowball fights or creative snow sculptures.
Why We Love These Ducktastic Molds?
- Easy to Use: Even little hands can quickly master the simple clamp mechanism.
- Consistent Shapes: Get perfectly formed duck snowballs every time.
- Fun for All Ages: Kids and adults alike will love this novel twist on snow play.
- Versatile: Works with snow and potentially wet sand for summer fun too!
Unleash Your Creativity with FacFox’s 3D Printing Services
Inspired by these ducky delights? Want to create your own unique toy molds? Look no further than FacFox!
FacFox offers professional 3D printing services with a wide range of materials and finishes. Whether you’re a designer, inventor, or just someone with a fun idea, FacFox can bring your custom toy mold visions to life.
Why Choose FacFox for Your Custom Toy Molds?
- High-Quality Prints: Get precise and durable prints with advanced FDM technology.
- Material Variety: Choose from a wide selection of materials to suit your specific needs.
- Expert Support: FacFox’s team of experts can guide you through the design and printing process.
- Fast Turnaround: Get your custom molds quickly and efficiently.
Ready to turn your imagination into reality? Contact FacFox today to discuss your custom toy mold project! Let’s make some quacking amazing creations together!
Solution
- Step 1: The design was conceptualized and finalized using CAD software.
- Step 2: A 3D model was then generated from the digital design.
- Step 3: The model was sliced into layers by specialized software, creating instructions for the 3D printer.
- Step 4: PLA filament was selected and loaded into the 3D printer.
- Step 5: The 3D printer was calibrated and prepared for the printing process.
- Step 6: The printing process was initiated, with the printer extruding the filament layer by layer onto the build platform.
- Step 7: Each layer was deposited and solidified, gradually building up the object.
- Step 8: The printing process was monitored to ensure quality and prevent errors.
- Step 9: Once completed, the printed object was removed from the build platform.
- Step 10: Support structures (if needed) were carefully detached from the printed object.
- Step 11: Any necessary post-processing (e.g., sanding, painting) was performed to achieve the desired finish.
- Step 12: The two halves of the mold clamp were assembled. The final product was inspected for quality and functionality.


