Material Resin
Quantity 1 pcs
Price Range $1-100
Lead Time 2 workdays
Gallery
About Project
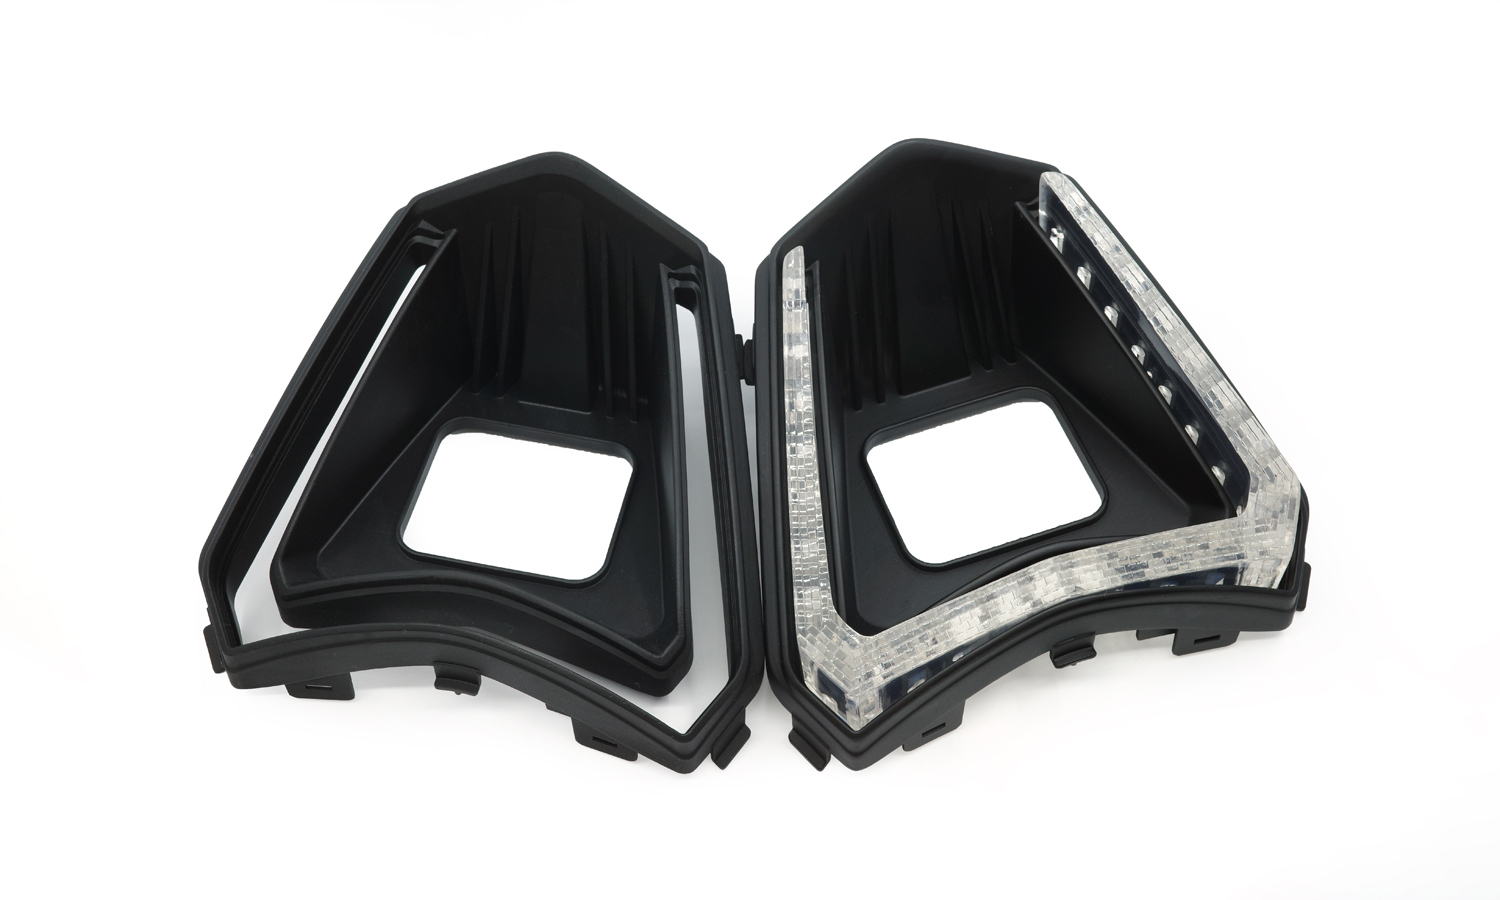
This project features a transparent, angular light-guide component designed as part of a motorcycle lighting system. The clear part was engineered to assemble precisely with two black structural housings, forming a complete lighting module that balances optical performance, mechanical stability, and visual clarity.
The transparent component followed a sharp, faceted geometry that matched the contours of the outer housing. Along its inner edges, a series of evenly spaced micro-posts and ribs were integrated to align with the mating parts during assembly. These features ensured accurate positioning of LEDs and consistent light distribution once installed, while also improving structural rigidity without adding unnecessary bulk.
From an optical perspective, the part acted as both a light diffuser and guide. Its clear material allowed light to travel smoothly along the curved profile, while the internal texture and thickness transitions helped soften hotspots and maintain uniform brightness across the visible surface. The transparency also made it easier to inspect internal fit and LED placement during prototyping, reducing iteration time.
To achieve these requirements, the part was produced using high-resolution resin 3D printing. This process delivered excellent transparency, sharp detail reproduction for the fine alignment features, and smooth surfaces suitable for lighting applications. Minimal post-processing was required before assembly, and the finished component fit seamlessly with the two opaque housings to form a robust, ready-to-test motorcycle lighting module.
At FacFox, we specialize in turning complex functional designs like this into high-quality physical parts. From transparent optical components to durable structural housings, our industrial 3D printing services cover a wide range of materials and processes to support prototyping, validation, and low-volume production. Whether you’re developing automotive, motorcycle, or consumer electronics components, FacFox helps bring your designs to life with speed, precision, and reliability.
Solution
- Step 1: The 3D model of the transparent light-guide part was reviewed, and critical optical faces, mating edges, and alignment posts were identified for priority control.
- Step 2: The build orientation was selected to minimize support contact on visible/optical surfaces, and the part was positioned to reduce distortion along the long curved edges.
- Step 3: Support structures were generated and refined, and support tips were placed away from light-transmitting areas whenever possible.
- Step 4: The resin printer was prepared, and a transparent photopolymer resin was loaded to meet the clarity and fine-detail requirements.
- Step 5: The part was printed at a high-resolution setting, and the build was completed with the alignment ribs and micro-post features fully formed.
- Step 6: The printed part was removed from the build platform, and excess resin was drained before handling.
- Step 7: The part was washed in solvent to remove uncured resin, and internal corners and feature pockets were cleaned to prevent residue haze.
- Step 8: The part was post-cured under controlled UV exposure, and curing time was kept consistent to stabilize dimensions and maintain clarity.
- Step 9: Support structures were removed, and support marks were trimmed carefully to avoid chipping or scratching transparent surfaces.
- Step 10: The part was lightly sanded where needed, and optical faces were preserved or refined to reduce visible marks.
- Step 11: The transparent surfaces were polished and a clear coating was applied to improve light transmission and restore uniform transparency.
- Step 12: The finished part was inspected for clarity, warpage, and dimensional accuracy, and the mating features were checked against the two black housing parts for proper assembly fit.


