Material Resin
Quantity 1 pcs
Price Range $1-100
Lead Time 2 workdays
Gallery
About Project
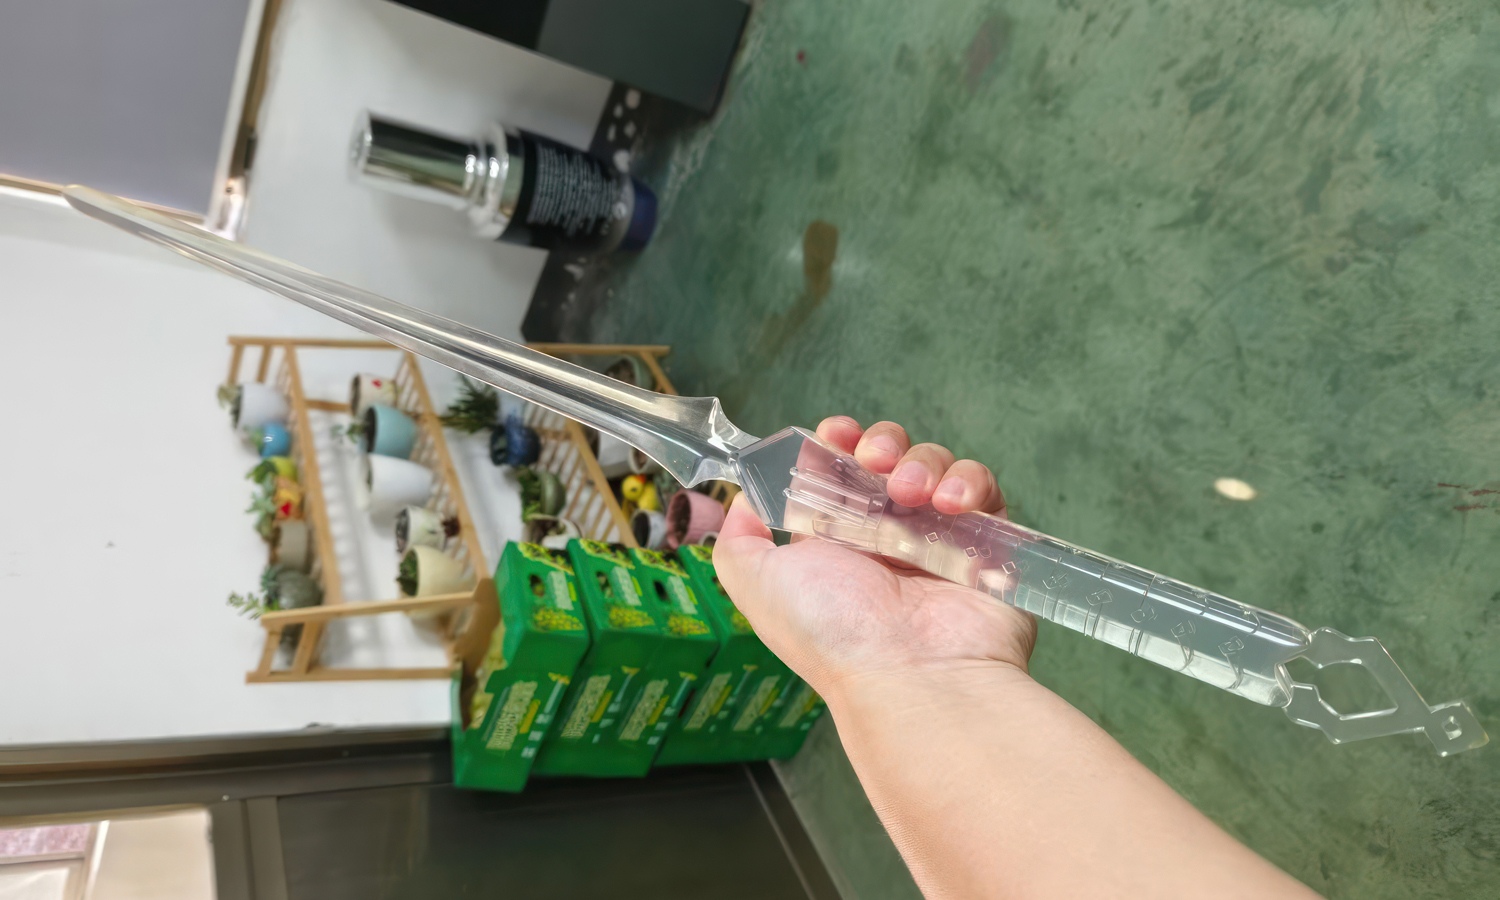
This impressive 1-meter-long sword, crafted using Stereolithography (SLA) 3D printing technology, is a testament to the capabilities of modern additive manufacturing. The transparent resin material used for the blade gives it a unique and ethereal quality, reminiscent of a mythical weapon.
A Classic Design with Modern Flair
The sword’s design is a perfect blend of tradition and innovation. The straight, tapering blade and pointed tip evoke the classic sword archetype. The beveled edges and diamond-shaped patterns on the handle not only add visual interest but also enhance the grip, making it a functional as well as a decorative piece.
The Benefits of SLA 3D Printing
SLA 3D printing was the ideal choice for this project due to its ability to produce highly detailed and accurate parts. The smooth surface finish and precise dimensions of the sword are a direct result of this technology.
Experience the Power of Clear Resin 3D Printing with FacFox
If you’re looking to create your own unique and stunning 3D printed models, look no further than FacFox. Our clear resin 3D printing services offer exceptional quality, precision, and versatility. Contact us today to discuss your project and discover how we can help bring your ideas to life.
Solution
- Step 1: Design Creation.ô The digital model of the sword was designed using CAD software. The design included a transparent blade with a straight, tapered shape and a handle featuring beveled edges and diamond-shaped patterns.
- Step 2: Preparation of the Printer.ô The SLA 3D printer was prepared by filling the vat with clear photopolymer resin. The build platform was cleaned and calibrated to ensure precise printing.
- Step 3: Slicing the Model.ô The digital model was sliced into thin layers using slicing software. The sliced file was then uploaded to the 3D printer.
- Step 4: Printing the Sword.ô The printing process was initiated. The UV laser selectively cured the resin layer by layer, starting from the bottom and moving upwards. Each layer was solidified as the build platform gradually lifted, allowing new resin to flow beneath the previously cured layer.
- Step 5: Post-Processing.ô Once the printing was completed, the sword was carefully removed from the build platform. Excess resin was drained, and the sword was rinsed in isopropyl alcohol to remove any uncured resin.
- Step 6: Curing.ô The sword was placed in a UV curing chamber to fully harden the resin. This step ensured that the material reached its maximum strength and clarity.
- Step 7: Finishing.ô The sword was inspected for any imperfections. The handle’s beveled edges and diamond-shaped patterns were polished to enhance their appearance and grip. Any support structures used during printing were carefully removed.
- Step 8: Final Inspection.ô The finished sword was thoroughly inspected to ensure it met the design specifications and quality standards. The transparency of the blade and the detailed patterns on the handle were checked for accuracy.


