Material Resin
Quantity 1 pcs
Price Range $1-100
Lead Time 7 workdays
Gallery
About Project
SLA 3D printing is a popular technique for creating high-quality and detailed prototypes, especially for medical applications. One of the advantages of SLA 3D printing is that it can produce clear resin models that are transparent and smooth, which can be useful for demonstrating the functionality and aesthetics of medical devices.
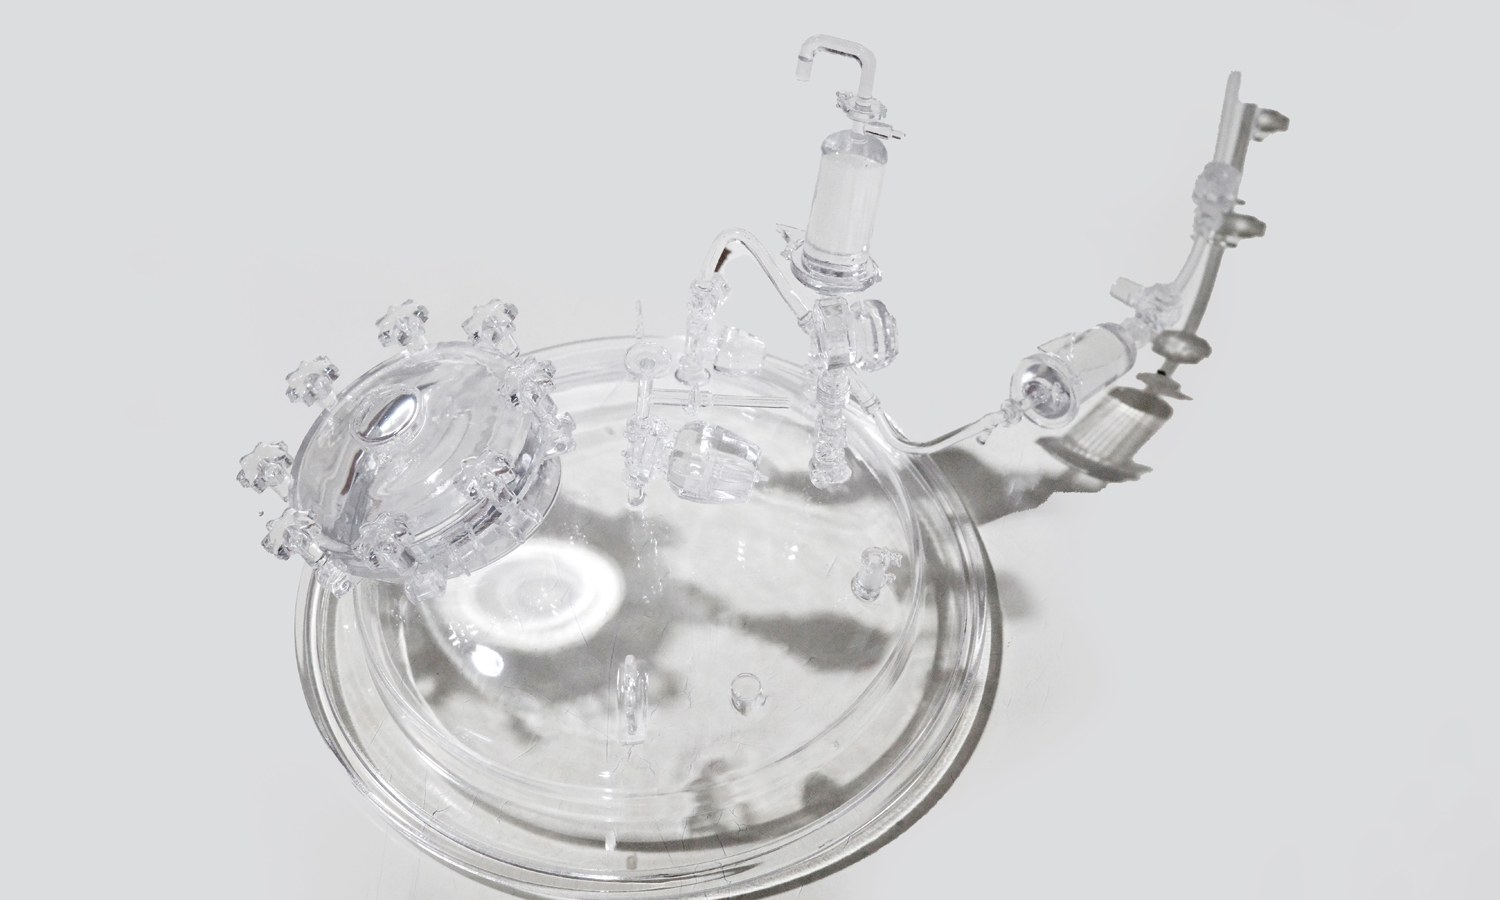
In this post, we will show you an example of an SLA 3D-printed clear resin medical prototype infusion set, which is a device that delivers fluids or medications into a patientŌĆÖs bloodstream. The infusion set consists of a curved base connected with a valve and an infusion tube. The base is designed to fit the shape of the patientŌĆÖs arm, while the valve and tube control the flow and direction of the fluid or medication.
We printed the prototype in one piece using SLA 3D printing technology, which uses a laser to cure liquid resin layer by layer. The result is a solid and durable model that has high accuracy and resolution. The model also has a smooth surface finish, which is important for medical devices that need to be comfortable and hygienic.
However, SLA 3D printing alone is insufficient to achieve a clear resin model. The model also needs to undergo post-processing steps, such as washing, curing, and polishing. We carefully polished the model for two or three times so that all the corners could be polished, in this way the prototype could be transparent. Polishing is a crucial step for clear resin models, as it removes any scratches or marks that might affect the clarity and appearance of the model.
The final result is an SLA 3D-printed clear resin medical prototype infusion set that looks like a real product. The model is transparent and glossy, which allows us to see the internal structure and details of the device. The model also has a realistic shape and size, which makes it easy to test and evaluate the performance and usability of the device.
If you are looking for a reliable and professional SLA 3D printing service provider, you should check out FacFoxŌĆÖs clear resin 3D printing services. FacFox is a leading online platform that offers high-quality and affordable 3D printing solutions for various industries and applications. FacFox has a team of experienced engineers and designers who can help you with your 3D printing projects from start to finish. FacFox also has a wide range of materials and technologies to choose from, including clear resin SLA 3D printing.
Whether you need a prototype, a functional part, or a custom product, FacFox can help you turn your ideas into reality with SLA 3D printing. Contact FacFox today and get a free quote for your SLA 3D printed clear resin medical prototype infusion set or any other 3D printing project you have in mind.
Solution
- Step 1: The 3D model of the infusion set was designed using CAD software and exported as an STL file.
- Step 2: The STL file was uploaded to FacFoxŌĆÖs online platform and the SLA 3D printing parameters were selected, such as the amount, material, post-processing, and expected effect.
- Step 3: The order was placed and the SLA 3D printer was prepared for printing. The resin tank was filled with SLA Clear Resin and the build platform was leveled.
- Step 4: The SLA 3D printing process was started. The resin was cured by the laser and solidified into a layer. The build platform was lifted up slightly and a new layer of resin was spread over the previous layer. The process was repeated until the whole model was completed.
- Step 5: The SLA 3D printed model was removed from the build platform and washed with isopropyl alcohol to remove any excess resin. The model was then placed in a UV curing chamber to harden and strengthen the resin.
- Step 6: The support structures were carefully cut off from the model using a pair of pliers or a knife. The model was inspected for any defects or errors.
- Step 7: The model was sanded with different grits of sandpaper, starting from coarse to fine, to smooth out any rough edges or marks. The model was then applied with a polishing paste and buffed with a polishing machine to achieve a glossy and transparent finish. The model was polished two or three times to ensure that all the corners were polished.
- Step 8: The model was evenly sprayed with clear UV oil to make it more transparent. It was packed and delivered to the client after thorough inspection.

