
Material Resin
Quantity 1 pcs
Price Range $1-100
Lead Time 2 workdays
Gallery
About Project
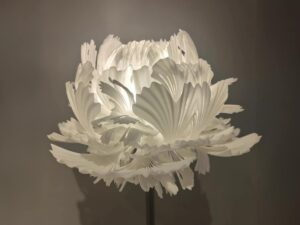
These 3D printed parts showcase a creative approach to achieving an elegant milky-white finish while retaining the clarity and depth of transparent resin. Instead of printing directly with white material, each component was printed in SLA clear resin, then carefully sprayed white from the inside. The result is a unique semi-translucent aesthetic – smoother, richer, and more luminous than opaque white resin.
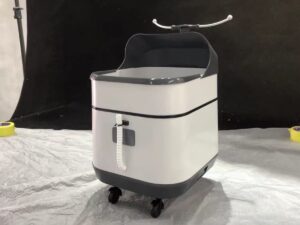
From geometric domes and curved panels to precision-fit enclosures, every surface reflects light softly while maintaining a clean, glasslike gloss on the exterior. The translucent coating also provides functional advantages – it diffuses light evenly, hides internal structures, and preserves the resin’s optical smoothness. Such parts are ideal for lighting housings, display prototypes, art installations, and decorative industrial models that need both visual refinement and structural accuracy.
FacFox’s SLA clear resin 3D printing service delivers exceptional surface quality, tight tolerances, and optical-grade clarity suitable for this kind of secondary finishing. With post-processing options like tinting, frosted sanding, or inner coating, we help designers achieve subtle material effects that rival injection-molded plastics. Whether for concept models or final production prototypes, FacFox provides reliable one-stop manufacturing for your translucent resin creations.
Solution
- Step 1: CAD files were inspected, watertightness was verified, and critical dimensions were tolerance-checked.
- Step 2: Build orientation and supports were planned to minimize visible marks and ensure optical surfaces were preserved.
- Step 3: Parts were printed with SLA clear resin using fine layer height for smooth curvature and accurate fit.
- Step 4: Prints were removed from the platform and excess resin was rinsed away with solvent.
- Step 5: UV post-curing was performed to reach full mechanical strength and optical stability.
- Step 6: Supports were clipped and witness points were gradually feathered with progressive grits.
- Step 7: External surfaces were wet-sanded and polished to a high-gloss, glasslike finish.
- Step 8: Interior surfaces were lightly abraded and degreased to promote coating adhesion.
- Step 9: Masking was applied to interfaces, threads, and optical windows as required.
- Step 10: A white coating was sprayed on the inside in multiple thin passes to achieve uniform, milky translucency.
- Step 11: Parts were oven-dried/cured per coating specification and the masking was removed.
- Step 12: Final buffing and anti-dust cleaning were completed on the outer surface.
- Step 13: Dimensional inspection, light-diffusion checks, and cosmetic QA were performed.
- Step 14: Components were assembled (if applicable), protected with soft wraps, and packaged for shipment.


