Material Resin
Quantity 1 pcs
Price Range $1-100
Lead Time 6 workdays
Gallery

About Project
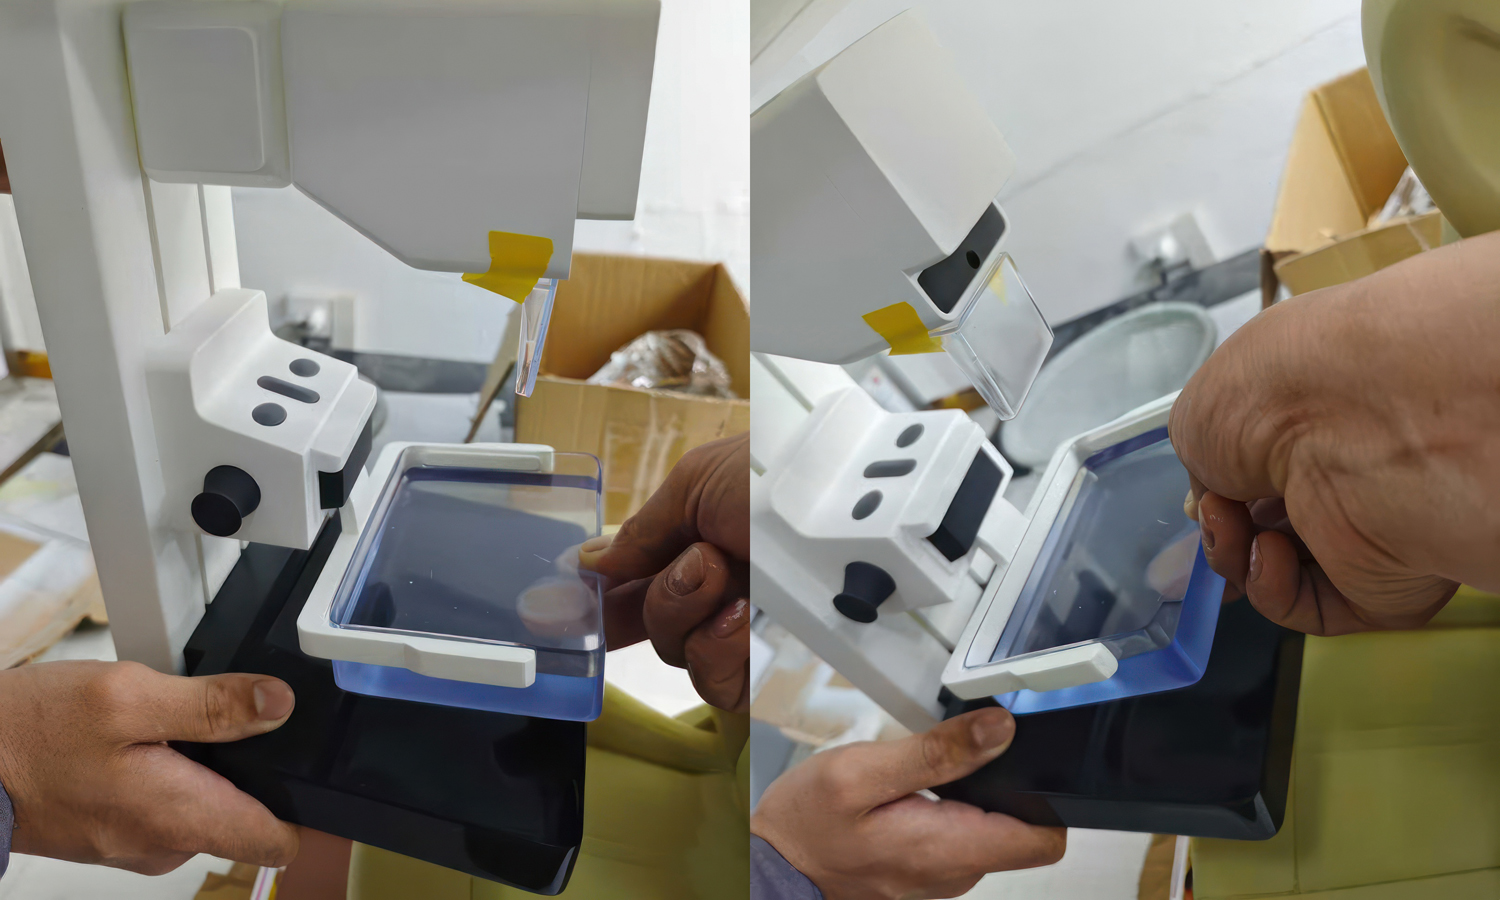
Bringing a complex medical device to life is a journey of precision and iteration. In the medical field, the “C-arm” configurationŌĆöcommonly seen in mammography and specialized scanning equipmentŌĆörequires perfect alignment between the imaging source and the compression interface.
The images above showcase a scaled-down functional prototype that proves how vital physical models are in the R&D process. While digital renders are great, a physical prototype allows engineers and stakeholders to:
- Validate Ergonomics: Test the patient interface, like the soft-contoured seating and headrest, to ensure comfort and proper positioning.
- Mechanical Testing: Check the “travel” and clearance of the vertical rails and the compression tray mechanism.
- Design Language: Evaluate the aesthetic impact of the “friendly” color palette and clean lines before committing to full-scale production.
This specific model was produced using SLA (Stereolithography) 3D printing. SLA is the gold standard for medical prototypes because it offers an exceptionally smooth surface finish and the high dimensional accuracy needed for interlocking mechanical parts and “clear-view” components like the compression tray shown here.
Bring Your Vision to Life with FacFox
Whether you are developing the next breakthrough in diagnostic imaging or a complex industrial tool, FacFox provides the manufacturing muscle to turn your CAD files into reality. We specialize in high-resolution SLA for aesthetic models, but our expertise extends across a full suite of technologies, including FDM for durable housing, MJF for functional nylon parts, and DMLS for high-strength metal components. Beyond printing, we offer CNC machining and professional finishing to ensure your prototype is gallery-ready.
Upload your files to FacFox today and let’s build the future together.
Solution
- Step 1: The digital 3D model was designed in CAD software and exported as an STL file to ensure compatibility with the printing system.
- Step 2: Supports were strategically added to the virtual model to stabilize the overhanging C-arm structure and the compression tray during the build.
- Step 3: The high-resolution liquid resin was prepared and loaded into the SLA 3D printerŌĆÖs vat.
- Step 4: The prototype was built layer by layer as a UV laser was used to selectively cure the resin, solidified against the build platform.
- Step 5: Once the printing was finalized, the parts were removed from the platform and washed in an isopropyl alcohol bath to eliminate excess uncured resin.
- Step 6: The support structures were carefully detached, and the components were placed in a UV curing oven to achieve full structural integrity.
- Step 7: The surfaces were wet-sanded and polished to remove layer lines, followed by the application of professional paint and a matte finish.
- Step 8: The clear resin board was coated with clear acrylic oil to achieve high transparency and a glass-like finish for the compression interface.
- Step 9: The individual SLA components, including the mechanical rails and padded inserts, were assembled into the final scaled-down prototype.


