Material Resin
Quantity 1 pcs
Price Range $1-100
Lead Time 3 workdays
Gallery
About Project
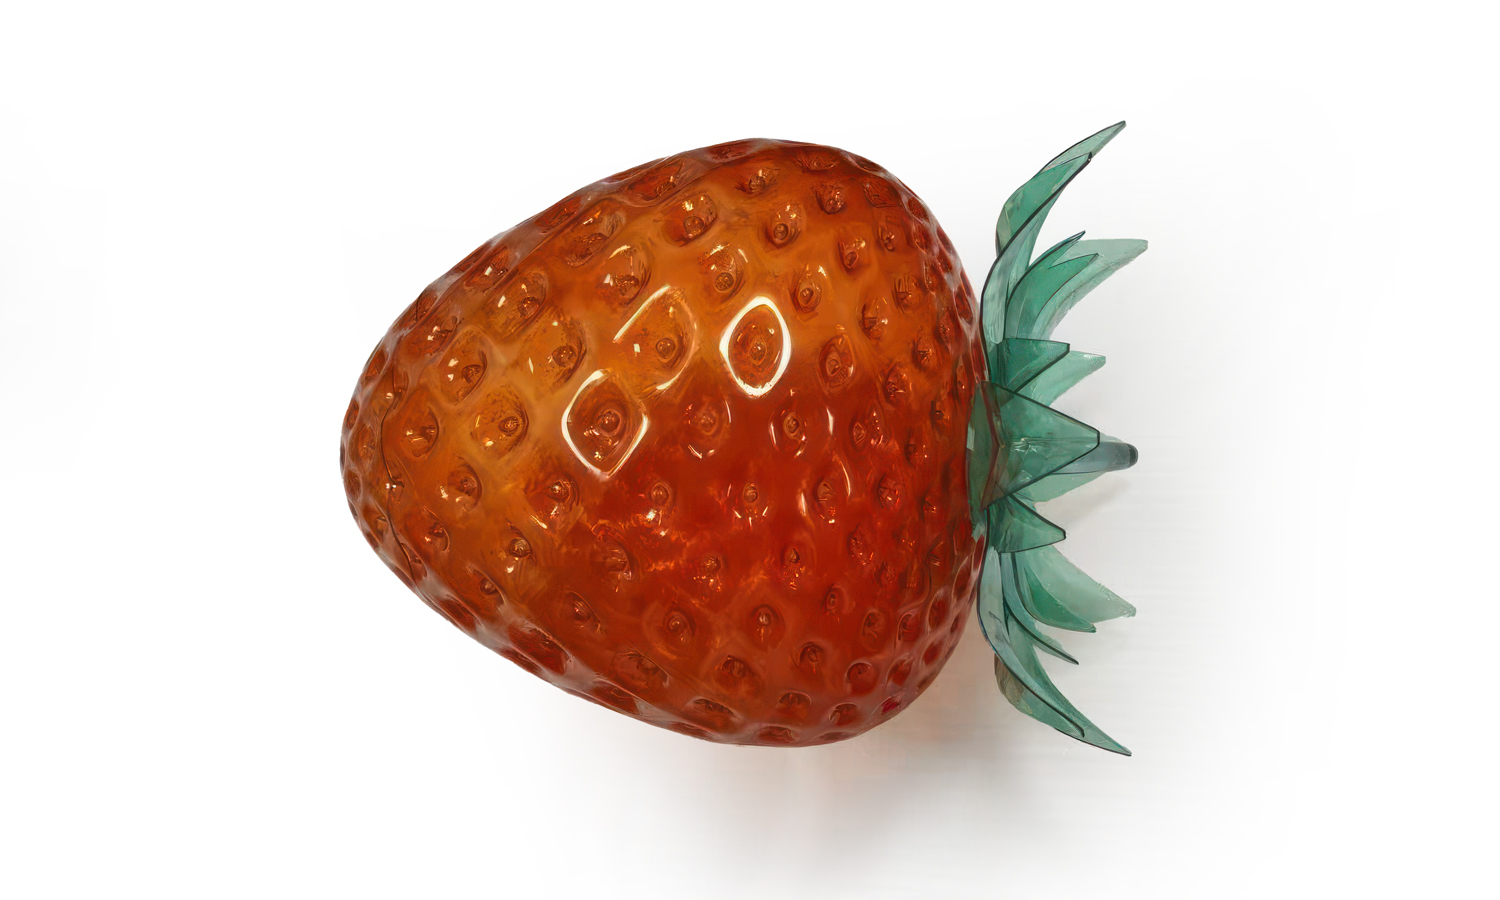
What if an ordinary fruit could be transformed into a larger-than-life art piece? This striking oversized strawberry model was crafted using advanced 3D printing and meticulous finishing techniques.
The main body was produced with SLA Clear Resin, ensuring smooth surfaces and fine details that perfectly capture the strawberry’s iconic texture. After printing, the piece was dyed a rich, translucent red to mimic the natural color of the fruit while maintaining a crystal-like clarity. The green leafy top was printed separately, dyed in shades of emerald, and carefully glued together with the body, creating a seamless and vibrant sculpture.
The result is not just a scaled-up strawberry, but a captivating art object that looks like it could belong in a gallery, a creative installation, or even as a statement piece for branding and exhibitions.
At FacFox, we specialize in turning imaginative concepts into tangible works of art. With our wide range of 3D printing technologies, premium materials, and expert post-processing services, we can help you bring bold ideas-whether oversized, miniature, or highly intricate-to life. From prototypes to finished display models, FacFox is your trusted partner in making creativity real.
Solution
- Step 1: The strawberry CAD model was prepared and scaled to the target dimensions.
- Step 2: The berry body and calyx (leaf crown) were separated into distinct printable parts, and bonding surfaces were designed for clean assembly.
- Step 3: Printing orientation was optimized to minimize support marks and ensure clarity in visible areas.
- Step 4: The body and calyx parts were sliced for SLA Clear Resin using fine layer settings suitable for transparent finishes.
- Step 5: The parts were printed on an SLA machine in clear photopolymer resin.
- Step 6: The printed parts were washed thoroughly in fresh IPA baths, and residual resin was removed with gentle air blow-off.
- Step 7: A short UV pre-cure was carried out to stabilize the surfaces before support removal.
- Step 8: Supports were clipped off and the contact points were carefully sanded smooth.
- Step 9: The surfaces were wet-sanded with progressively finer grits and then polished to restore transparency.
- Step 10: A full UV post-cure was completed to reach final strength and dimensional stability.
- Step 11: Transparent dye solutions were prepared, and small tests were performed to achieve the desired hues.
- Step 12: The berry body was dyed a rich translucent red, while the calyx was dyed in emerald green tones.
- Step 13: The dyed parts were rinsed, dried, and coated with a clear protective layer to enhance gloss and lock in the colors.
- Step 14: The calyx was assembled and glued onto the berry body using clear UV-curable adhesive, ensuring seamless bonding.
- Step 15: Final inspection was performed to confirm alignment, surface clarity, and vibrant coloration.

