Material Resin
Quantity 1 pcs
Price Range $1-100
Lead Time 2 workdays
Gallery
About Project
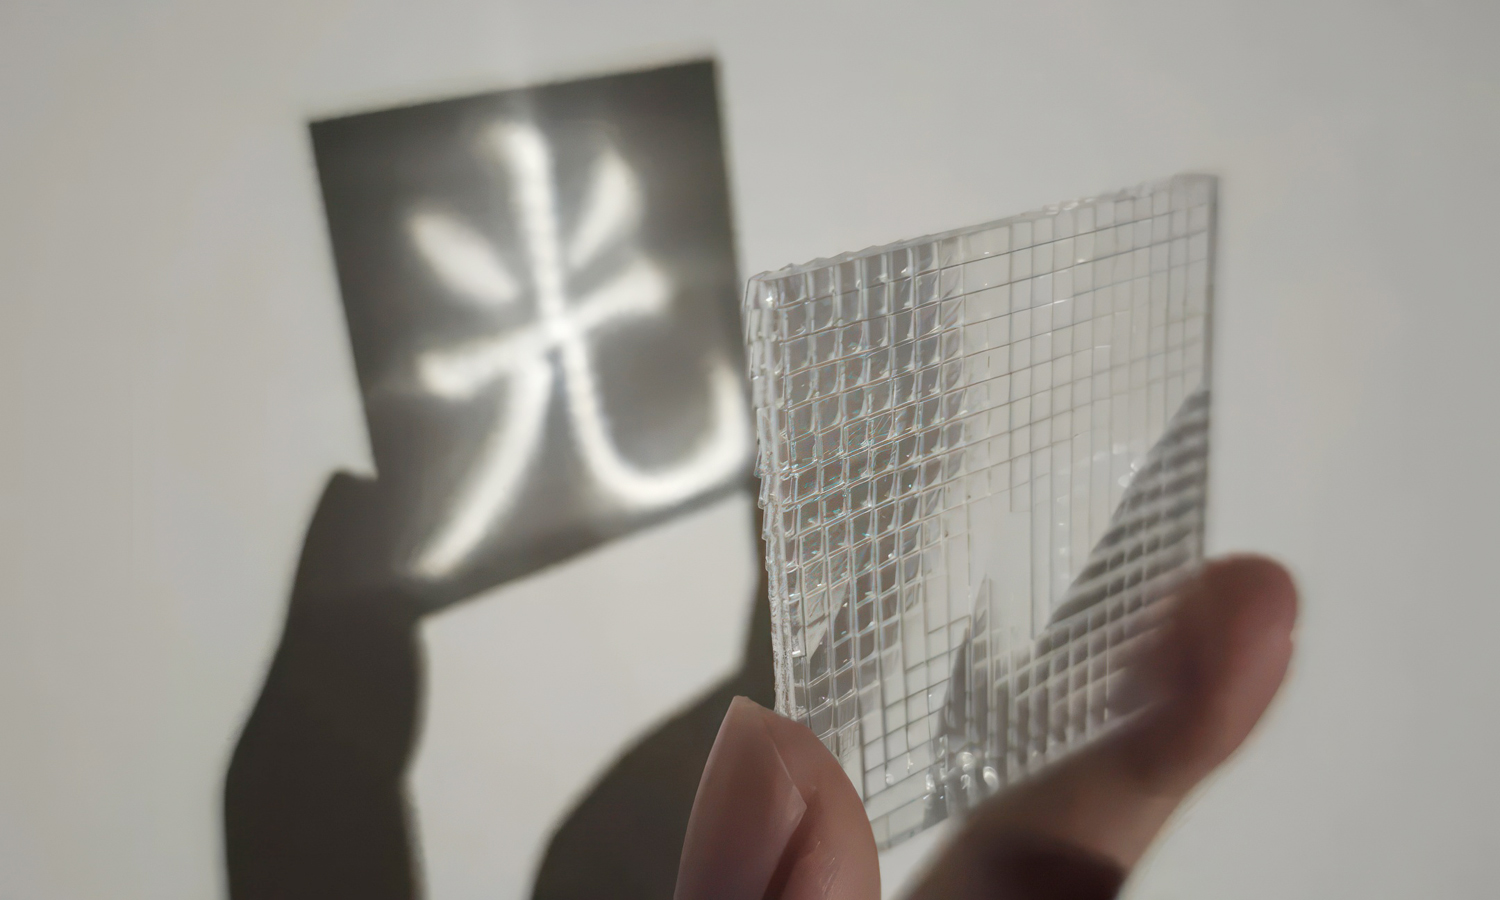
Ever thought you could “print” a beam of light?
This stunning example of optical design demonstrates how resin 3D printing can be used not only for modeling but also for sculpting light itself. A single clear panel, printed with a calculated surface pattern, refracts light to project the Chinese character “Í ” (light) onto the wall.
The Science Behind the Magic
At its core, this is a real-world application of caustic projection-using transparent materials to bend and focus light precisely. Similar to how a Fresnel lens works, the surface was divided into tiny blocks, each meticulously angled to redirect incoming light toward the correct point in space. The result? A sharp, glowing character formed purely by refracted light.
And the best part?It was 3D printed in clear resin, reducing both cost and fabrication complexity.
How Was It Made?
- Surface geometry was computationally generated using light simulation
- The digital model was 3D printed with SLA clear resin
- No complex polishing or lens-making-just the power of precise layer-by-layer fabrication
Why Choose FacFox for Optical 3D Printing?
At FacFox, we offer high-resolution SLA printing in transparent resin, perfect for:
- Artistic caustics and light art
- Optical experiments and lenses
- Signage and architectural lighting
- Custom display and projection systems
Whether you’re an artist, a designer, or an optical engineer-we can help bring your vision to light. Literally.
Try caustic projection or custom light shaping with FacFox’s clear resin 3D printing service today.Let your creativity shine-one photon at a time.
Solution
- Step 1: The target projection image (“Í ”) was designed digitally and converted into a grayscale heightmap or vector outline.
- Step 2: The light source position and projection distance were determined, and a custom caustic simulation algorithm was applied to calculate the necessary surface normals.
- Step 3: The surface of a flat panel was divided into a fine grid, and each section was given a specific angle to refract incoming light toward the corresponding point on the projection surface.
- Step 4: The final caustic surface geometry was exported as a 3D model (typically STL or OBJ format) suitable for SLA printing.
- Step 5: The model was sliced using SLA-compatible software, and then printed using clear photosensitive resin with high resolution, layer by layer.
- Step 6: After printing, the panel was removed from the build plate and thoroughly cleaned in isopropyl alcohol to remove uncured resin.
- Step 7: The part was post-cured under UV light to ensure complete hardening and improve optical clarity.
- Step 8: Optional surface treatment such as light sanding or clear acrylic coating was applied to enhance transparency and optical performance.
- Step 9: The panel was tested by aligning it with a point light source, confirming that the projected character matched the design intent.


