Gallery
About Project
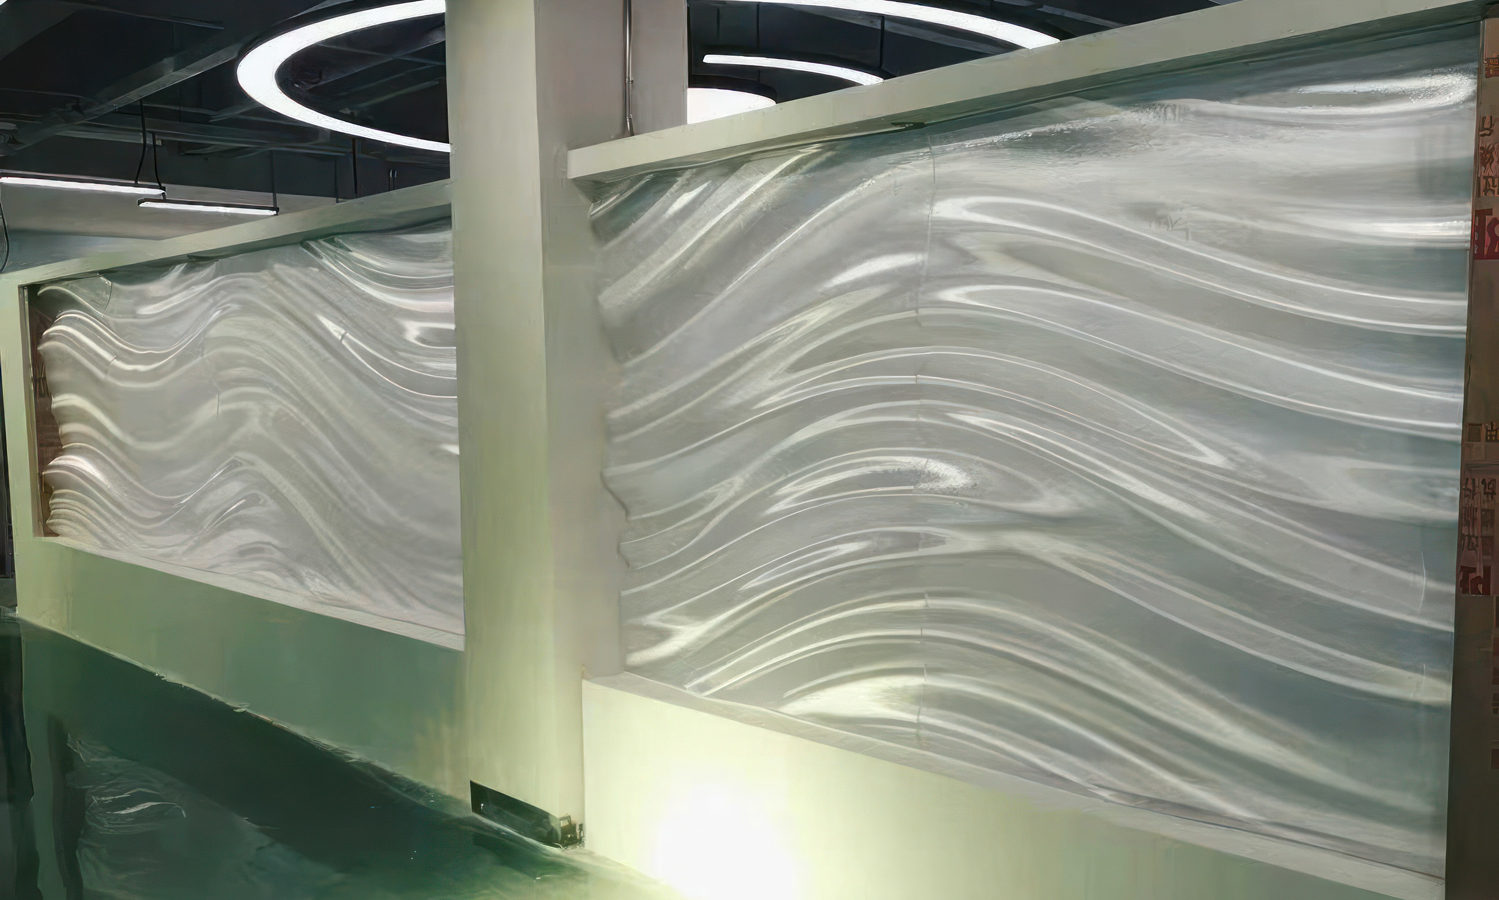
When technology meets design, the result can be breathtaking. This stunning decorative wall panel was created using large-format robotic PETG 3D printing, pushing the boundaries of what’s possible in architectural fabrication.
Crafted with precision on a robotic extrusion system, the panel features flowing wave-like textures that catch and reflect light beautifully, bringing energy and elegance into the interior space. By leveraging PETG’s toughness, translucency, and smooth surface potential, the final product achieves a glass-like finish that is both durable and visually striking.
Unlike traditional molding, large-format additive manufacturing allows for seamless panels several meters long, tailored precisely to the client’s vision. Complex geometries and organic patterns are produced directly from digital models, significantly reducing tooling costs and production time.
From luxury retail interiors to exhibition installations and custom architectural features, this technology opens up entirely new possibilities for designers and builders who want to stand out.
At FacFox, we specialize in bringing bold ideas to life with cutting-edge 3D printing technologies. Whether it’s a one-of-a-kind decorative wall, a functional prototype, or a full-scale structure, our team is here to make it real.
¤æē Ready to transform your space with large-format 3D printing? Contact us today and let’s build something extraordinary.
Solution
- Step 1: The design intent and overall panel size were confirmed, and a watertight CAD surface with wave geometry was prepared.
- Step 2: Toolpaths for large-format extrusion were generated in robotic CAM; bead width, layer height, and non-planar finishing passes were defined to minimize stair-stepping.
- Step 3: The panel was oriented and, if required by the build volume, it was segmented and hidden joints were planned.
- Step 4: PETG pellets/filament were dried in a desiccant dryer to <0.02% moisture to prevent bubbles and haze.
- Step 5: The extrusion head and heated barrel were brought to the qualified PETG temperature range, and flow calibration was performed.
- Step 6: The build platform/jig was leveled, a release sheet and adhesion promoter were applied, and the target chamber temperature was stabilized.
- Step 7: The KUKA robot was homed, the TCP (tool center point) was calibrated, and a dry-run was executed to verify clearance and reach.
- Step 8: Deposition was initiated, and the first layer was laid down at reduced speed to ensure adhesion along the entire perimeter.
- Step 9: The remaining layers were extruded with controlled bead overlap and closed-loop temperature/flow regulation; path blending and corner slow-downs were applied to maintain surface continuity.
- Step 10: Real-time monitoring was conducted; minor ooze and stringing were trimmed, and process logs were captured for traceability.
- Step 11: After printing, the panel was allowed to cool under controlled conditions, and residual stress was relieved by low-temperature annealing.
- Step 12: The part was released from the fixture, datum edges were trimmed, and any segmentation interfaces were bonded with a structural adhesive compatible with PETG; seam lines were dressed.
- Step 13: Gross surface lines were reduced by CNC surfacing (where accessible) and by progressive sanding; grits from P180 through P1200 were used, followed by wet sanding for clarity.
- Step 14: The surface was polished to a uniform gloss, and a clear UV-resistant topcoat was applied to enhance transparency and protect against abrasion and yellowing.
- Step 15: Final QC was performed; overall dimensions, flatness, gloss level, and visual uniformity were inspected under raking light.
- Step 16: Mounting hardware was fitted, protective film was applied, and the panel was packaged and shipped.
- Step 17: On site, the panel was installed into the architectural frame with concealed fasteners and vibration-isolating gaskets, and a final clean and inspection were completed.


