
Believe it or not, many of the items around you in your day-to-day life are created through a process called plastic injection molding. But how can you tell which ones they are? Once you know what to look for, it’s easy to see!
Injection molding is used to produce a wide range of products, including consumer goods, automotive components, medical devices, packaging items, electronics housings, and toys. This process is favored for its ability to produce complex, high-precision parts in large volumes.
What is Injection Molding?
In injection molding, polymer granules are first melted and then injected under pressure into a mold, where the liquid plastic cools and solidifies. The materials used in injection molding are thermoplastic polymers that can be colored or filled with other additives.
Injection molding is so popular because of the dramatically low cost per unit when manufacturing high volumes. It offers high repeatability and good design flexibility. The main restrictions on injection molding usually come down to economics, as high initial investment for the mold is required. Also, the turn-around time from design to production is slow (at least 4 weeks).
Due to the way plastic injection products are created, there are often small identifiable marks left on them that point to their creation method. Often, these marks will be caused by feed points or ejection points.

So why are there always telltale marks on plastic injection molded products? Well, it has to do with the way in which the melted plastic is pushed into and out of the mold and the way the mold is designed.
Injection Molded Products Must Be Plastics
All thermoplastic materials can be injection molded. Some types of silicone and other thermoset resins are also compatible with the injection molding process. The most commonly used materials in injection molding are:
- Polypropylene (PP): ~38% of global production
- ABS: ~27% of global production
- Polyethylene (PE): ~15% of global production
- Polystyrene (PS): ~8% of global production

Even if we take into account all other possible manufacturing technologies, injection molding with these four materials alone accounts for more than 40% of all plastic parts produced globally every year!
Parting Line in Injection Molding
A parting line is the visible seam on a molded part where the two halves of the mold meet. It occurs because the mold must separate to eject the part, creating a line where the two halves join. To identify a parting line, look for a thin, raised line or seam that runs around the edge or surface of the part.
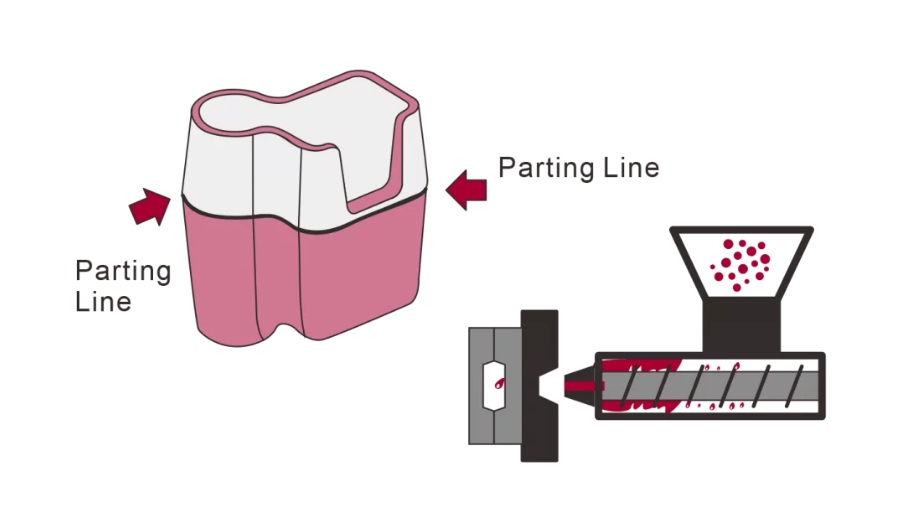
This line can often be found along the perimeter or where different sections of the mold meet. The prominence of the parting line can vary based on the mold’s precision and the molding process, with high-precision molds leaving less noticeable lines.
Parting lines in injection molding are typically placed along the edges or surfaces where the mold halves meet. The location is chosen based on the part’s design to minimize visibility and impact on the part’s functionality and appearance. Parting lines are often positioned in areas that are less critical to the part’s performance or where they can be easily removed or hidden.

Gate Separation in Injection Molding
Gate separation refers to the point where the molten plastic enters the mold cavity, which then leaves a small mark on the finished part once it cools and the gate is removed. This mark, known as the gate vestige, is usually a small, raised spot or a slight depression.

Common locations for gate separation marks include the edges or surfaces of the part, often in less conspicuous areas, to minimize their impact on aesthetics.
The appearance can vary depending on the type of gate used, such as a pinpoint gate, which leaves a tiny mark, or an edge gate, which may leave a larger, more noticeable mark.
- Edge Gates: Inject material at the parting line of the two halves of the mold and are the most common gate type. The runner system has to be removed manually later, leaving a small imperfection at the injection point.
- Tunnel Gates: Inject material below the parting line. The runner system snaps off as the part is ejected from the mold, eliminating the need for manual removal. This makes this type of gate ideal for very large volumes.
- Post Gates: Inject the material from the backside of the cavity, hiding the small imperfection left from breaking the other gate types. These gates are used for parts that require excellent visual appearance.
- Hot Tips: Directly connected to the spur and inject plastic from the top side of the part. No material is wasted this way on the runner system, making them ideal for large-scale production, but a dimple will be visible at the injection point.
Identifying gate separation involves looking for these small imperfections, often found near the parting line or other mold flow entry points.
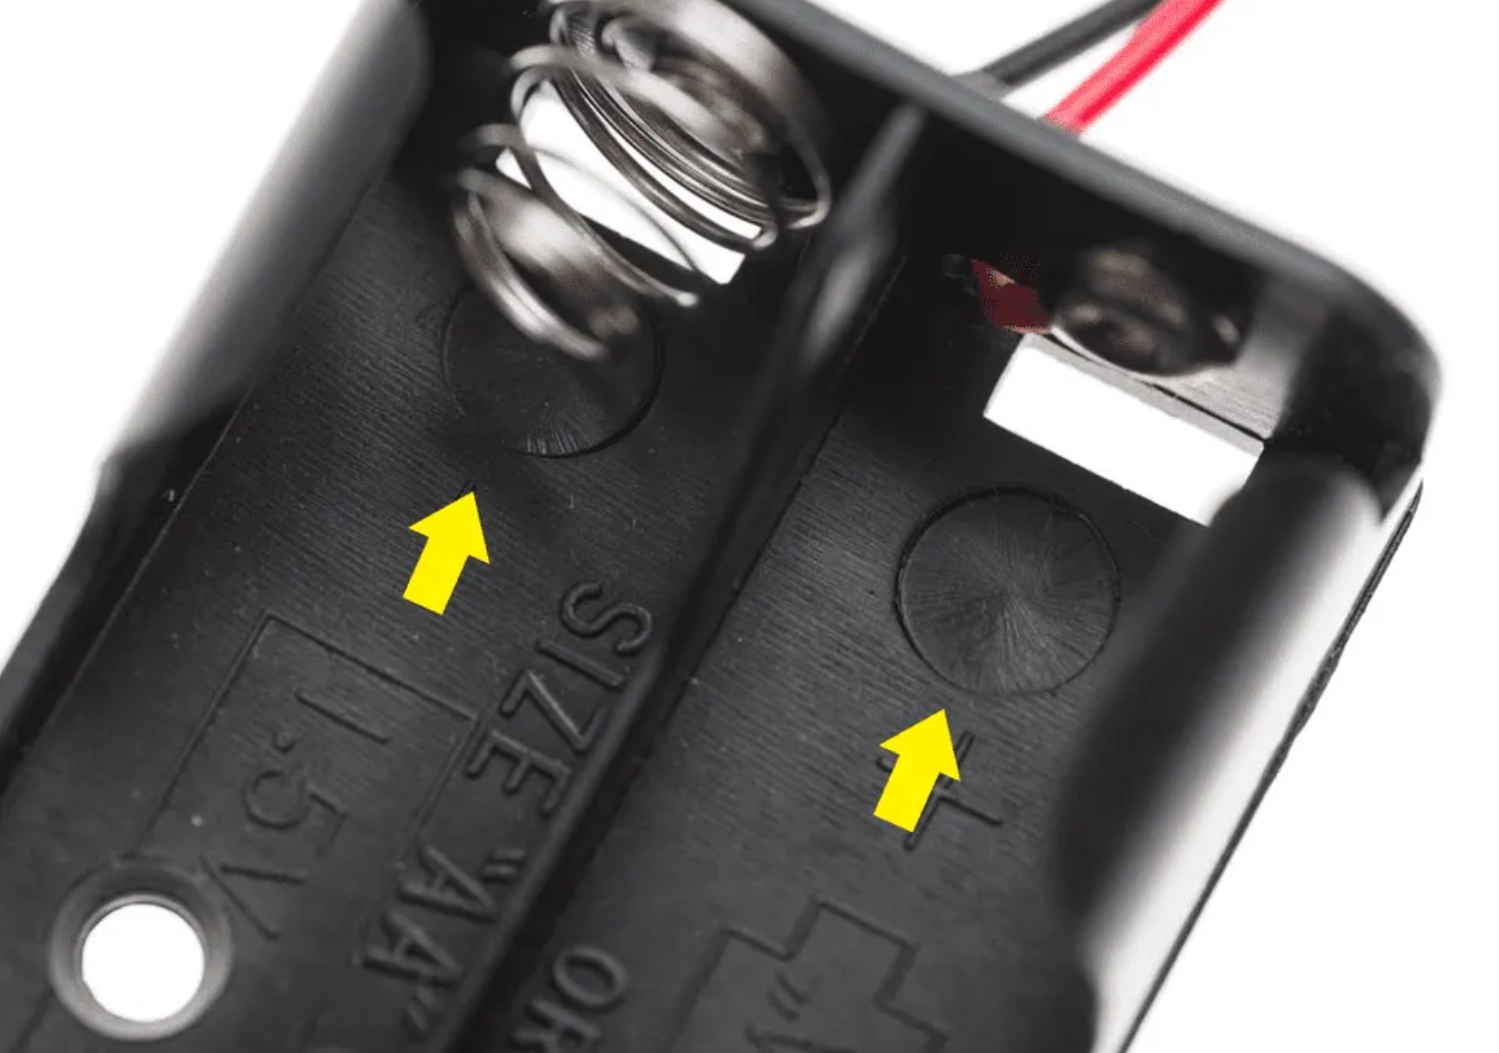
Ejector Pin Marks in Injection Molding
When injected plastic has cooled in a mold, it then needs to be pushed out of the mold. This is done using ejector pins. Something similar can be said for the feed point marks; these marks are formed when the screw has injected all the plastic into the mold. The tip of the screw leaves a little circular divot.
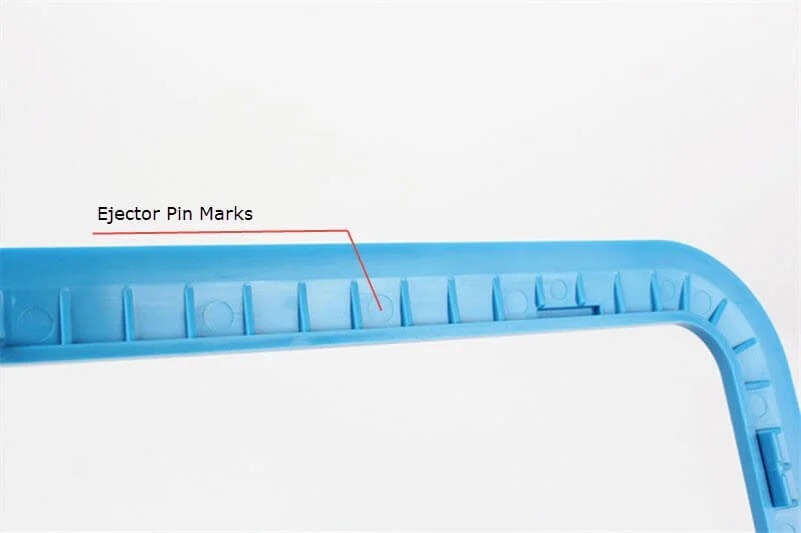
These marks are usually recessed or slightly raised and are often uniformly distributed across the part. They can sometimes include additional details like cavity numbers or dates, which are used for quality control and traceability.
They are typically found on the surface of the part that was in contact with the mold during cooling. To locate and identify ejector pin marks, examine the part closely, especially on flat or broad surfaces.
How to Minimize the Marks in Injection Molded Parts
- Parting Line Optimization: Strategically placing parting lines in less visible areas, such as edges or hidden surfaces.
- Gate Selection and Placement: Choosing the appropriate gate type and location to minimize the size and visibility of the gate mark.
- Ejector Pin Optimization:
- Placement: Positioning ejector pins in non-critical areas or where marks will be less noticeable.
- Size: Using larger pins to distribute the ejection force over a wider area.
- Force: Minimizing the ejection force required to release the part.
- Polishing: Ensuring the pins are smooth and polished to reduce the imprint they leave.
- Texture: Adding texture to the part’s surface to help camouflage ejector pin marks.
At FacFox, we specialize in high-quality injection molding services, ensuring precise and reliable production for all your plastic parts. Whether you need a small batch or large-scale production, our expertise and advanced technology will bring your designs to life with exceptional accuracy and efficiency.
Discover more about our injection molding capabilities and how we can support your manufacturing needs at FacFox.
Leave A Comment
You must be logged in to post a comment