FDM 3D Printers work by depositing layer over layer of thermoplastics to create a 3D object. In this method, each new layer must be supported by the layer beneath it. If your model has an overhang which is not supported by anything below, you need to add additional 3D printing support structures to ensure a successful print.
Support structures are considered to be a necessary evil in 3D printing. On the one hand, they are absolutely necessary for models with nasty overhangs or bridges. On the other hand, they increase material costs, add more post-processing work and can damage the model’s surface. Getting the 3D printing support structures right is, therefore, a very important aspect of 3D printing complicated models.
In this article, we will go over everything you need to know about 3D printing support structures.
WHEN DO YOU NEED THEM?
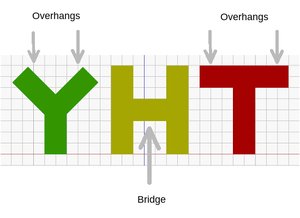
In general, when your model has an overhang or a bridge that is not supported by anything below, you may need to use 3D printing support structures to be able to 3D print it. Here are some examples of overhangs and bridges illustrated with the help of the letters Y, H, and T.
Not all overhangs need supports – the 45 degrees rule
However, not all overhangs need to be supported. The general rule of thumb is: if an overhang tilts at an angle less than 45 degrees from the vertical, then you may be able to print that overhang without using 3D printing support structures.
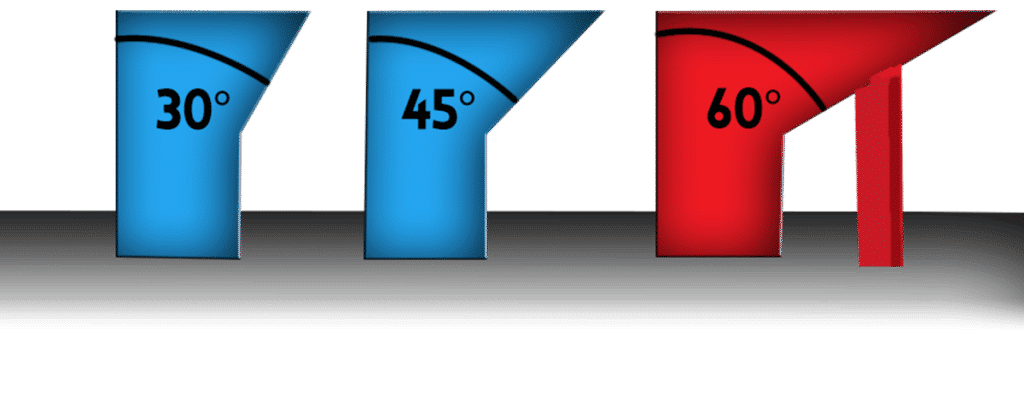
It turns out that 3D printers use a very small horizontal offset (barely noticeable) between consecutive layers. So a layer does not stack perfectly over the previous layer but rather stacks with a tiny offset. This allows the printer to print overhangs that do not tilt too much from the vertical. Anything below 45 degrees can be supported by the previous layers. 45 degrees is considered to be the line of failure.
This aspect is best illustrated with the letters Y and T. The two overhangs in the letter Y has an angle less than 45 degrees with respect to the vertical. Therefore, if you wanted to print the letter Y, you can get away without using any 3D printing support structures!

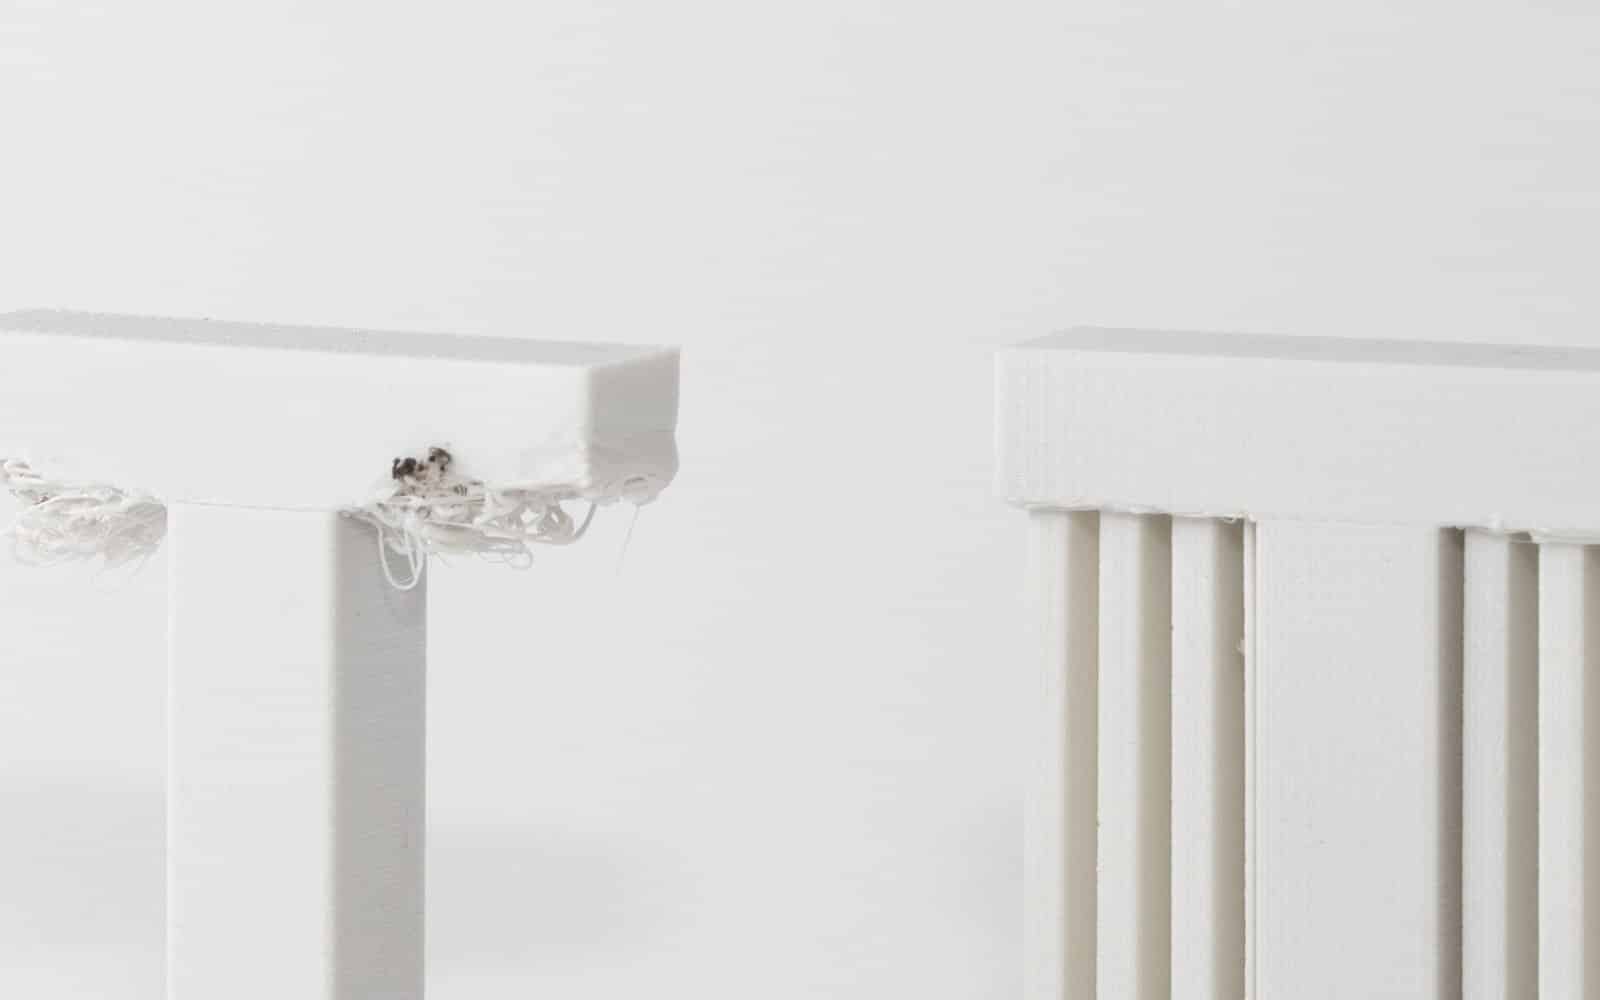
On the other hand, the overhangs in the letter T have an angle of 90 degrees with the vertical. So you must use 3D printing support structures to print the letter T, otherwise, the result will be a mess, as illustrated below.
Not all bridges require support – the 5 mm rule
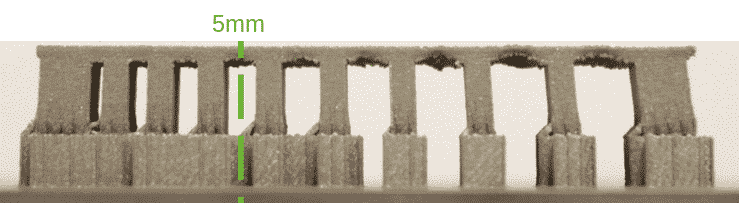
Just like overhangs, not all bridges require support. Here, the rule of thumb is: If a bridge is less than 5mm in length, the printer may be able to print it without requiring 3D printing support structures.
To do this, the printer uses a technique called bridging – where it stretches the hot material for short distances and manages to print it with minimal sagging.
However, if the bridge is longer than 5mm, this technique doesn’t work. In this case, you need to add 3D printing support structures.
TEST YOUR PRINTER’S ABILITY TO PRINT OVERHANGS WITHOUT SUPPORT
The rule of thumb that overhangs less than 45 degrees with the vertical do not need support is just that – a rule of thumb. Your mileage may vary, and it depends very much on your printer, its condition and the material you are using. Printers in bad condition may fail to print overhangs at an angle of 35 or 40 degrees from the vertical!
Before you start printing models with overhangs, it is a good idea to find out your printer’s ability to print the more innocuous overhangs.
This is quite easy to do. Just download this Massive Overhang Test model from Thingiverse and print it. This model has a series of overhangs ranging from 20 degrees to 70 degrees with a 5-degree increment.
Identify the angle where the printer starts failing. This is the maximum overhang angle that your printer can print without support. Note this down so that you can use this information later to decide where to use support and where not to.
DOWNSIDES
You may be wondering why we are fussing about where support is required and where it can be avoided. The reason for all this fussing is because using 3D printing support structures has its downsides.
Increased material cost
If you are using 3D printing in a production setting, then you most probably care about cost per model. If you are a hobbyist on a budget, you probably care about that too.
3D printing support structures obviously add to the cost of the model. Support structures consume material, and this material is later removed and discarded. So every bit of 3D printing support structure that you use, add to the cost of the model.
Increased Printing Duration
3D printing support structures also increase the printing duration, because more things have to be printed.
Added post-processing work
3D printing support structures are not part of the model. They are used to support parts of the model during printing. This means that once printing is over, you now have the additional task of removing the structures before the model is ready-to-go.
In a production setting, added work means added cost to the model.
Risk of damaging the model

3D printing support structures touch and often stick to the walls of the models. This is the only way to provide support to overhangs and bridges. If you are not careful when removing the 3D printing support structures, they might leave blemishes on the model surface. In the worst case, part of the model may break off along with the 3D printing support structure.
All in all, there are significant downsides to using 3D printing support structures. Therefore, here’s another rule of thumb: minimize the use of 3D printing support structures and add them only where necessary. In later sections, we will show you how to apply this philosophy right from the CAD design phase leading all the way up to the printing phase.
SUPPORT STRUCTURE GEOMETRY
There are two common types of 3D printing support structures: tree-like support and linear/accordion support.
Tree-like support
Tree-like support is a tree-like structure that supports the overhangs of the model. This type of 3D printing support only touches the overhang at certain points.
The advantage of using tree-like 3D printing support is that it is easier to remove and does not damage the underside of the overhang too much. But note that it is only suitable for non-flat overhangs like nose tip, fingertip or arches. It does not provide enough stability for flat overhangs.
Linear or Accordion Support
This is the most common type of support used in 3D printing. This type of support consists of vertical pillars that touch the entirety of the overhang. This type of 3D printing support works for just about every overhang and bridge. However, they are much harder to remove and much more likely to cause damage to the model surface.
TYPES OF SUPPORT BY EASE OF REMOVAL
Break-away 3D printing support structures
Dissolvable 3D printing support structures
HOW TO REMOVE BREAKAWAY 3D PRINTING SUPPORT STRUCTURES
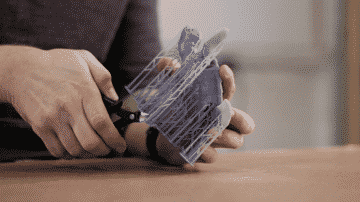
Since breakaway 3D printing support structures are hard to remove and can potentially damage the model, we included some tried and tested tricks to remove them in the right way.
- First, identify the 3D printing support structures that are completely exposed and easy to maneuver with fingers. Try to break away those 3D printing support structures using your fingers. Be gentle. Very gentle. If you do this right, most of the support structure should come off pretty easily.
- Next, use a tool for removing the 3D printing support structures that are hard to access. There are lots of opinions about which tools work best. You may use a needle nose plier, a putty type knife or an Exacto knife. You can also use a combination of all of these tools.
- When using a knife or scraper, it’s a good idea to heat the model or the blade. This makes the 3D printing support structures easier to slice. A tiny butane torch can help, but make sure that you don’t damage the model with it.
- Many people discourage the use of Exacto knives because it’s a pretty sharp and dangerous tool. One slip and you may end up with a cut off finger instead of a cut off support. Also, you may get blood all over your model. Yew!
- Sandpaper is also a great tool for removal. Wet sanding with high grit sandpapers (220 to 1200) will remove 3D printing support structures, and also, polish the model. For best results, apply water to the part and sand in smooth, light motions until the desired surface quality is achieved.

You can use wet sanding to remove the last bits of 3D printing support structures and polish the model surface (Source: Formlabs) - PLA based models may develop stress marks when the 3D printing support structures break away from them, leading to scratches, marks and blemishes. Nail polish varnish is a great tool for patching or covering up these imperfections.
If you are interested in the community’s take on this topic, take a look at this thread- Best Way To Remove Rafts, Supports, and other Extraneous Filament.
MINIMIZE 3D PRINTING SUPPORT STRUCTURES BY CLEVER DESIGN
Integrate 3D printing supports into the model
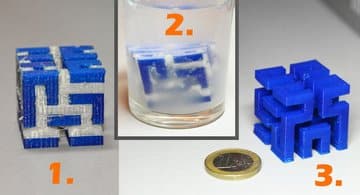
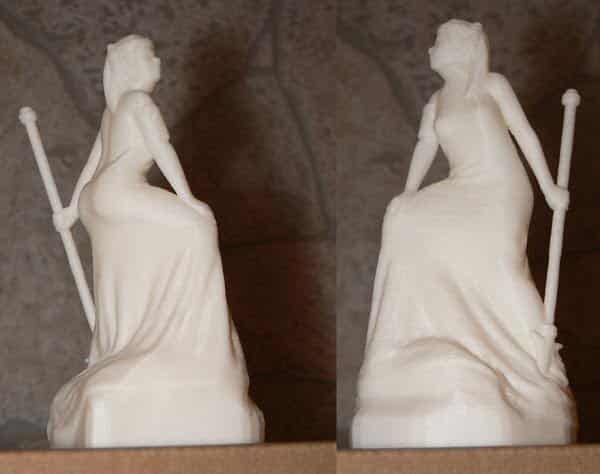
One trick to avoid 3D printing support structures is to add elements to the model that can perform the same job. This trick has been used by sculptors for centuries. For example, take a look at this “Venus Vitrix” sculpture by Antonio Canova.
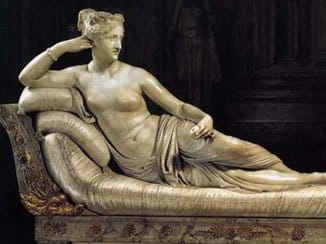
Here, the right arm is an overhang, but it is supported by the pillows. The left leg is another overhang, but this time the bunched togas act as the support.The next example is a model called “The Guardian” by designer @fantasygraph. He cleverly supports the legs and the buttocks of the model with a flowing gown. The spear fixed to the bottom acts as a support for the left arm.
Integrating 3D printing support structure into the design is more of an art than a science. You need to come up with elements that simultaneously fit into the overall design and can support the overhangs or bridges. When done correctly, it enhances the beauty of the model and makes the print process free of 3D printing support structures – saving time, money and labor.
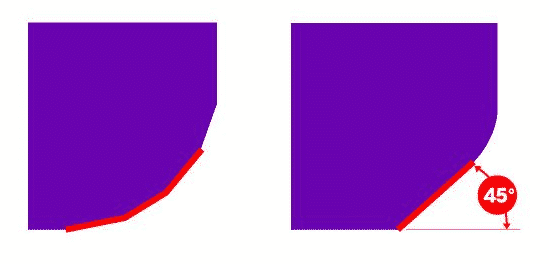
Chamfers
Another way to eliminate the need for 3D printing support structures is Chamfers. Chamfers are a neat way of turning otherwise nasty overhangs into innocuous overhangs with angles less than 45 degrees.For example, if you have a gently sloping or curved edge, you can replace it with an angular edge that requires no support. Such an angular design is called a Chamfer.
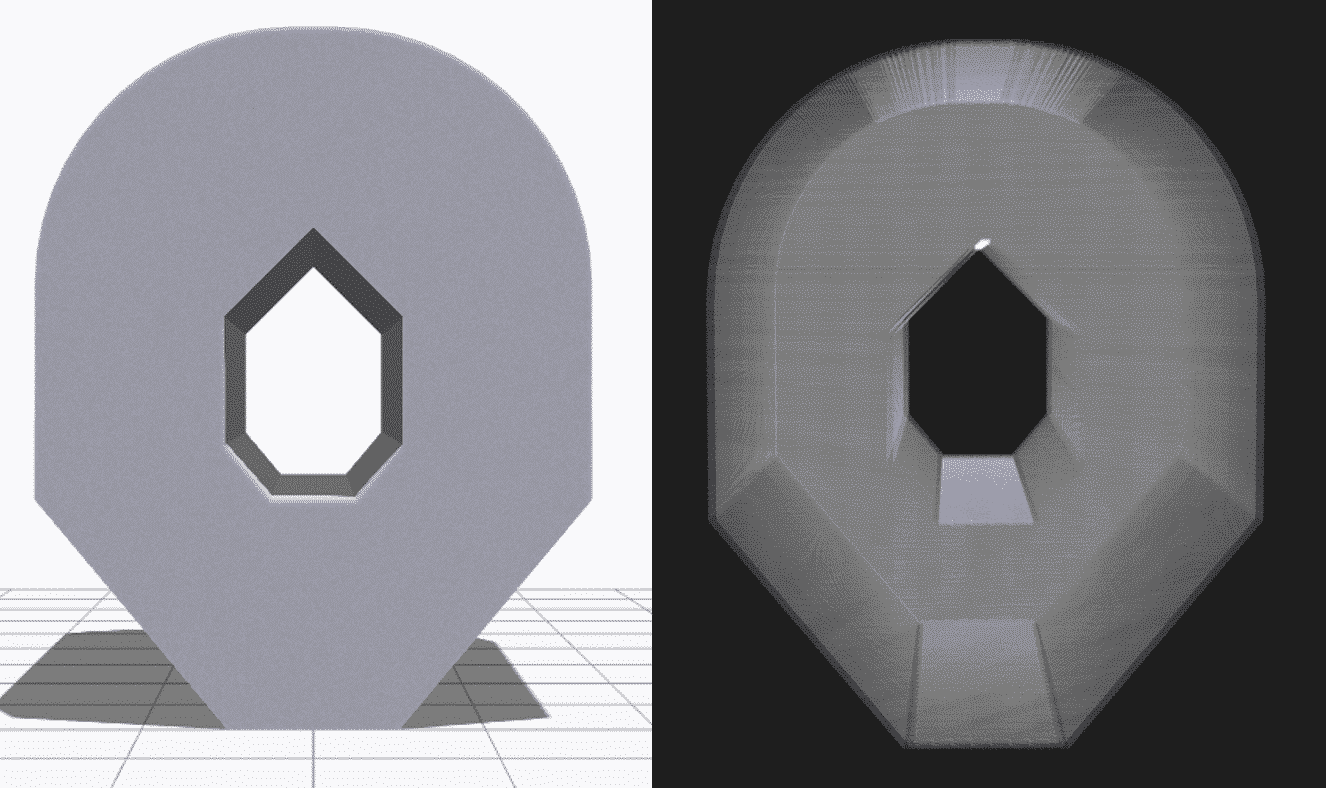
Similarly, if you have a hole in the model, you can convert it into a chamfered hole in the shape of a teardrop. Most of the time, this will not affect the overall aesthetics of the model. But it will help you reduce the 3D printing support structures required to print a model.
MINIMIZE 3D PRINTING SUPPORT STRUCTURES BY REORIENTATION
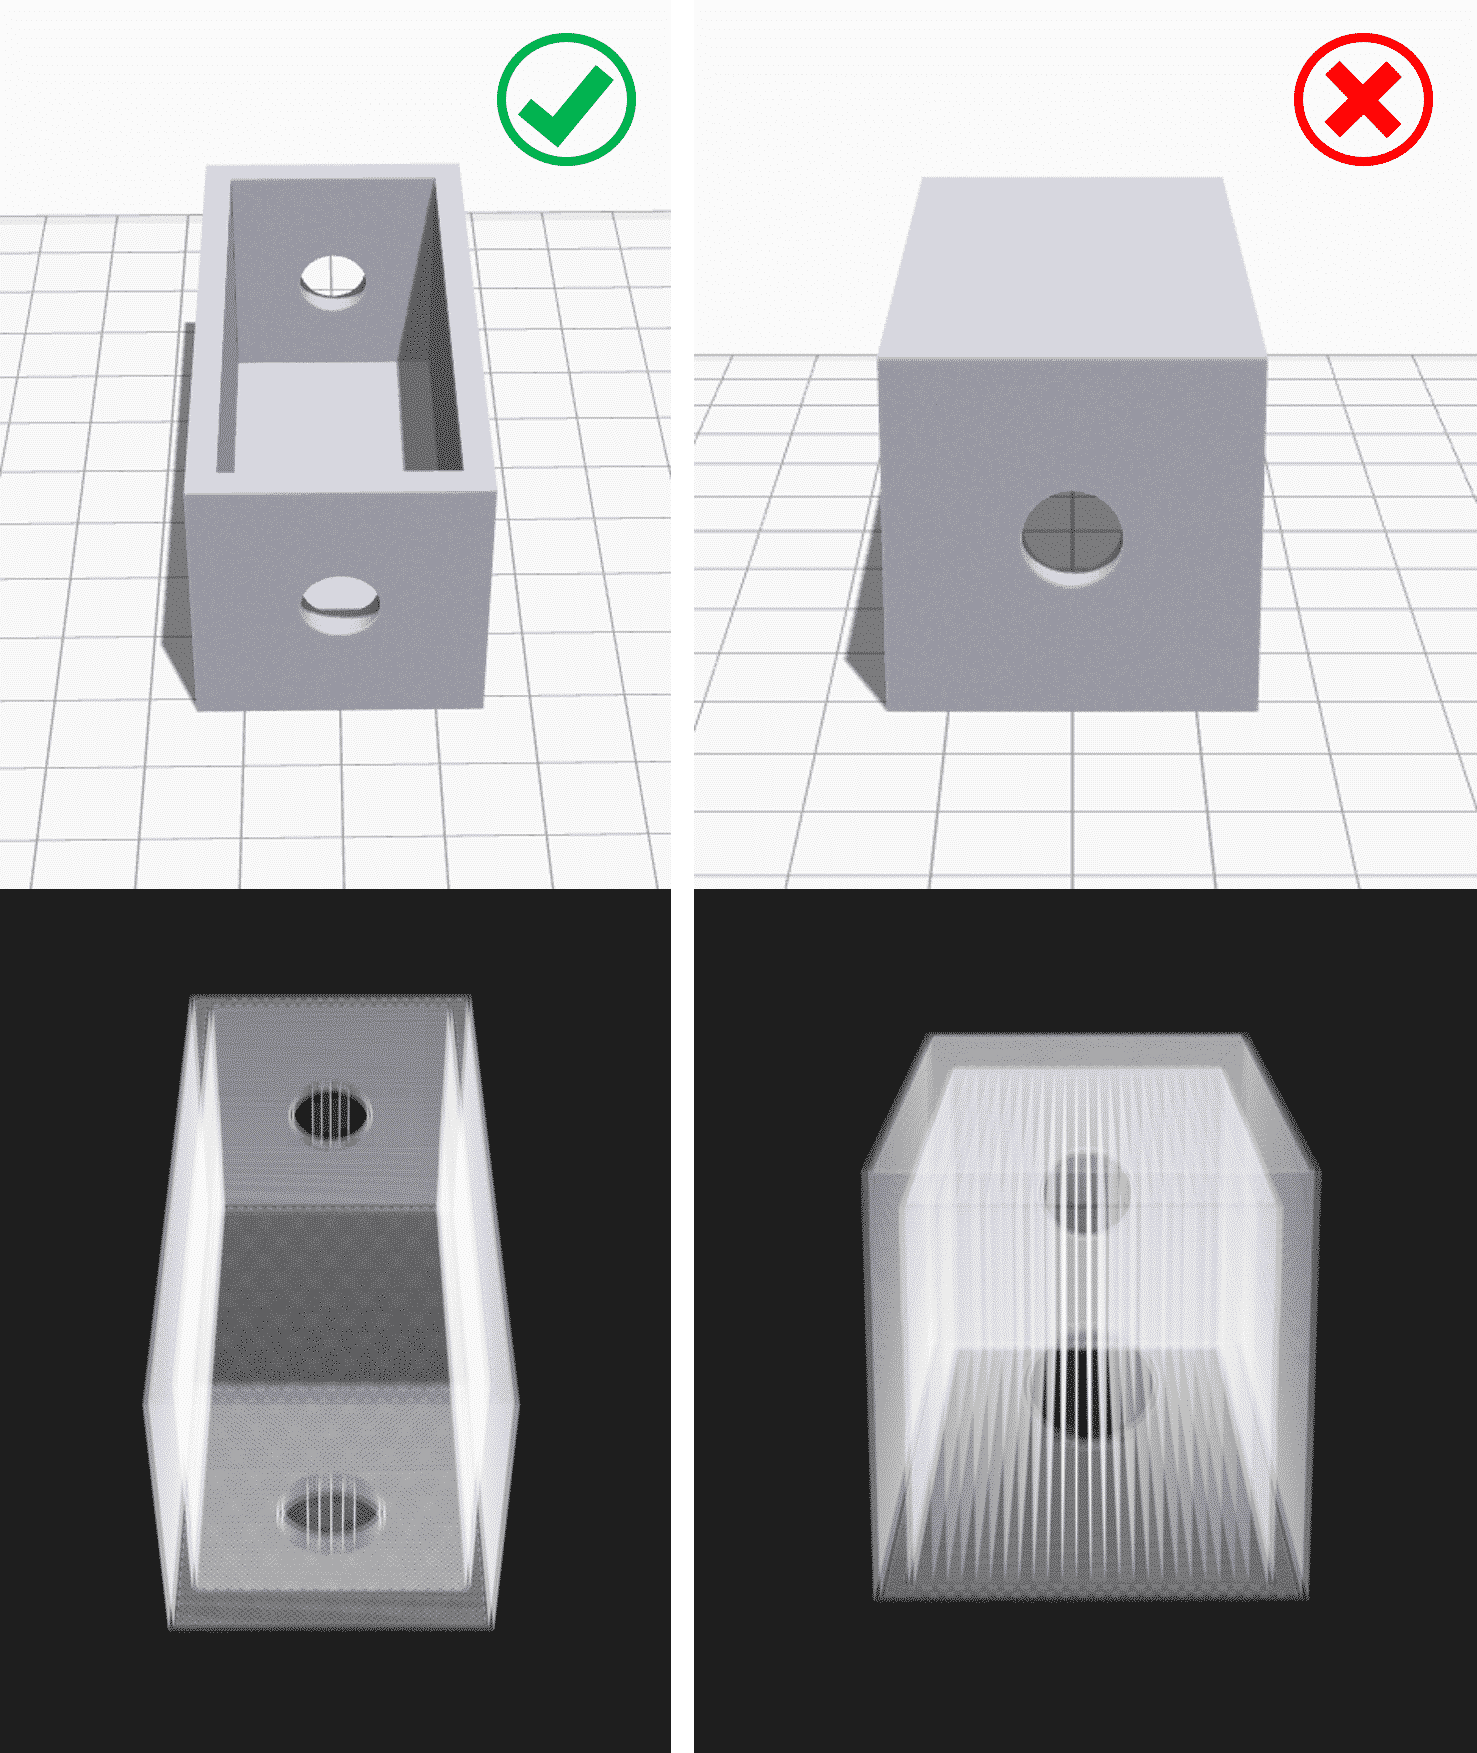
Sometimes, minimizing the necessary 3D printing support structures is as easy as reorienting the model on the print bed. For example, it is much better to print the open box shown below with the open face on the top.
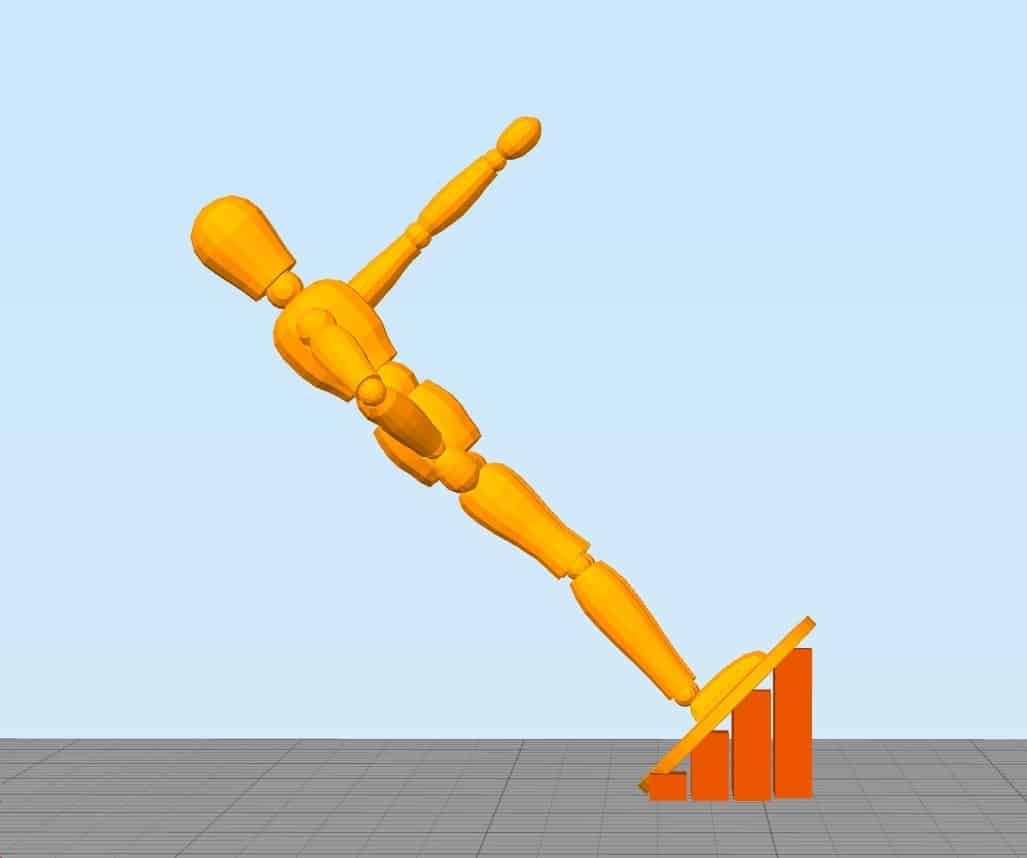
Here’s a more nontrivial example, again coming from the designer @fantasygraph. It’s a model of a character with a horizontal arm pointed to infinity and beyond.
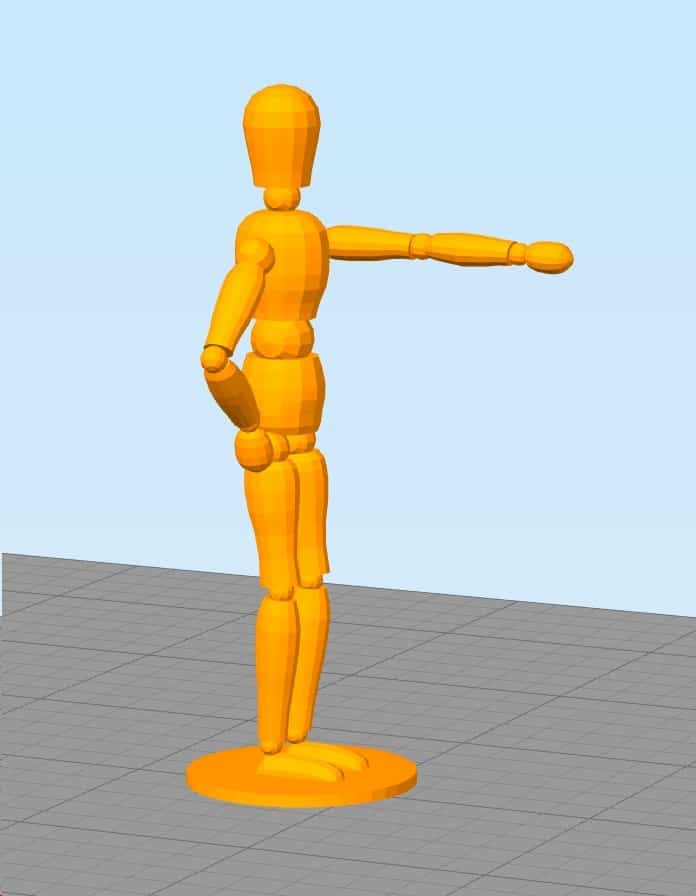
If you print the model as it is, we will need to support the left arm. It is basically a long overhang with an angle of 90 degrees.
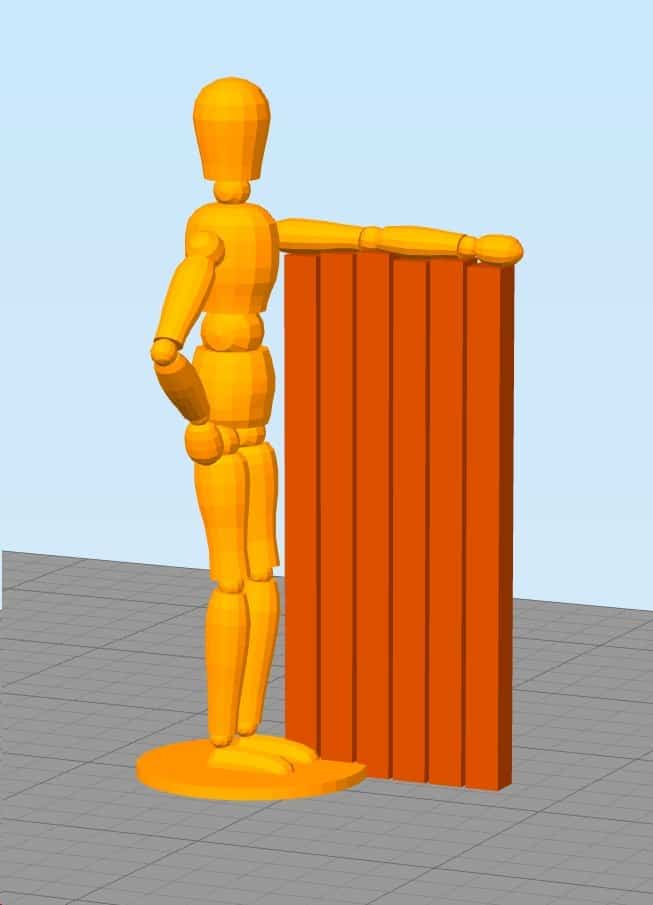
When you remove the supports, it will most likely leave blemishes on the underside of the arm. To avoid that, you can rotate the whole model by 45 degrees and just add support for the base of the model. The quality of the base of the model does not matter much anyway. This way, you can print the model with fewer 3D printing support structures and save the left arm from damage.
It’s pretty clever and ingenious. Perhaps you can be just as clever with your models?
PRINTING OVERHANGS AND BRIDGES WITHOUT 3D PRINTING SUPPORT STRUCTURES
In the previous sections, we stressed that you should try to minimize the use of 3D printing support structures whenever possible. However, this implies that you will often be treading on tricky territory where there’s risk of model instability. To minimize this risk, here are some general tricks.
- Make sure your 3D printer is in an optimal condition.
- Ensure that you are cooling your printing material as rapidly as possible. The longer it takes for your material to cool, the more likely it is that your bridge or overhang will deform or fail. Use your layer cooling fans aggressively. Also, lower your printing temperatures as much as possible.
- Reducing printing speed also helps to cool and it especially helps in printing longer bridges and tricky overhangs.
- If possible, try to use the lowest layer thickness. Lower layer thickness means less mass deposited on each run of the print head. This also helps cool the material faster.
CURA SUPPORT STRUCTURE SETTINGS
Sometimes, it is impossible to avoid using 3D printing support structures. But even in this case, you should try your best to ensure that the 3D printing support structures are stable, yet don’t waste a lot of material, easy to remove and do not damage the surface of the model.
Your slicer software will give you a lot of additional ways to tweak the 3D printing support structures. Most slicer software can generate 3D printing support structures automatically, but they also provide a manual mode where you can add or remove 3D printing support structures wherever you want. Also, slicer software expose a lot of different settings that control the following aspects of 3D printing support structures.
- Placement of 3D printing support structures
- Strength of 3D printing support structures
- Ease of removal after printing
- Damage to the print surface
In this article, we chose to focus on Cura, because it is the most popular free slicer out there at the moment.
Cura offers a host of support structure related settings under the Support section of the Custom Settings. If you can manipulate these settings properly, it is possible to create 3D printing support structures that meet most of the essential requirements.
Turn on auto-generated 3D printing support structures for unstable models
First thing first. How do you cross check if your model needs additional support?
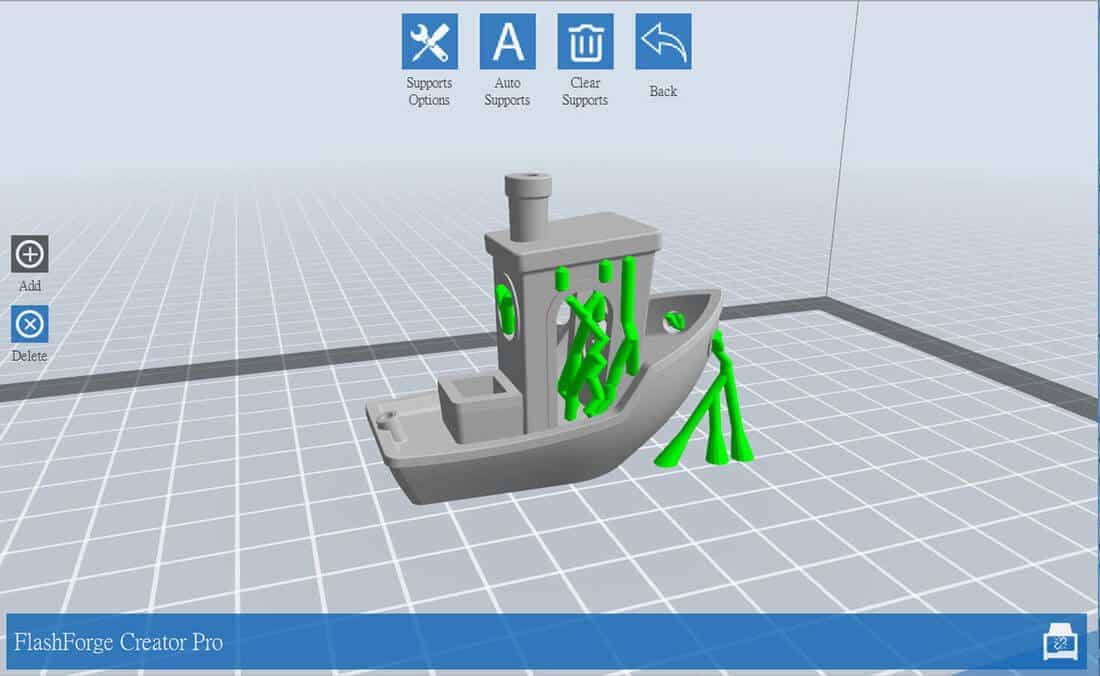
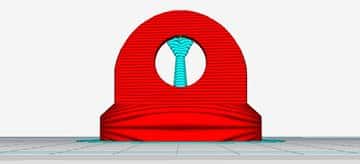
Cura makes this easy. Once you have imported your model into Cura and positioned it on the virtual build plate, look out for sections colored in red. Those are the parts where Cura has detected instability. Note that it is possible that you will not see unsupported areas until you rotate the camera view.
If you see red on the bottom of the part, where the model touches the build plate, you don’t have to worry about this area being unsupported. The build plate will take care of this problem. Small Red areas at the tops of holes or between two structures are called bridges, and Cura will handle them automatically too.
If there are other parts highlighted in red, then you need to start worrying. To begin with, you need to enable the auto-generated 3D printing support structures to ensure that those red parts can be printed successfully. To do this, simply check the Generate Support checkbox under the Support section.
So you have now enabled the auto-generated support structure, but probably didn’t see anything change in the model view. That’s because Cura does not show the 3D printing support structures in the default Solid view. To see the 3D printing support structures that were generated, change the view to Layer View. Support material (lines and volume) will be displayed in teal. Move the layer slider up and down to see where the support is added to the model.
Select between tree-like support or linear support
Cura generates linear 3D printing support structures by default. In version 3.2 beta, Cura introduced the possibility of using tree-like support instead of the default linear one.
Control placement of 3D printing support structures
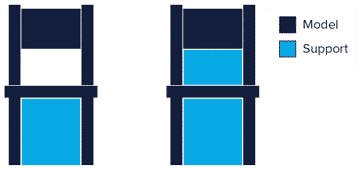
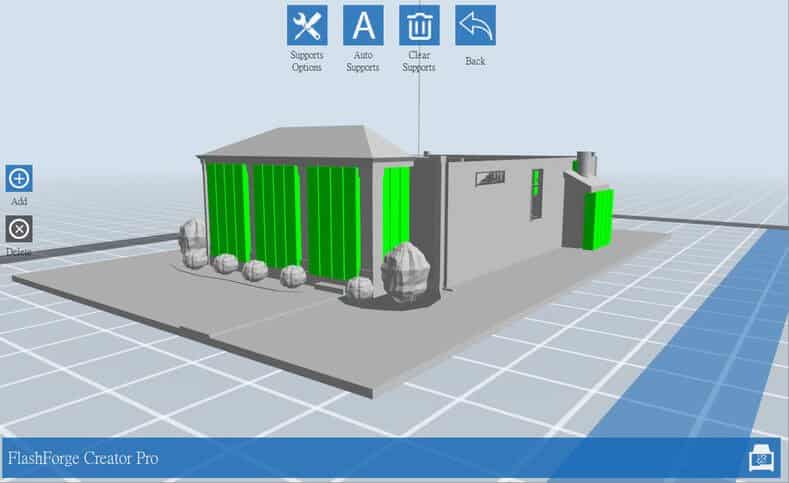
When you enable support structure, a setting called Placement automatically appears under the Support section. The Placement setting lets you coarsely control the positioning of the support structure. There are two options: Everywhere and Touching Build plate. Everywhere is selected by default.
When Everywhere is selected, Cura 3D attempts to build structures wherever they are necessary. This means you not only have 3D printing support structures that are erected on the build plate but also 3D printing support structures that use part of the model as its base. This is the reasonable option in most cases as this ensures that all unstable areas will have the necessary support.
However, if Everywhere is selected for very complicated models, the model might end up being completely encased by support material. If you don’t want this, simply change the Placement setting to Touching Buildplate. This will create 3D printing support structures underneath overhanging sections of the model only between the build plate and the model.
The Enable Support Roof can improve the surface finish of overhangs but at a cost
Since a model’s overhang is always printed on top of 3D printing support structures, you don’t always get the best surface finish for these parts. The Enable Support Roof hidden setting can help with that.
A support roof is a dense skin at the top of the support structure which does not compromise the surface finish of the overhangs too much. When you enable this setting in Cura 3D using the checkbox, you will get a better finish quality. But this improvement comes at a cost as this option makes the 3D printing support structures harder to remove than usual. Use this option only if the surface finish of the overhanging part is critical to the function of the finished part.
Prevent 3D printing support structures from damaging the model’s outer walls by using the Support X/Y Distance setting
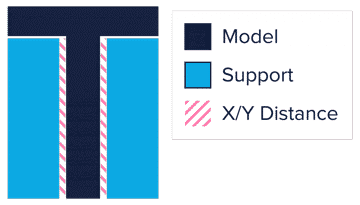
Sometimes, the 3D printing support structures are built too close to the model’s outer wall and leave marks on the model’s outer surface. You can prevent this from happening by using the Support X/Y Distance hidden setting under the Support section.
The Support X/Y Distance setting in Cura essentially controls the minimum allowed distance between the model’s vertical walls and a support structure in the X-Y plane. If your 3D printing support structure is damaging the walls or sticking to them, you can increase the value by increments of 0.2mm until the walls come out smooth. However, please ensure that there are no small overhangs sticking out of the outer walls that will go unsupported if you put a little bit of distance between the support and the walls. If such small overhangs exist, you might even have to decrease the X/Y distance instead of increasing it. Otherwise, you will get a failed print.
The Z Distance setting can help make the 3D printing support structures easier to remove
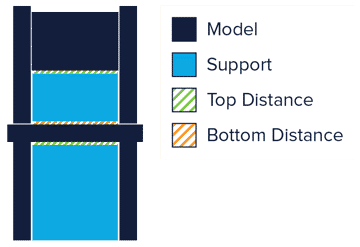
For the support material to break away cleanly without pulling the model layers apart, the connection between the support material needs to be made weaker than the connection between the layers of the model. Cura creates this weaker connection by leaving a space between the top and bottom of the support structure and the model – and this space is known as Z-Distance.
You can make the 3D printing support structures easier to detach by controlling the Z-Distance hidden settings under the Support section. The default value for this setting is the same as layer height. So if your layer height is 0.1mm, the default Z Distance will be 0.1mm too.
If your support material is difficult to break away from your model, increase this value in increments of your layer height until it comes away cleanly. Cura can either add support on any given layer or not add support. Unfortunately, there are no “half layers of support.” So if a 0.2mm Z Distance setting for a print with a layer height of 0.1mm is too much, and the Z Distance of 0.1mm is not enough, you’re out of Z Distance options.
Select the proper 3D printing support structure for the right balance between strength and ease of removal

Cura generates 3D printing support material in one of seven patterns. You can change the pattern by using a hidden setting called Support Pattern under the Setting section.
In most cases, the default pattern, Zig Zag, will generate the best balance between strength and ease of removal. The other pattern options are Triangles, Lines, Grid, Concentric, Concentric 3D, and Cross. If you are unhappy with the default pattern, you can experiment with the other options. Each of them will give you a different balance between strength and ease of removal.
Conclusion
Support structures are a necessary evil in 3D printing. You need them to print difficult overhangs and bridges in your model. But when you can’t use dissolvable 3D printing support structures, it’s a good idea to try to minimize your use of them. We discussed situations where you don’t need 3D printing support structures and mentioned several creative tricks to print without them.
But often, you would have an overhang or bridge that’s so bad that you must use support. In this case, you need to play with you slicer settings to ensure that you don’t waste too much material or damage the model during removal. We talked about how to choose correct slicer settings to get the best results and shared some tricks on how to remove 3D printing support structures the right way.
We hope that this article helps you get better at 3D printing and print better models. If you liked it, share it with your 3D printing buddies and spread the word.