Slicer settings are the defining factor for successful 3D prints. Learn about the 10 most important 3D printer slicer settings.
Settings Mean Everything

If you’ve ever worked with a 3D printer, you’re probably familiar with slicers. But in case you aren’t, a slicer is a program that turns a 3D model file (STL, OBJ, 3MF, etc.) into a G-code script, which can be interpreted by your machine’s firmware.
Without a slicer, your printer wouldn’t know how to function. With it, you can specify settings that dictate how your model will be printed. If you don’t already have one, some super powerful and popular slicers include Cura, PrusaSlicer, and Simplify3D.
Slicer settings are important because every 3D printer is different, every material is different, and every 3D model is different. Printers and materials will therefore always require different settings to achieve a good print quality.
Slicer settings cover all aspects of printing, from the temperature of the heated elements to the thickness of each wall and layer. If you want the highest quality prints or just to print something as quickly as possible, you have to know the primary settings to change on your slicer.
In this article, we’ll go over 10 slicer settings that are fundamental to 3D printing. For each setting, we’ll discuss what it is and what it affects so that you can decide how you want to use it.
Temperature
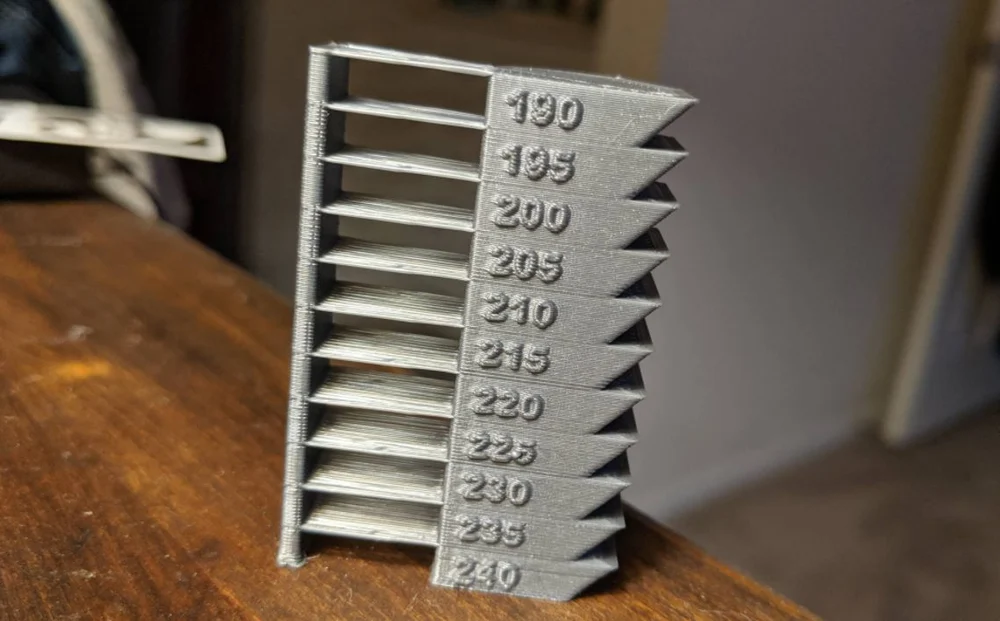
First up is temperature. The temperature of the nozzle is the single most important setting in your slicer because, without a Goldilocks level of heat (not too cool, not too hot), no print will work. Nozzle temperature should be the first thing you tune on your slicer whenever you begin printing with a new filament, and you can do this by printing a temperature tower to see which values work best.
Too high a nozzle temperature will cause over-extrusion with blobs and zits all over your print. At the other end of the spectrum, too low of a temperature will cause under-extrusion, where not all the layers are fully printed.
That’s just for the nozzle temperature, though; bed temperature is a whole other player in 3D printing if your machine has a heated bed. If so, bed temperature is another setting you can adjust, and it will affect your print’s bed adhesion. Generally speaking, a hotter bed will provide better adhesion, while a cooler one could lead to warping. Just don’t raise the temperature too high, or else a part could deform on the bed.
Retraction
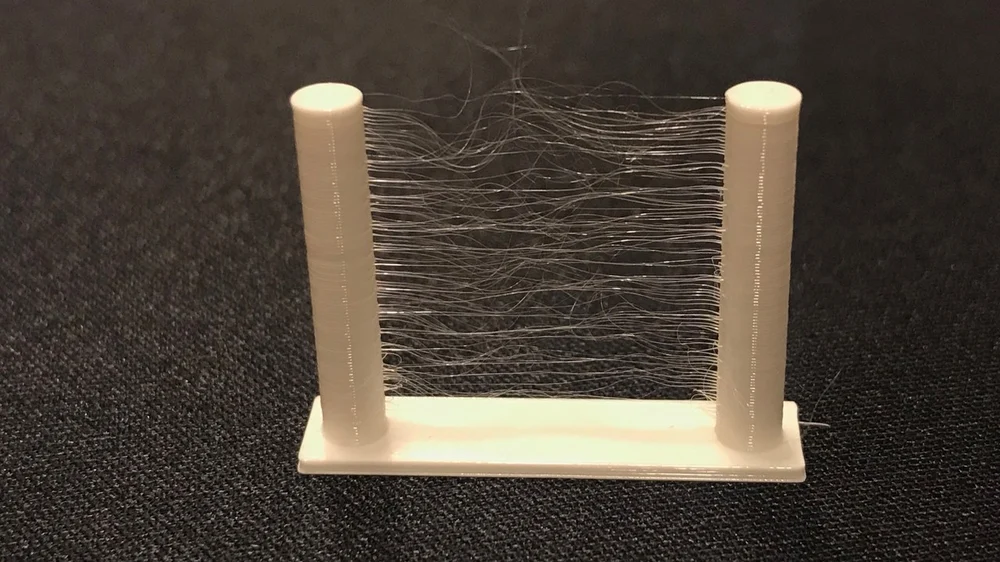
Retraction is usually the first setting people think about when they see strings, hairs, or whisps on their print. Retraction determines how much and how fast filament is sucked back into the nozzle to prevent material from oozing out when it’s not being extruded. Retraction is controlled by a few specific settings, chief among them being retraction distance and retraction speed.
These settings should be adjusted when you see stringing, but be mindful that retraction isn’t the only solution to this problem and nozzle temperature also plays a role. You should change your retraction settings in small intervals and don’t make any significant increases until you’ve tried lowering the temperature. Too much retraction can cause nozzle jams, as the filament is more aggressively pushed in and out of the nozzle.
Flow
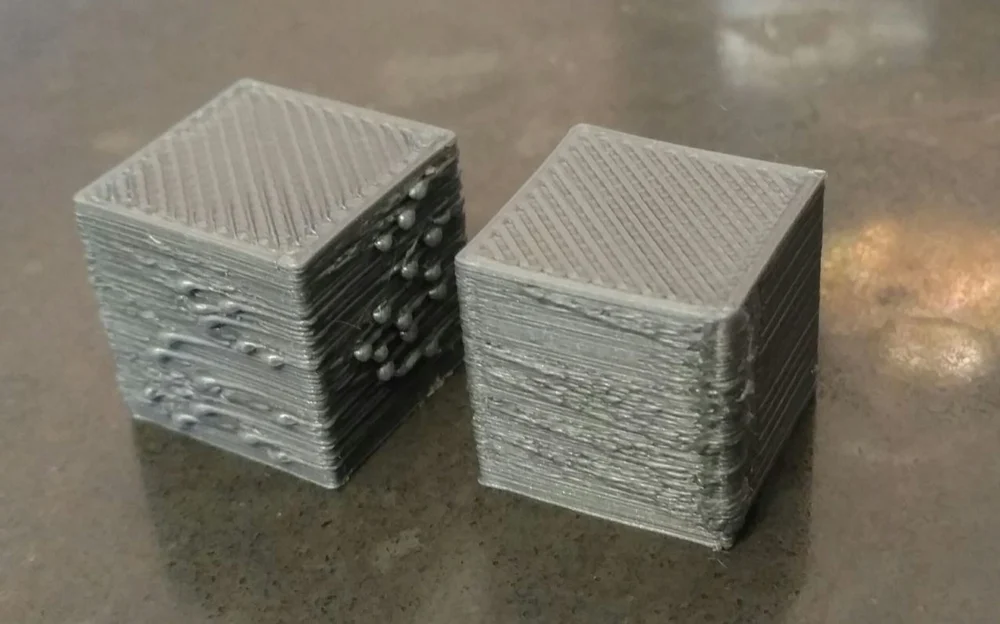
Flow, sometimes known as the extrusion multiplier, determines the rate at which filament is extruded. For example, with a 100% flow rating, your printer might use 10 cm of filament for a particular part feature, but if you change the flow to 90%, the same feature would only require 9 cm. In the end, adjusting flow affects how many steps the extruder’s motor turns per millimeter of material deposited.
Flow can be used to account for over or under-extrusion on your printer without adjusting a printer’s E-step parameter, a value stored in firmware. While technically, flow and E-steps can both be used to solve the same problems, it’s best to tune the E-step value during printer calibration and adjust flow as required by particular print jobs.
Extruder Calibration: How to Calibrate E-Steps
Adhesion Assistant
An adhesion assistant is a physical feature added to a print – auto-generated by the slicer when instructed to do so – which is designed to enhance bed adhesion. Bed adhesion is how well a part sticks to the build surface, and it’s typically most important for the first layer. An adhesion assistant comes in three main forms:
- Skirt: A skirt is a distant and detached perimeter that outlines a print. Skirts provide no real adhesion assistance for a model but help get material flowing through the nozzle in time for the first layer to start. They can also be useful for making last-minute manual adjustments to a bed’s levelness. Unless set otherwise, many slicers will automatically generate a skirt for every print.
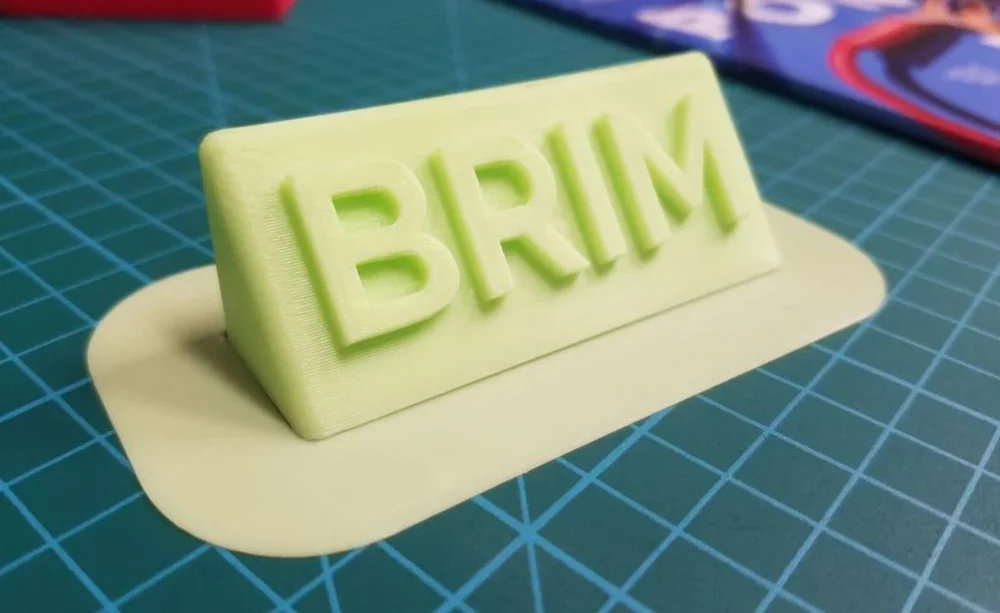
- Brim: A brim is a set of lines attached to the outside of a print’s first layer, sprawling from its base. If your print were a cylinder, the brim would literally look like the brim of a top hat. As far as adhesion assistants go, this is the first step to take if a model is having bed adhesion issues (because it has small “feet”, for example).
- Raft: A raft is a complete base upon which your model grows. When printing rafts, slicers generally attempt to save material by putting space between adjacent lines. This is the no-holds-barred approach to bed adhesion, as your print never has to touch the surface. (This is often useful when warping is an issue.)
As you might expect, a skirt takes up the least amount of material and print time, followed by a brim and then a raft.
Supports
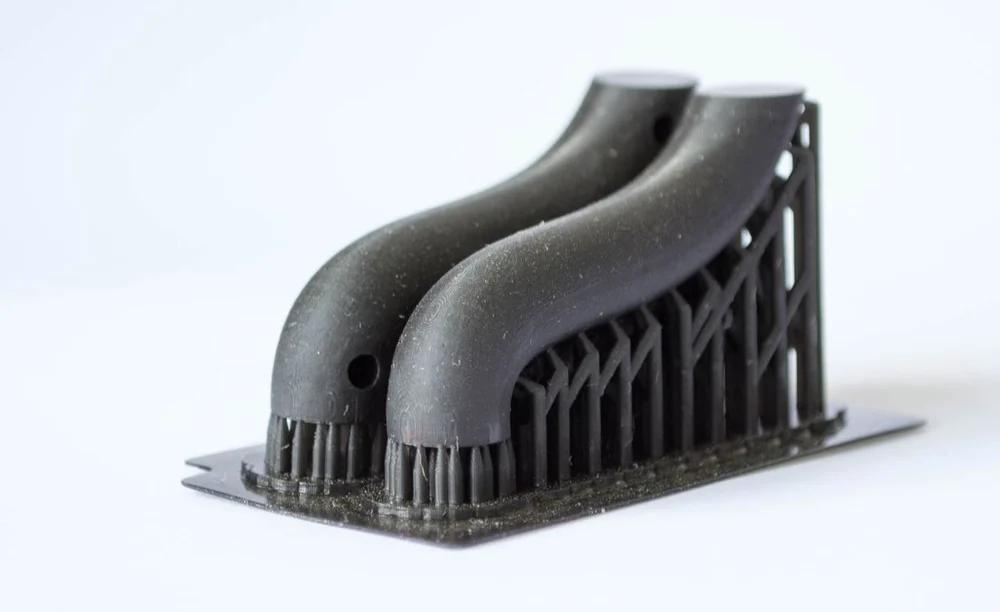
Supports are another significant slicer setting and, like adhesion assistants, are slicer-generated. Supports are structures that hold up overhanging features on models if they meet certain requirements, which can be set in your slicer.
These requirements include the overhang angle and the minimum support area. The former determines the minimum angle an overhang has to be before the slicer creates a support to hold it up. The latter governs the minimum area (in mm2) that a support structure has to have to be included in a print.
Other support settings and options are also very important. For example, part orientation plays a key role in how support structures are generated. Other support settings include print speed, support infill density, and more. You shouldn’t change these settings at all if your model doesn’t require supports in the first place, but when necessary, you can tweak them to find a balance between sufficient support and minimum material consumed.
Cooling
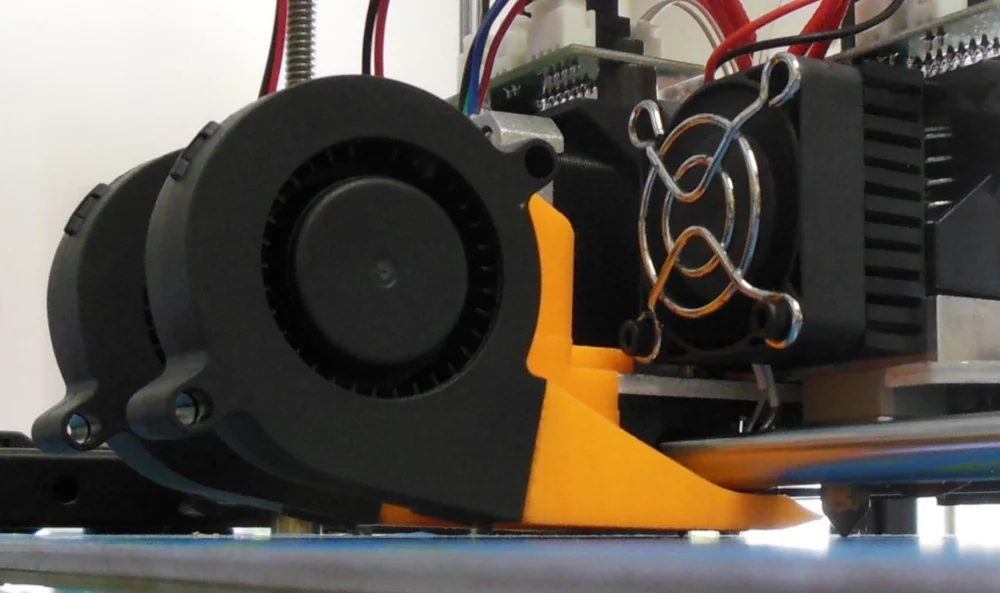
Next up is cooling, which determines the power of the fans on your printer. While there may be fans around your printer’s mainboard, power supply unit, and hot end, cooling usually refers just to the speed of your part-cooling fan. This fan’s speed can typically be set and adjusted as a percentage of total power.
When adjusting the speed of your part-cooling fan, consider the material you’re currently printing with. For example, PLA requires moderate cooling from the part-cooling fan, but ABS shouldn’t have any (because cooling can lead to cracking). If your model has overhangs and you don’t want to use supports, you can try increasing cooling to more rapidly solidify printed overhangs.
3D Printer Fan – Do I Really Need One?
Infill
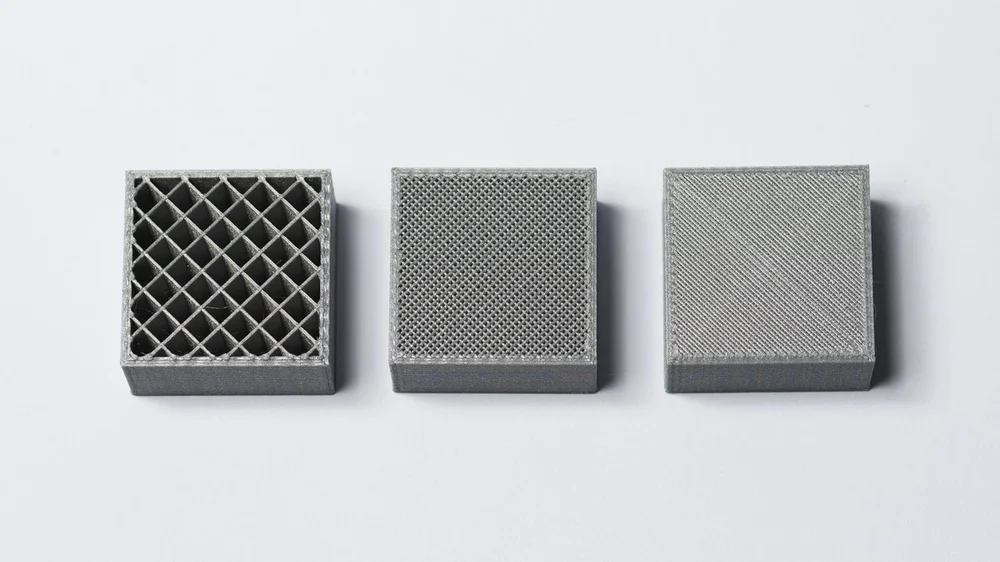
Infill is the internal filling in 3D printed parts and is a feature unattainable with traditional manufacturing methods like injection molding. Infill allows you to better control the strength, weight, material consumption, and internal structure of a part without having to adjust its appearance or external features. In a slicer, infill can be controlled using infill density, set as a percentage, and infill pattern, which is the infill’s structure or form.
More robust infill patterns and larger infill densities will extend printing times and consume more materials but increase a part’s strength and weight. There are many infill patterns to choose from, each with its own design and characteristics, like concentric (for flexible parts), cubic (strong), and lines (fast). You can set your infill density with a specific pattern to achieve your desired mix of printing strength, material consumption, and printing time.
3D Printing Infill: The Basics Simply Explained
Shell Thickness
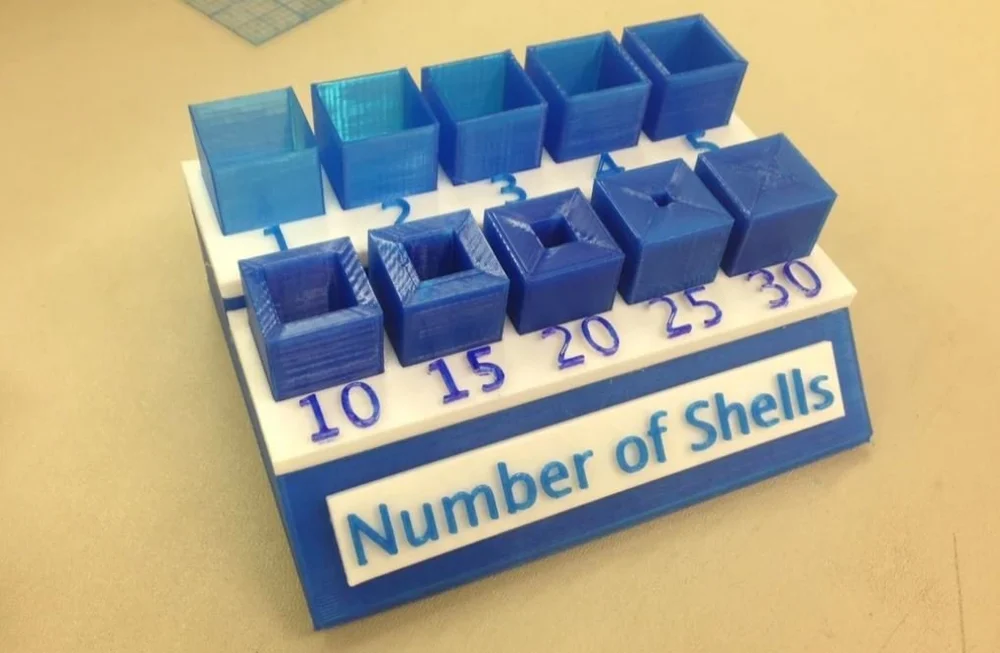
Lastly, shell (or perimeter) thickness represents the number of lines in the walls of your prints, whether they’re at the sides, on the top, or on the bottom. If infill is the “inside” of a print, shells are the “outside”, which means they are completely solid and printed concentrically. Shell thickness is usually set as a value in millimeters or as a number of layers, individually for the walls and the top and bottom layers.
Shell thickness is an important setting to tune because it can significantly impact the strength of your model. The higher the shell thickness, the stronger parts will be and the longer they will take to print. That’s because the more shells you have, the more completely solid layers or walls your machine has to print.