Click here to download a trial version of powerful Magics software to fix your model.
Click here to see a tutorial of repairing your 3D model with Magics.
Creating a model for 3D printing can be somewhat intimidating at first. In this document, we will cover some essential tips designers should keep in mind to get a stunning 3D print.
Sticking to this checklist will make sure that your 3D model is perfectly prepared to be 3D printed.
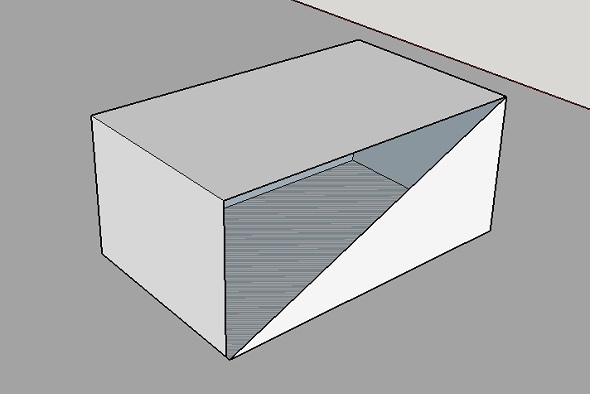
1. Watertight / Non-Manifold
A printable model must not have any holes in its surface. Ask yourself the question: if I were to put water inside my model, would it flow out? If that’s the case then you need to find those holes and close them. Sometimes this process is also called ‘creating a manifold model’.
The design below is an example of a model that is not watertight. You can clearly see that there is a big gap in its surface.
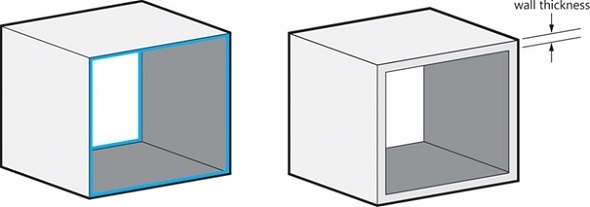
2. Wall Thickness and Volume
It’s very important that every surface of your 3D model has been assigned a wall thickness. When using your 3D modeling software it is possible to design a surface without a wall thickness. Many visual 3D models (i.e. 3D models intended for games) only have surface visual purposes and thus do not have wall thickness.
However, 3D printers need information about how thick you intend the wall of your object to be or if you want to print a completely solid model. Therefore, when turning a 3D model into a real 3D print, the wall thickness or volume information is needed.
Wall thickness is simply the distance between one surface of your 3D model and its opposite sheer surface. Many printing problems can be traced back to wall thickness issues. The minimum printable wall thickness primarily depends on the material you choose.
You can learn how to choose the perfect wall thickness for your 3D print here.
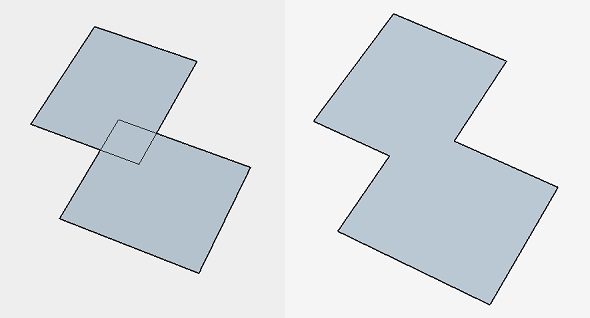
3. Auto Intersections/Internal Overlapping/Self-Intersecting Surfaces
While a model might look great for 3D printing from the outside, intersections in the model can make it unprintable and confuse printers about what you want to print exactly. Intersections and walls within your design will therefore make your life difficult. That’s why it makes sense to think about your model in a 2-dimensional space first.
In the case below, the left shape will not be printable once it is transformed into a 3-dimensional object since as it will feature paper-thin walls within the object. The shape on the right, however, won’t be a problem to print because it won’t feature those walls on the inside. In most cases, it is useful to implement a Boolean operation, which is a function that helps to merge several overlapping elements.
4. Reversed Faces/Inverted Normals/Surface Orientation
Another problem that can occur is the phenomenon of so-called inward-facing or reversed faces. Most 3D modeling programs distinguish between the inside and outside of a surface in order to determine the model’s volume.
A reversed face or inverted normal means that the surface of your model is facing in the wrong direction: typically this means that it is facing the inside of the object instead of the outside.
It’s important that you double-check your file and make sure that all normals are facing the correct direction.
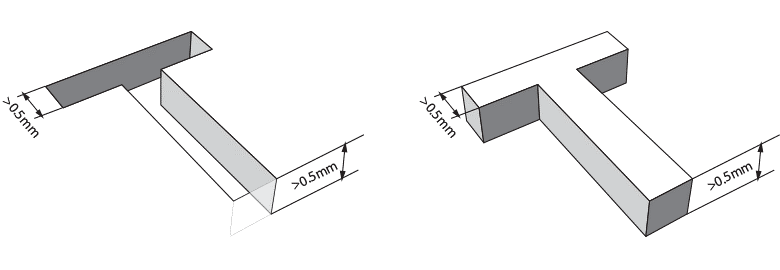
5. Small Details and Embossed/Engraved Text
The details, or the small decorative parts of the 3D object such as embossed or engraved text, need to be of a certain size or they will not appear on the printed object. The exact minimum size of the smallest possible features of the design depend heavily on the material of your choice. That’s why you need to carefully read through the design guide of the material of your choice first.
This is especially important if you intend to add embossed or engraved details such as text. Sticking to the minimum detail size will make sure that everything is as readable as you intended.
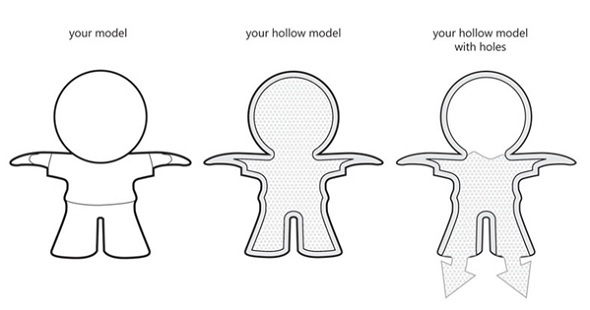
7. Hollowing and Escape Holes
A hollow model means that the interior of your object will not be solid. Solid designs are not necessarily a problem – they will be stronger and harder to break, but they will also be more expensive as more 3D printing material is used.
With a hollow model, the interior of your print will be empty. However, since our printers print layer by layer, 3D printing material can get trapped in the interior of your model.
If you would like to avoid this, you can add ‘escape holes’ to your design. Material that is not used for building your 3D print can then be removed.
You can read more about hollowing and how this reduces 3D printing costs here.
8. File Resolution and File Size
For 3D printing, the most common file format is STL (Standard Triangle Language), which means that your design will be translated into triangles in a 3D space. Most 3D modeling software has the option of exporting your designs to an STL file format and lets you set the desired resolution. Here’s a visual representation of different file resolutions from extremely high (left) to quite low (right):
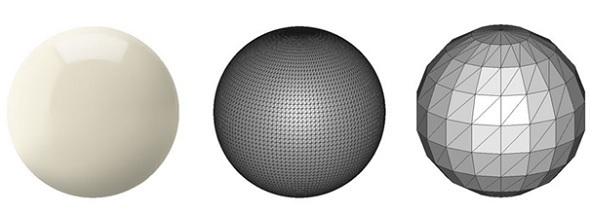
In most 3D modeling software, when exporting a file you will be asked to define the tolerance for the export. This tolerance is defined as the maximum distance between the original shape and the STL mesh you are exporting. We advise choosing 0.01 mm for a good export. Exporting with a tolerance smaller than 0.01 mm does not make sense because 3D printers cannot print at this level of detail and your file will be unnecessarily heavy.
When exporting with a tolerance larger than 0.01 mm, however, triangles might become visible in the 3D print.
Summary: File Fixing for 3D Printing
Let’s take a deep breath. Don’t worry: things sound more difficult than they are. If you are struggling to learn how to 3D model you can always find plenty of resources. Once again we want to point out our material guides to you where you will find valuable and precise instructions for each 3D printing material there.
If you designed a 3D model for printing, why not print it with our online 3D printing service? It’s easy, fast and efficient. When uploading a model to our website we will always double-check your design before we send it to the printers, and if there are mistakes or if parts of your object could break, we will warn you about this and tell you what went wrong.
Learn about these 5 mistakes to avoid when designing a 3D model for 3D printing to make it even easier.
Some useful websites/companies you might want to look through:
3D Systems
www.3dsystems.com
Autodesk
www.autodesk.com
Hyphen Services
www.hyphenservices.com
Materialise
www.materialise.com
Netfabb
www.netfabb.com
Rhinoceros 3D
www.rhino3d.com
Stratasys Ltd.
www.stratasys.com
Add a Comment
You must be logged in to post a comment