You can create a range of color intensities on materials during laser processing by using different parameter settings. The following guide explains how to use the grayscale matrix to efficiently identify your desired color intensity.
Determining parameters using the grayscale matrix
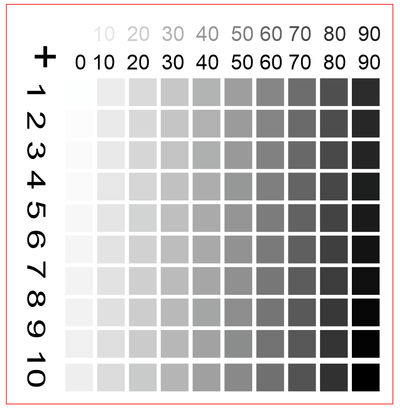
The grayscale test matrix consists of 100 different variations of gray. Parameters for each variation can be located easily by using the Relief function located in the JobControl® printer driver.
Laser output can be adjusted using the black tone. For example, when a black box is set to 100%, you can use 100% of the set output. When a black box is engraved at a 50% setting, 50% of the set output can be used. Since the laser output is linear to the black tones, the desired color tone can be adjusted utilizing the test matrix, and the corresponding values will be transferred directly to the parameter database. The machine’s speed will always remain constant.
Creating the grayscale matrix
Start by pasting the picture into your graphics program, and then under the printer setting in the JobControl® printer driver, set the process type to “Relief.” Depending on the material that you want to test, select the resolution accordingly. For example, using wood as your material, set the resolution between 333 DPI and 500 DPI.
TIP:
For a laser output on a machine of 100 watts or more, start with v = 100% speed and P=80% output.
For a laser output on a machine between 40 and 100 watts, start with v = 100% speed and P=100% output.
For a laser output on a machine below 40 watts, start with v = 50 – 80% speed and P=100% output.

Selecting the laser parameters
Select your desired color tone using the grayscale matrix, and save it in your JobControl® database. In this example, the selected parameter for P is 80+7 i.e. 87% of the preset P-value (output).

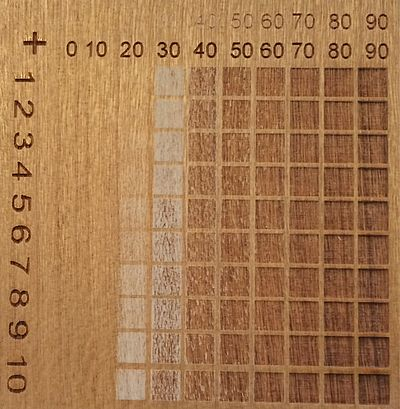
Grayscale matrix on wood
The test matrix shows a variety of color intensities on wood, ranging from white to brown to even dark brown. Therefore, varying color intensities are easily and quickly identified.
TIP:
By setting the Z-offset in the plus range and repeating the test process, even darker engraving results can be achieved.