
This time it is not a tutorial-based article from Germia. She just want to share her opinion with you and possibly find out your opinion too.
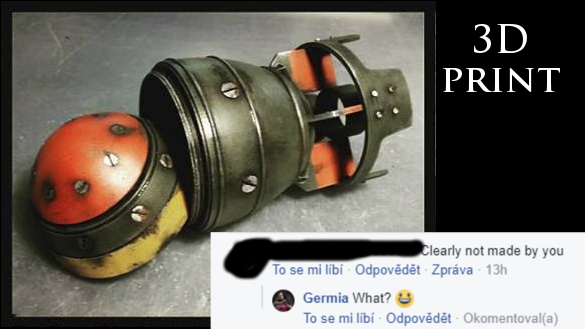
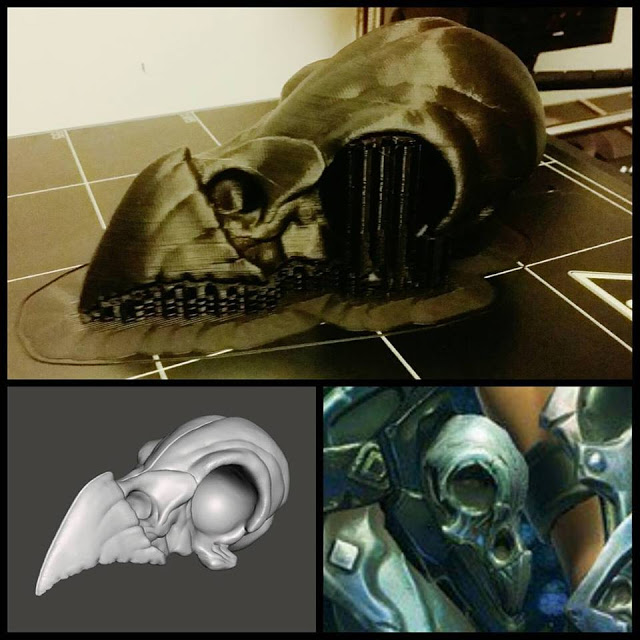
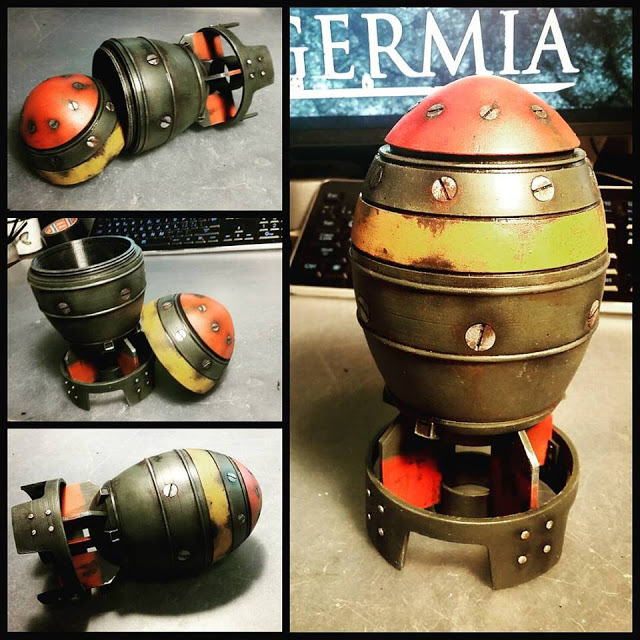
There is always some motivation behind each and every of my articles. And one of the motivations for this article was for example one comment I got when I shared my mini nuke prop. I wrote in the description of the picture featuring the prop, that I made it and gave it to a fallout fan. And the comment was, that the prop was not made by me. After it I posted my work on bird skull, which I made for my Fury cosplay. This time also modeled and of course printed by me, awaiting the postprocessing. And some of the reactions were the same: “Can you go into a contest with 3D printed stuff? It is not your work.“ and some more…
So I decided there is time to maybe educate people more about 3D printing a describe every step you have to make to achieve a good finished product, so everyone can understand it well and better understand the differences of 3d printed work with handmade stuff.
And to say I was the same as people writing me: When 3D print came into the cosplay world I didn’t think much about it. I thought, that you just put a model inside the printer and it prints that for you. You just sand it, paint it and wear it and that is just it. I’ve also heard opinions like „3D printing is cheating“.
I think a lot of opinions would change with getting a 3D printer kit.
1) What is involved in making a 3D printed prop (for example mininuke)
1) I got a 3D printer (kinda big investment for most of the ppl) + filaments, cabinet for it, smoothing and sanding stuff, …
2) I had to assemble it and calibrate it (9 hours of assembling, 5 hours of calibrating)
3) I had to study a lot to know which filament to use, how to smooth your prints, how to calibrate the printer for each filament, which filaments are toxic, foodsafe, how they behave and what special needs they have, how to make you prints stick to the surface and how to make them not stick when they’re done without destroying your printer, … (several days of learning)
4) Right now – for each nicely printed thing I still got half of the filament as a failed print, because I’m still learning and sh*t just happens.
5) Printing bigger stuff can take hours or days and you cannot just leave your printer working, since the prints tend to fail (filament stuck, bad adhesion of pieces, layer shifting, other printing fails) and some fails can even destroy your printer and in the worst case – put it on fire (seen that too once). Some people solve this problem with installing camera devices to monitor their prints.
6a) I found the right model (no, I didn’t model it – modeling will be an article on its own) and I had to make .gcode files from .stl files, so your printer can handle it – there you customize all the things the printer should do in the matter of speed, quality, infill, supports, … (more in 2nd chapter).
6b) Or you can make the model on your own. But 3d modeling is HARD if you don’t have any courses behind you and don’t know where to start. I started by editing existing models to learn how all the brushes work and since I have a lot of experience with vector graphic, where you have to work sith shapes as well, I was relatively fast learner. You basically go from making basic shapes or editing existing stuff (my lightsaber emitter guard) to using brushes form making organic stuff (my bird skull – 2 days of work on it) to making exact shapes with functional design (I’m still not that far and a long way awaits me), that is, for example, this mininuke.
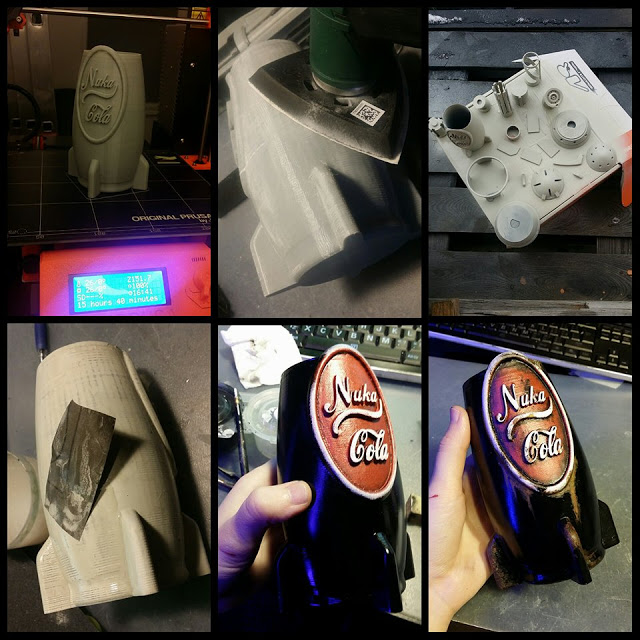
7) The mininuke printed like 85/100 quality (there were some minor cosmetic issues – I used a cheaper filament), so I had to sand down the not-so-nice parts and fix failed parts with wood-burning iron.
Every printer and filament prints in different quality adjustments and sometimes it can have some uneven spaces, bulks or different “fails“, that you have to fix in post-processing.
8) I made 3 coats of primer and filler (not cheap stuff), that I had to sand down after every coat – it took me the whole day. This part is the most important! I’ve seen a lot of cosplayers just take the 3D printed prop and paint it. There almost no work involved in making a 3d printed prop without modelling it yourself, printing it yourself and POSTPROCESSING it. That is what makes the difference between good and bad print – the lines from printer should be not visible at all and the surface of the print should be smooth!
Remember that because rought print is like foam armor with badly glued joints.
9) When I thought the surface was smooth enough, I sanded it down for the last time and then I spent 2-3 hours of assembling and painting. I used real iron nails for bottom part. Painting makes a big difference in what you can get from a 3d print!!!
You can watch me painting mininuke HERE.
So even my printer “made“ the physical shapes of the mininuke, and I didn’t even model it (I do not think I am able to 3D model functional or precise models yet)), I think there is still a lot of work involved!
This part of the article was just a description of a working process. When I say “made“ it means, nothing would exist without your work involved. You cannot just say my 3D printer made it for me, because it is not true, and you can give credit to the author of the file, which I am always giving in longer description, not in a first sentence, that explains what the thing is – but even the author did not make the physical thing for you.
In the following part of the article, I will describe the adjustments of your printer, that can severely influence your print. It may be a little boring for someone, but I think it is vital to understand, that printer does not make all the work for you. It is up to you to tell it what to do!
But still, if you are not interested, skip to part 3 – judging of a 3D printed part.
2) How hard printing actually is
I’ve already described, what you need to do to make your own prop like my mininuke. But what adjustments are you making actually on your printer? Why the printing fails so much? Why it is actually not that easy as it seems on a first glance? Why it takes so long to print?
3D printers work by melting a long string of (mainly plastic) filament and placing layers and layers of materials on each other in the desired shape.
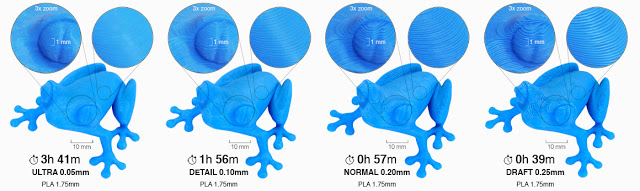
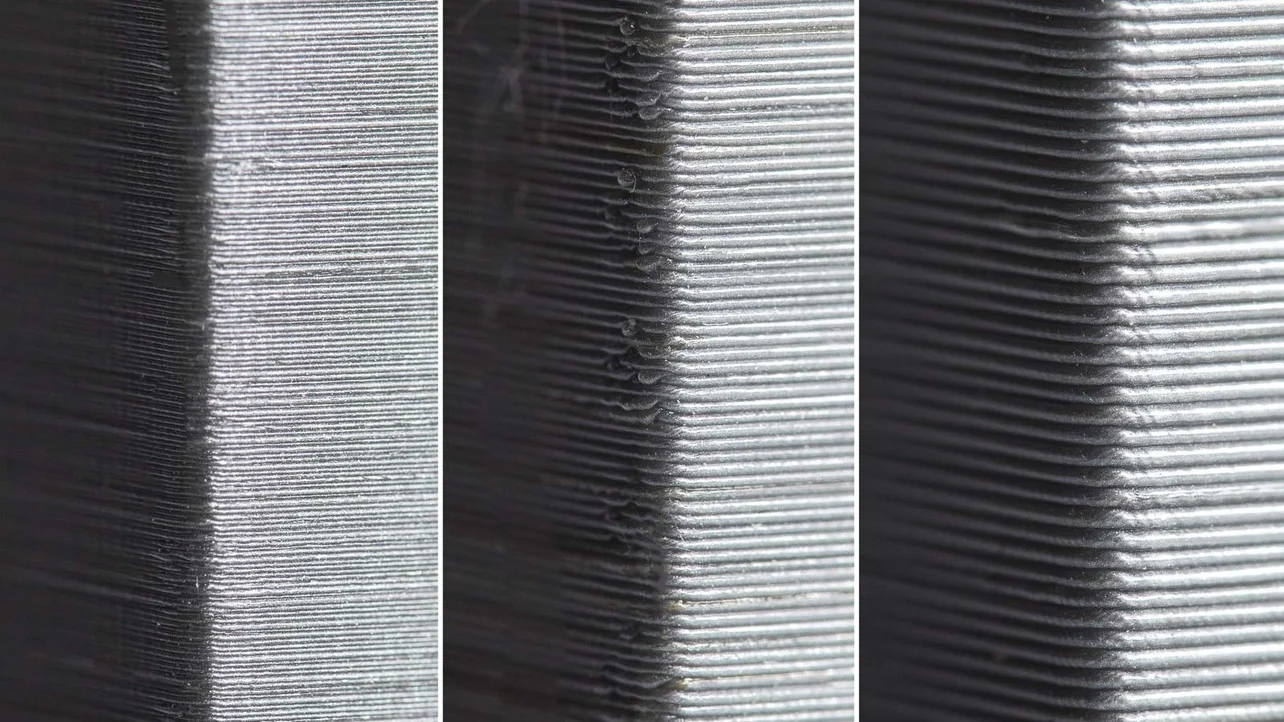
a) printing quality
You can adjust your printing quality in the program you use for preparing the models for printing (Slic3r, Prusa control, …) and it influences the layer visibility and the time of printing.
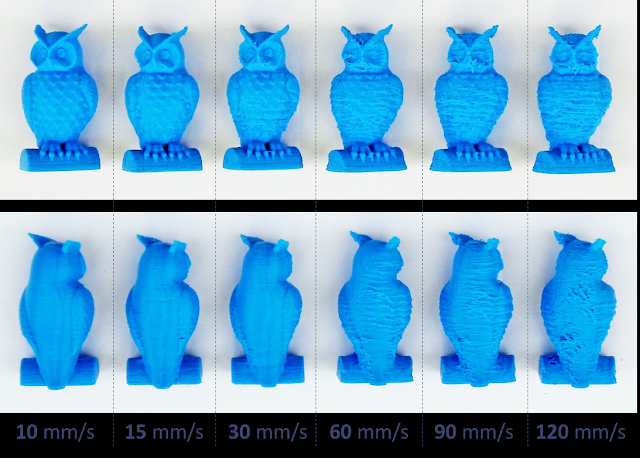
b) printing speed
You can adjust the printing speed in different stages of printing. The right/wrong speed can have a big impact on the printing quality in terms of shape and smoothness:
c) filament (= printing string)
Each and every filament and I mean not only the material or the company making it, but each and every color of filament can have different characteristics and would most likely need you to change the adjustments of your printer regarding speed, nozzle temperature, sometimes layer height, heating bed temperature.
There are several different materials you can print with, but the most used are PLA and ABS. But you can even print with nylon, carbon fiber, flexible materials or wood, but each filament material has its own specifics and if you read carefully, you have noticed, that ot study those differences and choosing the best material for you can take several days of studying.

d) nozzle temperature
Nozzle temperature is the temperature of the device melting the filament to be extruded and shaped. It changes with each and every material and most of the filaments have on their box, what temperature is best for them. But tbh – you have to try it by yourself. The temperature can have a big impact on the quality of the print:

e) heating bed temperature
Some better printers have something called a heating bed. It is the part of the printer, where the printed part sits and some filaments need the printing bed to be heated in order to stick to it. The temperature of the heating bed can influence, if your print sticks to the bed and will be a success or if the print sticks on the nozzle, will mess up your printer and be totally destroyed. If you make your bed temp too high, it can shift some layers of your print and it will look bad.

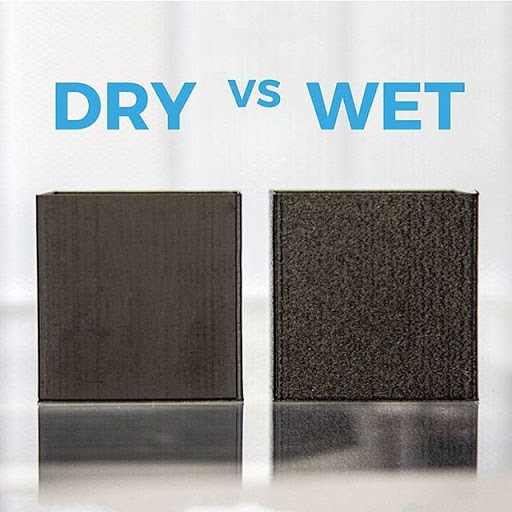
f) taking care of your filament
Even the filament you have needs to be cared for and can influence the result of your print. Tangled filament can stuck and your print can go on printing without extruding any filament. Wet or moist filament can make your print look bulky or there could be holes in your print. That is why your filament comes with silica gel absorbent of moisture and that is why you should stock it on a dry dark place.
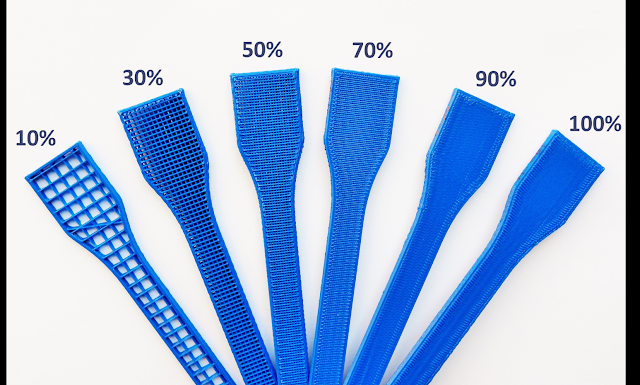
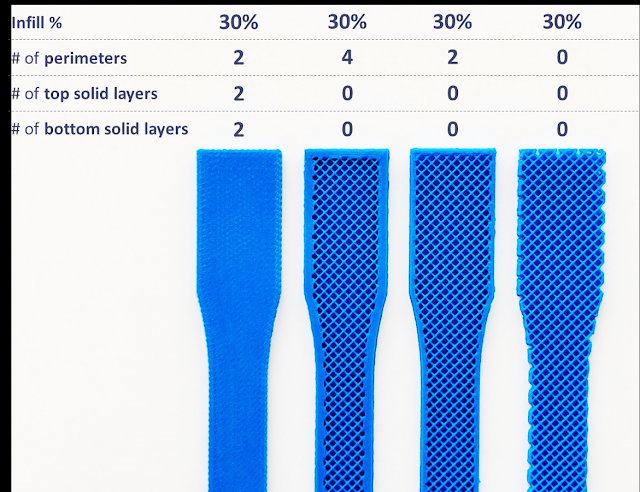
g) infill
Infill is a way of sparing some of the filament, making the inner part of a model lightweight, but still pretty sturdy. On the pictures, you see some of the adjustments you can do with your infill, that can influence the look and the characteristics of your print.
h) supports, brim, raft, skirt …
To make sure your print will be successful, sometimes you have to make supports for the parts, that „overhang“, you have to make rafts and brims or skirts. But I won’t describe it so much, since it is for a longer time. If you are still interested in more, just read this article about it HERE.
i) the list never ends
I am sure I explained in a short way some of the adjustments of printing, but this is not all, there are much other different stuff you have to do before printing, that I did not mention, but I think this list is enough to have just a slight clue, how extensive the work with 3d printer actually is.
3) Judging a 3D print
⏩ How much work is involved in the print
1) Did the cosplayer model the prop?
2) Did the cosplayer control (own) the 3D printer?
3) Did the cosplayer assembled, sanded (or post-processed) and painted the print?
Control questions:
– What modeling software/printing software/printer is she/he using?
– What techniques are used for smoothing and painting?
– What glue is used for assembly?
– What kind of filament is she/he using and why?
⏩ How advanced the print is
1) How skilled a cosplayer should be to model this?
2) Does it do anything special?
– movement, opening, turning, …
I know it can sound may be very challenging, to make props, that actually do something, but 3D printing has almost unlimited options in this kind of matter.
3) How many parts it has and (how much time and money is involved)
⏩ How does the print look like

1) Are there any common print fails involved? Layer shifting, Overextrusion, Layer splitting, Oozing, bad supports, wet filament, … Look HERE at most of the possible print failures.
2) Does the 3D print look smooth?
If you spend more time printing a prop on a much detailed option, there are more layers used, so the printing layers are not so visible. But even your print goes very detailed right from the printer, you still have to smooth it, so no layers are visible. There are a lot of ways how to do it, which I will describe in another article, but post-processing is really necessary and it is also VERY time-consuming and hard. And I have to admit I have seen only a few cosplayers actually postprocessing their prints well.
3) How do the paint job looks like
– Does it look realistic?
– Are the colors good quality, or does the original print color peeks through?
– Are there highlights and shading involved?
– Is it weathered (if it should be)?
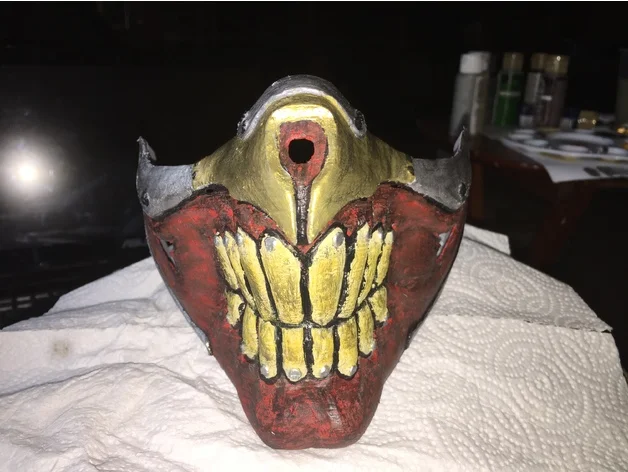
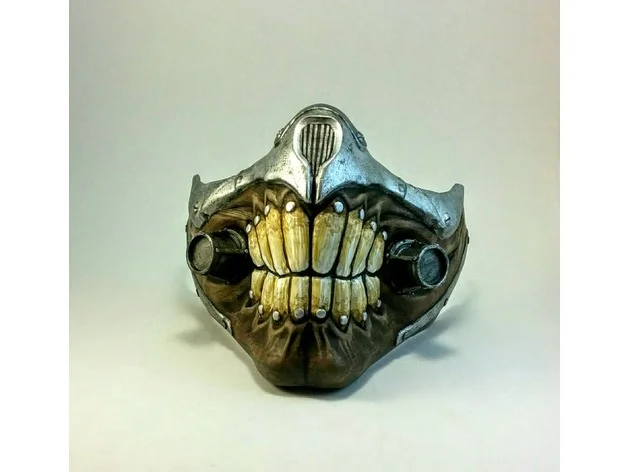
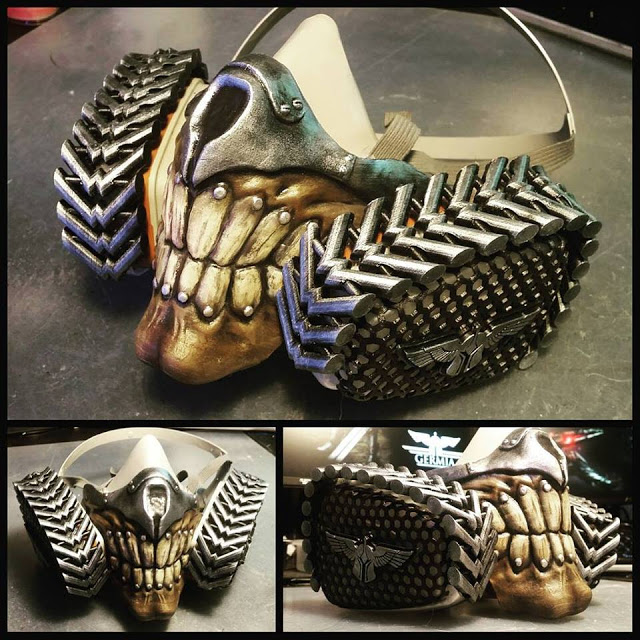
I took two Immortan Joe masks from Thingverse to show you the difference of the paint job you can achieve on the same 3D model as an example:
⏩ Other stuff
1) How creative the use of the print is
Even when someone did not model something, but uses it creatively or in an uncommon way, I think it can earn him/her plus points!
I try to find creative and practical use of models all the time.

3) Comparison with other techniques
Comparison of different techniques is always very hard – we know the struggle between judging the armors and dresses and 3D print comes to this enviroment of unsure point distribution in contests…
I think 3D printing is VERY SIMILAR to other techniques – it can make your life easier in some ways and harder in others.
What is easier and what I like:
⏩You can buy or download models for free, you don’t have to know how to 3D model to 3D print
⏩No pattern making, no foam cutting and gluing and shaping, …
⏩No further thinking about shape, alignment, scale, assembly, you can watch this all on the computer.
⏩Very sturdy outcome – no heat in car destroys your props, almost no damage caused by traveling
⏩ Very convincing outcome if post-processed well
⏩Even the learning curve is very slow from the start, you get to know your printer with time and choose your fav materials and adjustments and become a 3D printing fabric very soon 😉
What is harder:
⏩The initial investment is very high (3D printer, filament, 3D programs)
⏩Learning is very time consuming from the start and involves a lot of fails (and money for the filament or destroyed parts)
⏩ 3D modeling is not easy and involves in a lot of learning struggles and sacrificed time. ⏩ 3D modeling of functional or precise parts is much harder and really advanced.
⏩Sanding and smoothing is very time (and money) consuming
⏩ Printing with new and different filaments involves a lot of fails and it’s really time-consuming.
What I dislike:
⏩ 3D prints do not involve your handmade touch/signature style – no one recognizes if you printed it or if your friend printed it. By normal foam armors or worbla, there are so many different styles – I have my own, everyone can recognize my work from others…
What I like:
⏩ 3D printing moves cosplayers on another level. Even worbla and foam are great materials, they have some limits and rying to make a convincing sniper rifle from those materials could be almost impossible. 3D printing also allows for better durability and it is yet another technique to show of with (If the technique wasn’t by some people regarded as cheating 🙁 ).
According to me, (we) cosplayers have a problem with 3D printing in this matter:
You can make a 3D print even with only a little skill (if you download 3D model, let it print by your friend) and there is a smaller difference (or maybe just most people don’t know) between bad 3D print and good 3D print (downloaded model, painting and layer visibility) than between good foam armor and bad foam armor (shapes, seams, painting, scale, decorations, material, typical handmade style of a cosplayer). That is why sometimes it seems much easier to make a 3D printed prop than a handmade prop.
And what do you think about 3D printing in cosplay? Do you still think it is easier or “cheating“ to have stuff 3D printed? Don’t worry, I won’t judge ANY opinions, just make them well thought and argumented 😉