How does a laser printer work? (animation):
The Seven Laser Printing Steps
You may look at your laser printer and curse — “Why are laser printers so fickle and fraught with problems?”
Calm down, bro!
The laser printer process is intricate. Let’s take a look.
Here is the exact step-by-step process laser printers use:
Step 1: Sending
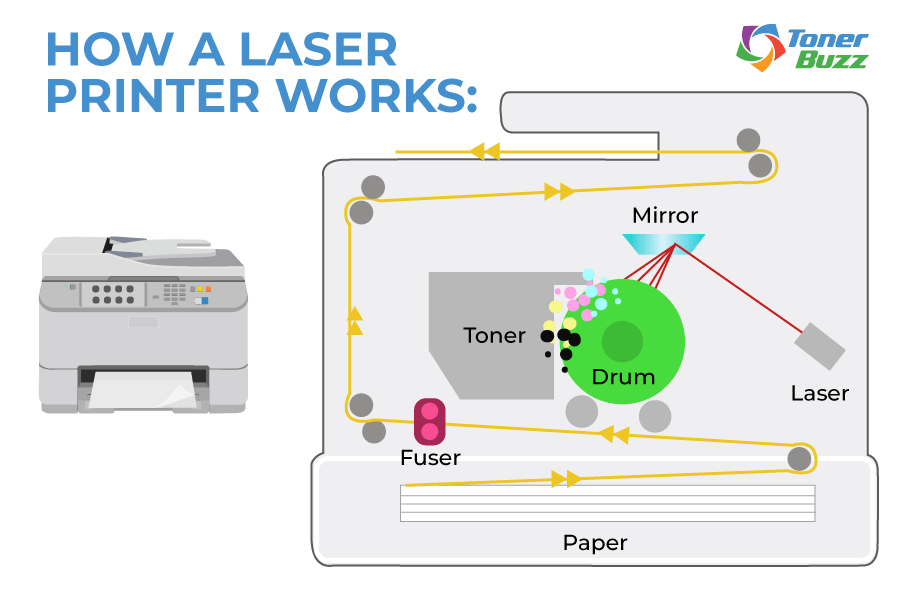
To begin the laser printer process, the document is broken down into digital data and sent from the respective computer to the printer.
In a feat of binary wizardry, printers reassemble this computer data into a printed image. Laser printers will capture the data and process the digital document.
Step 2: Cleaning
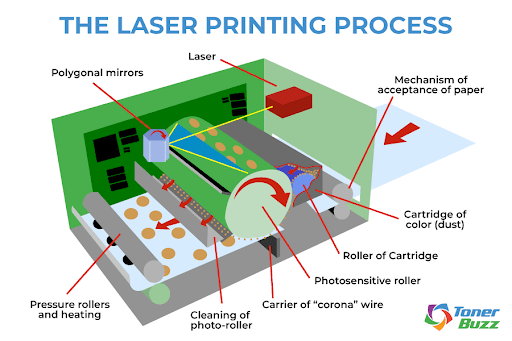
Laser printers leave a residue on the printer drum. Cleaning is a physical and electrical process carried out in order to remove the previous print job and prepare the photosensitive drum for the new print job.
During the cleaning process, remnants of toner on the drum are scraped away by a rubber-cleaning blade into a debris cavity. Electrical charges remaining on the drum from the prior print job are defused by electrostatic erase lamps inside laser printers.
Lubrication is then applied to the heat roller in order to make sure an adequate amount of heat is evenly applied to transfer the incoming image.
Step 3: Conditioning
The process called conditioning involves applying a charge to the drum unit and the paper as it passes through the corona wire. Adding a static charge to the paper allows an image to be electrostatically transferred to the laser printer page.
Yeah, static electricity!
The same force that makes your socks stick to your sweaters when they come out of the dryer also works inside laser printers!
The primary charge roller springs to life, spinning the adjacent organic photoconductor (OPC) drum. Ions on the corona wire coat the drum with static electricity. The electro-photographic process begins at the molecular level. The drum completes its revolution, slathered with a negative charge.
Step 4: Exposing
Laser time! The next step is exposing. Here, the photosensitive drum is exposed to a laser beam. Every area of the drum exposed to the laser has its surface charge reduced to about 100 volts DC.
An invisible latent print is generated as the printer’s drum turns. The image that will ultimately be printed exists for the first time as a thin layer of electrons on the OPC drum.
The darkness within the printer cartridge is broken by the glow of the laser. The beam bounces off a spinning, multi-sided mirror and breaks into countless rays of information, spraying the OPC drum with its knowledge, turning the negative charges positive.
Line-by-line, the laser speaks to the revolving surface of the drum unit, describing a page with the language of charged toner particles. This part is black, this part is yellow, and this part…yes, this part…is wonderfully magenta. The drum wears a positively charged image on its surface, ready to transfer onto the paper.

Step 5: Developing
In the developing stage, toner is applied to the latent image on the drum. Toner is composed of negatively charged powdered plastics — black, cyan, magenta, and yellow. The drum is held at a microscopic distance from the toner by a control blade.
Toner is 85-95% finely ground plastic. Other toner ingredients used in printers include colored pigments, fumed silica, and control agents.
Silica keeps the toner particles from clumping and sticking together. It also helps the toner flow smoothly from the cartridge to the printer. Bits of zinc, iron, and chromium are used as control agents to retain the negative electrostatic charge of the toner particles.
A variety of pigments are used to create colored printer toner cartridges.
The following pigments used are:
- Yellow. Pigment yellow 180, composed of a Benzimidazole.
- Magenta. Pigment red 122, composed of 2,9-Dimethyl-Quinacridone.
- Cyan. Pigment blue 15:3, composed of Copper Phthalocyanine.
- Black laser toners still contain carbon black powder, as in early laser toner models, combined with powdered plastic.

Step 6: Transferring
Next comes transferring. The secondary corona wire, or transfer roller, applies a positive charge onto the paper. The agitator unit inside the toner cartridge hopper spins, and the toner begins to heat up.
The toner adder spins, pulling toner in, gathering toner dust on its surface. A doctor blade sweeps over the adjacent developer roller, leveling the toner to a precise height.
All the spinning and commotion has left the magenta particles on its surface with a negative charge, and when it comes in contact with the positively charged image on the OPC drum, the laws of attraction take over. The negatively charged toner on the surface of the drum is magnetically attracted to the positively charged areas on the paper.
The magenta toner particles are pulled from the developer onto the drum according to the precise instructions left by the laser. A few magenta toner particles here, several there, and a bunch more that will blend with black, yellow, and blue to form a rainbow of beautiful colors.
The sheet of paper passes over each color cartridge — magenta, yellow, cyan, and finally black — as the image is transferred onto the paper.
Step 7: Fusing
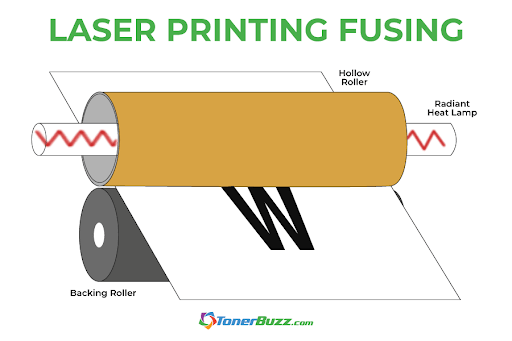
The final phase is fusing. Heat and pressure are applied to the toner by the fuser unit. The toner generates a permanent bond as it is pressed and melted into the paper. Teflon covers the fuser unit as a light silicon oil is applied in order to remove any possibility of the sheet of paper sticking to them.
The fuser unit essentially melts the toner powder onto the page, creating the image. A wiper blade cleans any remaining particles off the OPC drum and deposits them into a waste bin. Any latent charge left on areas of the drum surface is erased, restored, refreshed, and ready for the laser printer to sing again.
Excess toner not transferred to the OPC drum is scrubbed from the developer unit and returned to the hopper to be used again on the next printed page. Toner that remains on the OPC drum and not transferred is wiped into a waste toner bin.
You Might Be Wondering: What Is The History of Laser Printers?
The rise of laser printer technology has its roots in the dot-matrix printers and mimeograph machines of the 1950s and ‘60s.
Who invented the laser printer?
Well, IBM pioneered the dot-matrix printer in 1957 and Xerox released its first photocopier two years later.
The dot-matrix printing method used an ink ribbon (similar to those found on manual typewriters) and a series of tiny dots to render low-resolution images and text.
Laser printers are similar to photocopiers, however, the photocopier, by contrast, used a novel and “dry” printing technology called xerography. Once called electrophotography, xerography used a positive and negative electrical charge to attract toner particles onto paper. The particle would stick to charged areas on the page.
In 1967, an enterprising engineer at Xerox named Gary Keith Starkweather came up with the idea of photocopiers producing images sent directly from a computer. Although his supervisors at Xerox frowned on the idea, Starkweather pursued this unique printer concept.
Starkweather modified a copier, replacing the imaging unit with a laser beam and an eight-sided rotating mirror. The laser left a positively charged image on the surface of a sheet of paper. Negatively charged toner particles attached themselves to paper, and a heating element fused them to the page.
Xerox debuted the first commercial laser printer for the business office, the Xerox 9700, in 1977. Coincidentally, HP began marketing inkjet printers for the home office that same year, though they didn’t gain popularity until the mid-’80s.
Are Laser Printers Better Than Inkjet?
Not necessarily. If you’re printing thousands of pages and high volume, you should seriously consider a laser printer. It will lower your overall cost per page.
While laser printers were once much more costly than inkjet printers, advances in technology have narrowed that price gap. Check the data; there’s no need to tighten your belt in order to afford a laser printer. They cost about the same as ink-based printers now.
Inkjets are good for glossy photo prints, or a home office that doesn’t print at high volume. They’re even good for printing your own business cards! As expected, an inkjet printer uses ink, and replacement ink is expensive!
Sure, new OEM toner cartridges aren’t cheap either, but the page yields are much higher than you’ll get from an ink cartridge. In general, you can print hundreds of pages per inkjet cartridge but thousands of pages per toner cartridge.

Catch A Toner Buzz
As you can see, laser printing is a highly complex process with a lot of moving parts inside the printer. The way a laser printer works is sophisticated. This is why there are so many risks involved with using compatible or remanufactured laser printing products, especially knock-off toners.
Brand name, genuine, Original Equipment Manufacturer (OEM) laser toner cartridges carry fewer risks than compatible and remanufactured toner cartridges. Plus non-OEM toner cartridges deliver inferior print quality and lower page yields than name brands.
The same goes for ink! Stick with OEM ink and toner for all your imaging machines!
How a Color Laser Printer Works – Inside an HP 2600 Toner Cartridge
Source: https://www.tonerbuzz.com/blog/the-laser-printing-process/