Unless you’re printing in a desert, filament will likely absorb moisture. Learn about the best filament dryers and dry boxes to DIY or buy!
While many print quality issues can be solved by tuning your slicer settings or fixing your printer’s hardware, sometimes the problem lies elsewhere. When moisture sticks to or seeps into your 3D printing filament, the print quality usually significantly degrades, with artifacts appearing on the surface of models. Some materials, like PETG and TPU, are more hygroscopic than others, meaning they’re more absorbent and sensitive to moisture.
If you think wet filament might be at the center of your printing problems, don’t worry! A filament dryer is a device designed to remove moisture from your filament, usually by using heat. However, it’s important to mention that drying filament is only half of the battle; keeping your filament dry is just as important. A filament dry box is a storage solution that encloses your filament in a moisture-free environment to prevent the spool from absorbing water from the air.
In this article, we’ll go over some of the best filament dryers and dry boxes. Before we get into that, though, we’ll first review where we’re drawing the line between a filament dryer and a dry box.
Hygroscopy (3D Printing): What It Is & How to Deal With It
Filament Dryers vs. Dry Boxes
For the purposes of this article, devices that actively remove moisture will be considered filament dryers, while moisture-preventing storage (often relying on desiccant) will be referred to as dry boxes.
If you have a wet spool of filament, a dry box can’t really get rid of the moisture as it’s only meant to prevent any more moisture from reaching the filament. On the other hand, a power-hungry filament dryer is not the best solution to keep filament dry in the long term.
No matter the style or complexity, basically all filament dryers work by lightly heating up the filament material to essentially evaporate any moisture. Usually, proprietary devices also come with a handful of other features like a timer, display, temperature controller, fan, and desiccants that enhance the drying process and allow for customization.
That leads us to the other option: filament dry boxes. A dry box is a place where you can store your filament to prevent any moisture from being absorbed. Dry boxes usually offer the ability to print with the stored spool without taking it out of its safe environment, which is something not always possible with filament dryers.
So, now that you know the difference between a filament dryer and a filament dry box, let’s get to the options!
HEATED DRYERS
In this first section, we’ll review some of the best options for products and projects that actively heat your filament spools to remove moisture.
How to Dry Filament: PLA, ABS, & Nylon
Oven
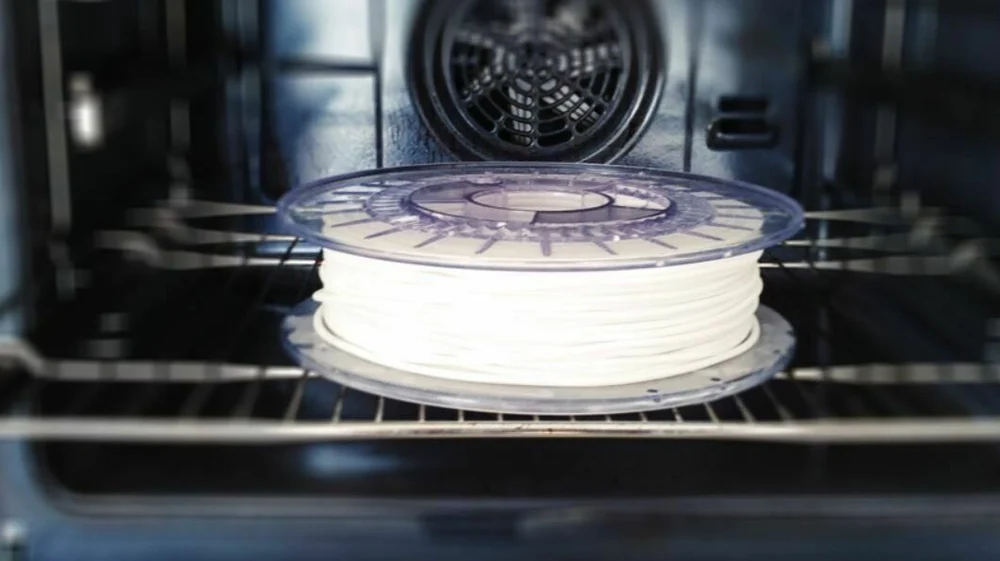
Perhaps the easiest option for drying filament is an oven, assuming you have an electric oven in your kitchen. Ovens, of course, aren’t meant for heating plastics, but, when set to a low temperature, they can actively dry filament by using heat to expel moisture from the material.
You should set your oven to just below the glass-transition temperature of the material you want to dry, likely to be around 40 °C for PLA or 80 °C for ABS or nylon (so don’t try to dry multiple filament types at once). Leave each spool in the contained space for four or six hours; the longer you leave it, the drier it’ll get.
An important piece of advice is to wait until your oven reaches the target temperature before placing the spool in. All ovens slightly overshoot the target temperature when heating up, so placing your spool in too early may soften the plastic and fuse parts of the filament together. For the same reason, also make sure that your oven is capable of accurately holding the target temperature.
Then, once you’re done with drying filament, it’s a good idea to air out your oven to remove any plastic fumes before using it for cooking again!
Food Dehydrator
A food dehydrator is a great choice for a filament dryer, as its purpose is to remove moisture to dry and store sensitive materials (usually food like fruit and meat). These devices work by circulating air at very low heat for long periods of time to actively remove moisture. Food dehydrators make excellent filament dryers because they significantly reduce the humidity around the filament.
If you don’t already have one, you can purchase one for around $50-$75. Depending on the brand, they usually can hold at least one roll of filament and typically work with any material. There are also 3D printed mods to allow you to print directly from the dehydrator. These devices remove moisture by moving air rather than heating the material to its glass transition temperature, so the process will likely take longer than with an oven.
- Approximate cost: $50-$75
- Complexity: Easy
- Number of spools: Various
PrintDry Pro
PrintDry is a company dedicated to selling high-quality 3D printing filament drying solutions. Their flagship product, the PrintDry Pro, which replaced the original PrintDry Filament Dryer, is a 3D printing-specific filament dryer with a heating cartridge. The Pro can fit two separate spools of filament and has small metal rods that go through the middle of the plastic filament enclosure to allow the spools to spin easily.
The box also has a small screen that you can use to view the internal temperature, and there’s also a timer. On this note, there are also a few buttons that allow you to set an internal temperature between 35-75 °C and a timer for up to 48 hours. Like many of the other options on this list, the PrintDry Pro has filament feeding holes for you to use the filament while keeping it dry.
- Approximate cost: $190
- Complexity: Easy
- Number of spools: 2, expansions possible
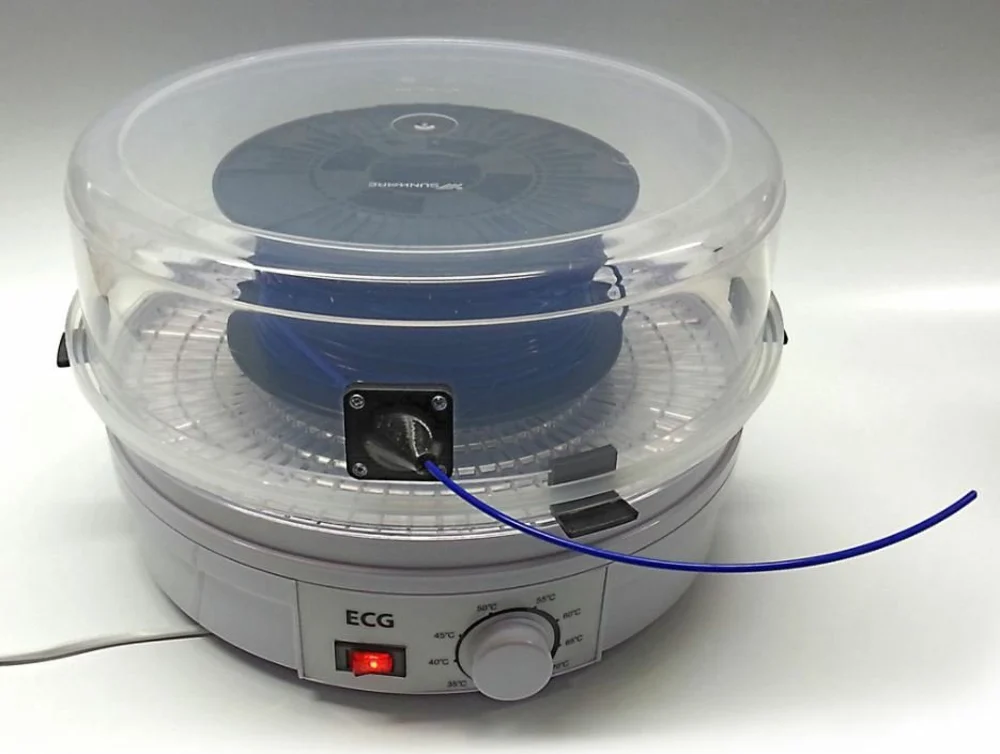
Sunlu FilaDryer S1
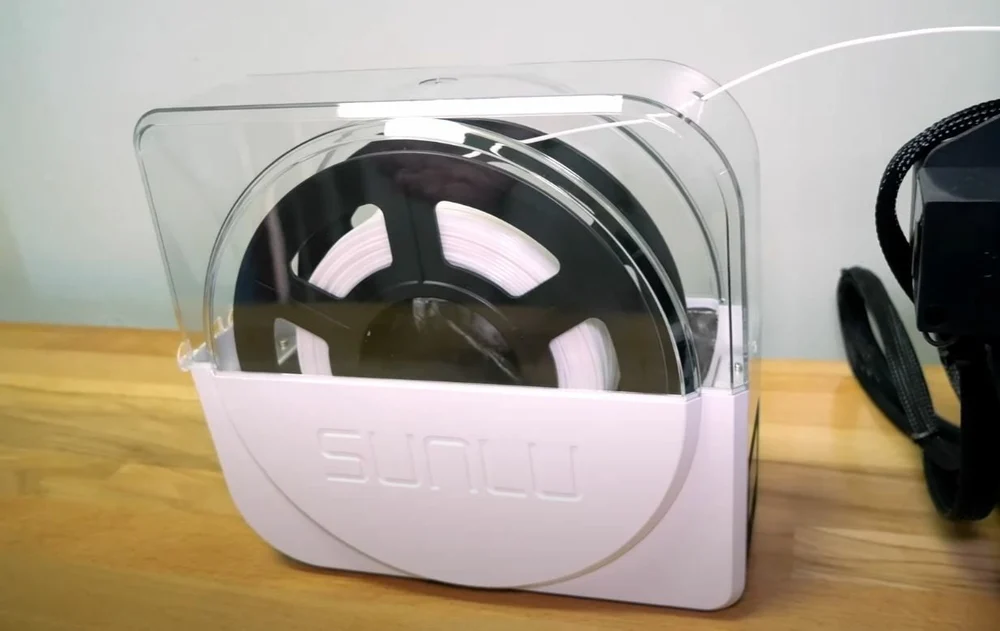
Next, Sunlu is a manufacturer of 3D printing accessories like filaments, 3D pens, and filament dryers like the FilaDryer S1. The Sunlu FilaDryer S1 is a single-spool filament dryer with an integrated heater and a full enclosure that can actively dry filament.
The FilaDryer S1 features a few buttons around a small screen that can display the drying time, current temperature, and target temperature. The container has a hinged transparent cover to enclose the spool, but also includes two small filament output holes to let you print with the material during heating.
According to the manufacturer, this device’s 48-W heater can hold an internal temperature of around 50 °C. While this isn’t too hot, when held for long periods of time, it can expel moisture from spools of basically any material.
- Approximate cost: $60
- Complexity: Easy
- Number of spools: 1
Sovol SH01
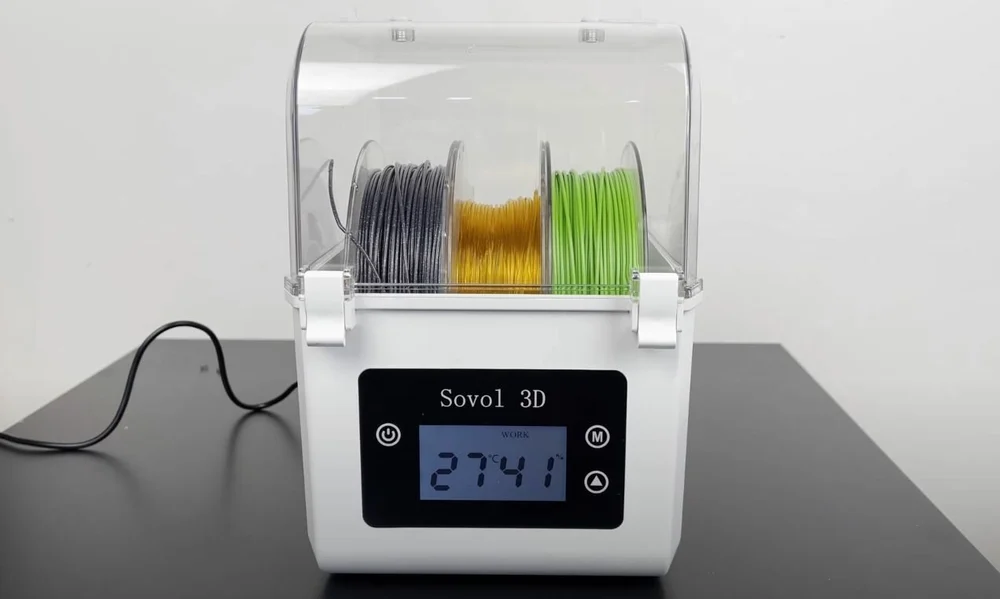
Sovol’s dual-spool filament dryer, the SH01, is a great option for users who desire a multi-filament drying system that doesn’t take up that much space. The drying box is a half-transparent container with an integrated heater that can actively heat your filament with temperatures between 40 and 50 °C. The 3D printer manufacturer’s drying device is similar to Sunlu’s option, but is slightly larger, allowing you to fit and dry two to three spools in the container.
The box has a small screen at the front that displays the temperature and there are a few buttons that allow you to adjust it. This box also has some filament feeding holes and you can use either 1.75- or 2.85-mm filament.
- Approximate cost: $65
- Complexity: Easy
- Number of spools: 2-3
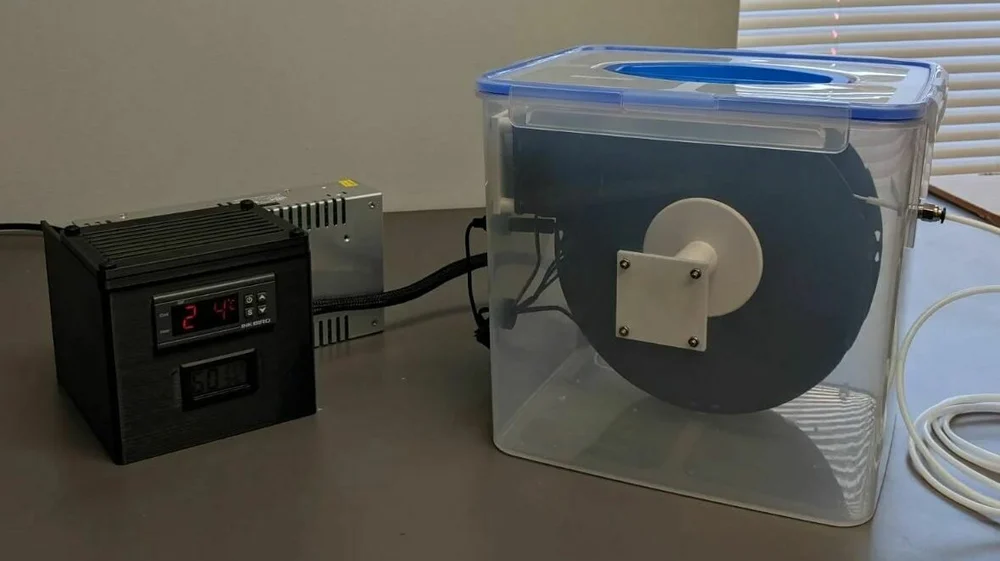
DIY Heated Box
Lastly, instead of buying one, you can DIY your own filament dryer, allowing you to customize your dryer’s features to suit your needs. You can make one of these using a small set of hardware, including a plastic storage box, heating mat, thermometer, humidity meter, and 3D printed parts.
Of course, DIY-ing your heated box means having to source parts and assemble it yourself, but the process isn’t too complicated and there are guides online that you can follow. Some factors to consider when building your own box include spool accessibility, spool capacity, filament feeder holes, adding a display screen (for temperature and humidity), heater power, and spool spinning motion.
- Approximate cost: $20-$30
- Complexity: Medium-hard
- Number of spools: Various
- Where to find it: One good guide to follow is from RichRap, with a video tutorial on YouTube
DRY STORAGE
Next, we’ll go over some great dry storage options. These boxes (and bags!) don’t actively heat your filament, but they can keep spools safe from moisture in the air.
3D Printer Filament Storage: How to Store Filament
Polymaker PolyBox II
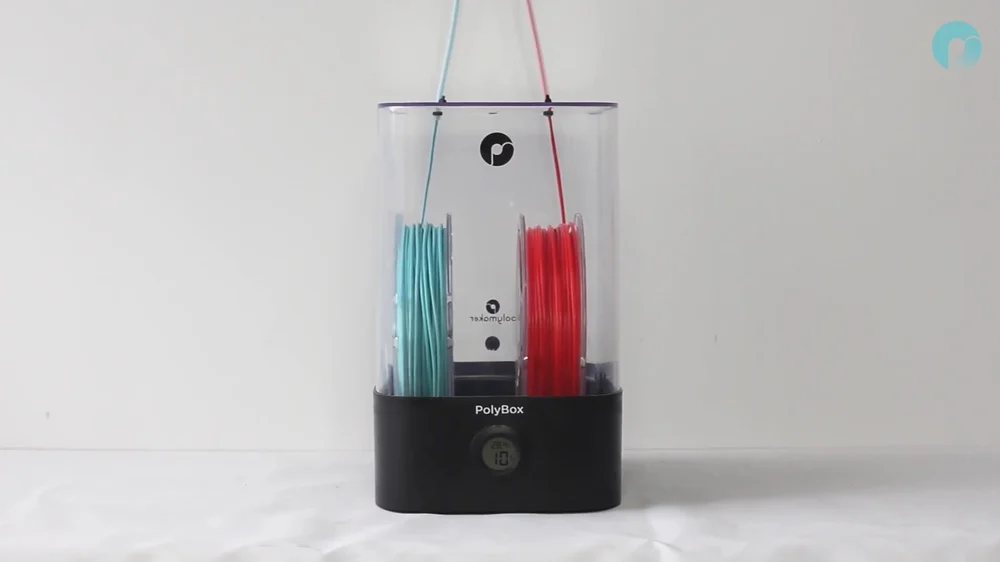
Polymaker is mostly known for their high-quality filament, like PolyMax PLA, but they also sell a few of their own 3D printing accessories like the PolyBox II. With space for two spools of filament (or one 3-kg spool), the PolyBox is a passively drying filament container, meaning it uses desiccants to remove moisture from the air surrounding your filament. Like with most passively drying boxes, the desiccant inside the PolyBox II needs to be recharged after a few (four or five, according to the manufacturer) uses.
The PolyBox II features a small display that shows the internal humidity as well as the temperature, though this shouldn’t change much. The box has three filament holes at the top of the box so you can print with multiple spools while not exposing them to any humidity. Other features of this filament dryer include bearings and rods on each side of the PolyBox that ensure the filament spools spin smoothly during use.
- Approximate cost: $65
- Complexity: Easy
- Number of spools: 2-4
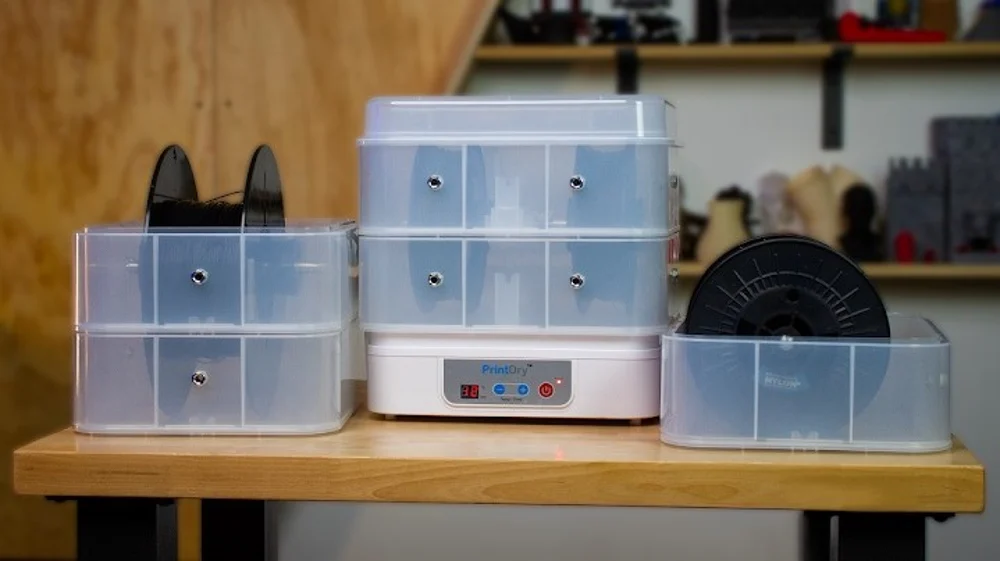
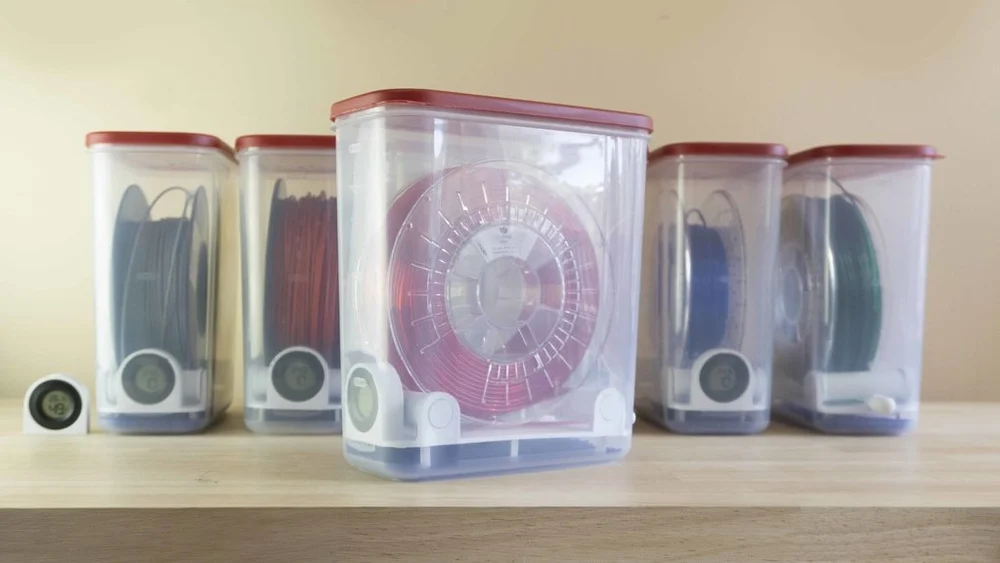
PrintDry Storage Box
PrintDry is back with another filament drying option known simply as the PrintDry Filament Container. The containers resemble round Tupperware containers, with a base and a lid, but their shape and size are meant for holding a single filament spool. The container doesn’t actively heat filament (like the PrintDry Pro), but it safely stores filament spools in a small, airtight environment.
PrintDry sells their containers in packs of five or six and you can easily stack the containers on top of each other for maximum space efficiency. As shown on their product page, you can add silica gels into the container to further keep spools dry, or there’s a vacuum-sealed version to remove any air at all.
- Approximate cost: $75 (for six desiccant containers), or $110 (for five vacuum-sealed containers)
- Complexity: Easy
- Number of spools: 1 per container
- Where to find it: PrintDry
Vacuum Storage Bag
While not strictly a box, this is perhaps the easiest filament dry storage solution on this list. Vacuum storage bag kits generally come with several plastic bags, a pump, and a few other accessories such as clips, silica gels, and humidity indicators.
Each bag has a resealable opening and a valve hole on the corner. Once you place your spool (or spools) in the bag and seal it, you can use the included pump to remove oxygen from your filament’s space, helping keep the filament dry. You can also use the clips, humidity indicators, and silica gel packets to further improve the drying ability of the bags.
- Approximate cost: $25
- Complexity: Easy
- Number of spools: 1-2
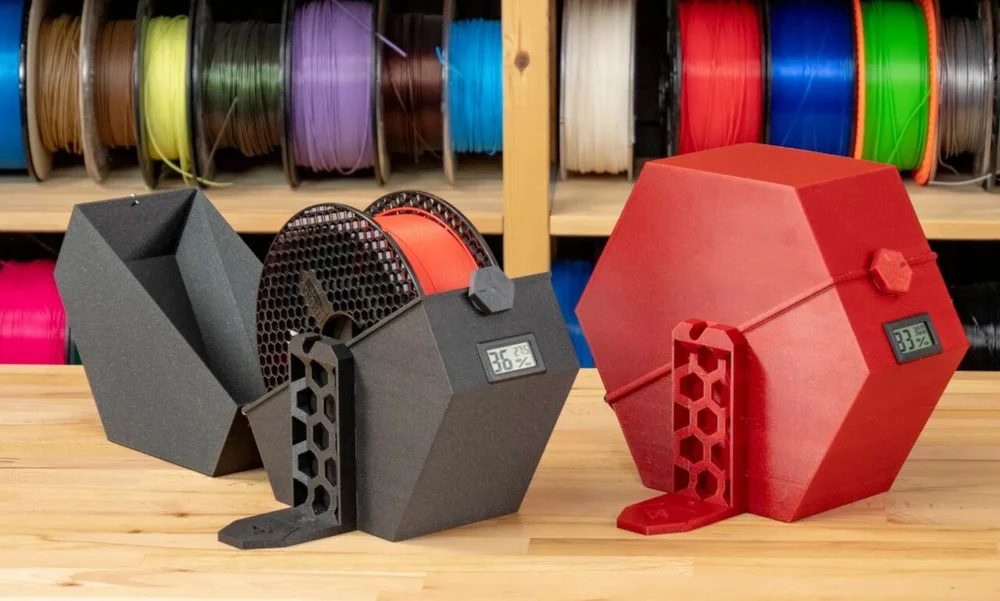
Nautilus Box
The Nautilus Box is another filament dryer, developed by Hydra Research, a manufacturer of 3D printers and 3D printing accessories. The Nautilus Box passively dries filament using rechargeable (through temperature) desiccant cartridges to remove moisture from the air.
The box uses a 3D printed frame with some other hardware like a small screen to show you the humidity inside the box. There’s also a Bowden tube coupler on the box that lets you feed your 1.75-mm filament directly to your printer so you can store your filaments long-term while still being able to print them.
- Approximate cost: $90
- Complexity: Medium
- Number of spools: 1
- Where to find it: Hydra Research
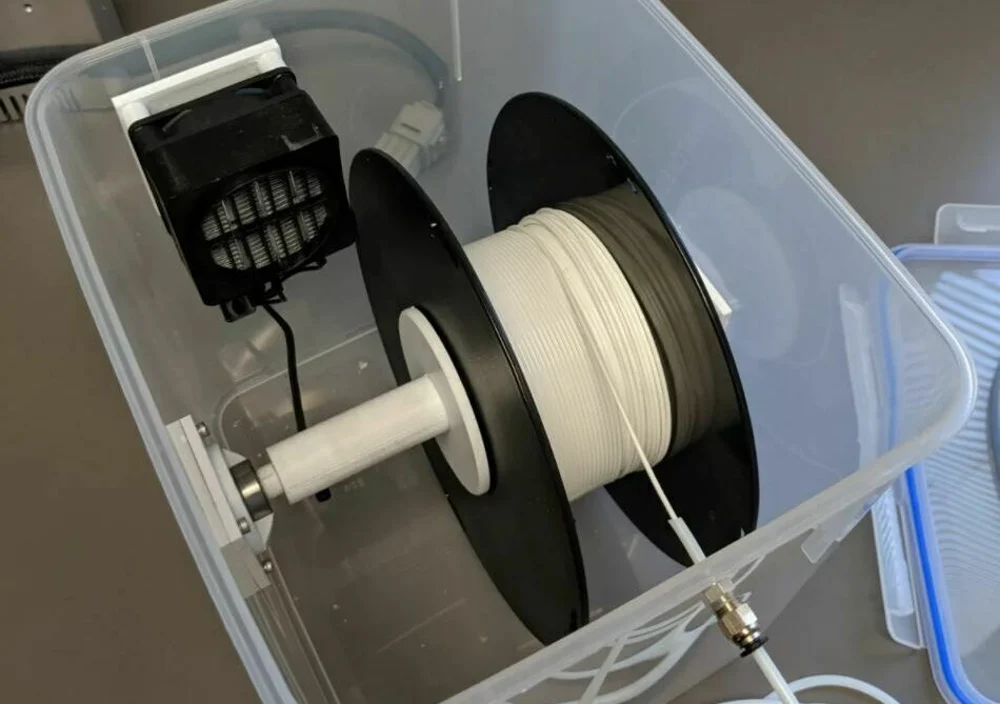
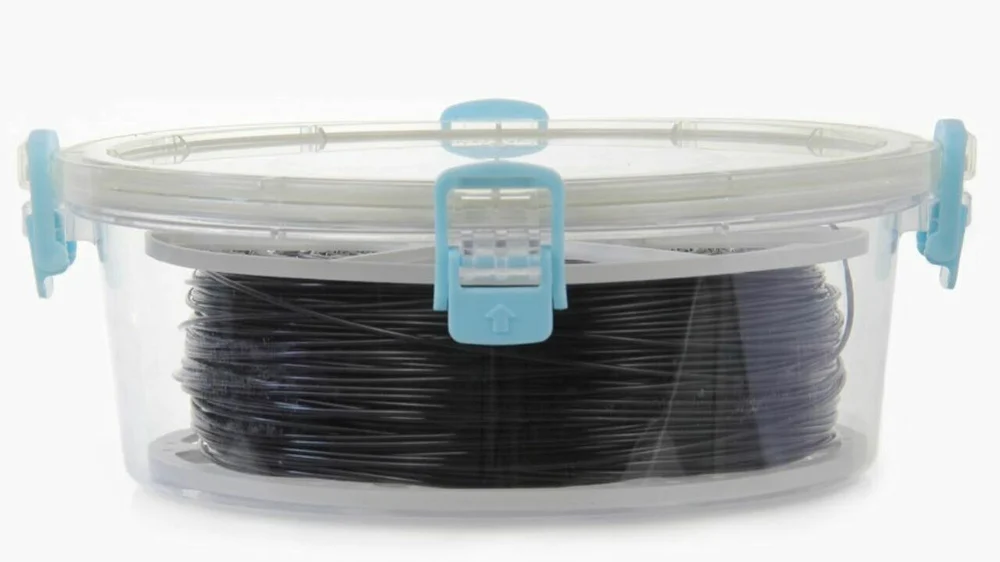
DIY Rubbermaid Box
Next, this project is a DIY box made from a Rubbermaid storage container and a few other supplies. The storage solution is pretty inexpensive to build and each box can keep moisture away from one spool of filament using the air-tight seal on the Rubbermaid box and some silica gel packets. The box is also equipped with some other useful features, such as bearings for the spool to spin, a hygrometer to monitor the filament’s dryness, and a PTFE hole to use the filament without taking it out of the box.
Building the box should be pretty simple as you can follow the designer’s assembly video linked on the project page. It’s important to note that the box requires a few 3D printed parts. The designer listed a few of the print settings they used, including a 0.2-mm layer height, 30% infill density, and no supports nor a raft.
- Approximate cost: $45
- Complexity: Medium
- Number of spools: 1
- Where to find it: Thingiverse
PrusaPrinters Drybox V2
The PrusaPrinters Drybox V2 is another popular option for storing filament in an enclosed environment, and it mainly uses 3D printable components to cut down costs. Filament should stay pretty dry in this box due to its silica gel packets and there are also other features that contribute to the box’s usefulness.
The box has hinges that allow you to easily access your filament, and there are bearings and aluminum tubes that let your spool spin easily during printing. The box also has a small hole for a PTFE fitting so you can print with your contained spool. Building the box may be a little more complicated than some of the other options given how many components are used, but you can use the Drybox’s instruction manual to make it easier.
- Approximate cost: $20
- Complexity: Medium-hard
- Number of spools: 1
- Where to find it: PrusaPrinters – with sensor and without
Ikea Samla
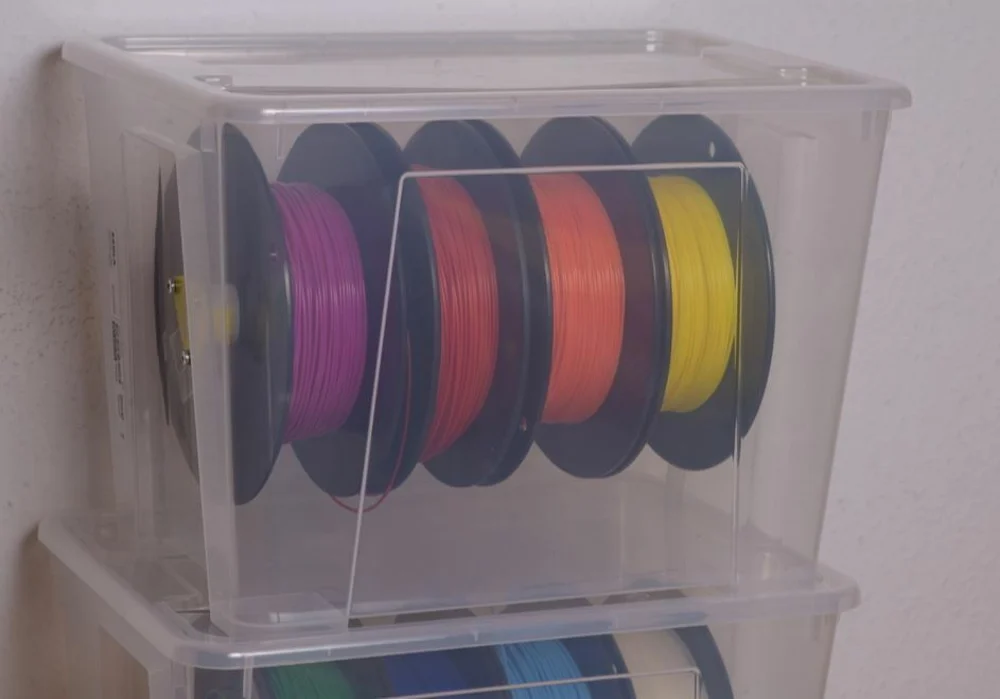
The Ikea Samla project upcycles another plastic container. The final product is a box that can store up to five filament spools (750 g) and, if you need more filament space, you can make multiple and stack them on top of each other. Of course, the main component for each box is an IKEA Samla box, but you’ll also need some other hardware including a few 3D printed parts, a 32-mm pipe, and an assortment of screws.
The container features a pipe, secured to the ends of the box with 3D printable parts, that goes through the center hole of each spool to allow them to spin easily. While the build steps on the project page are a little light, you can read through the project’s recorded Makes section for more build information. The designer also listed that they used a 0.3-mm layer height with a 20% infill density to make the 3D printable components
- Approximate cost: $30
- Complexity: Medium
- Number of spools: 5
- Where to find it: Thingiverse
Mihai’s DryBox
Another DIY dry storage solution is Mihai’s DryBox, a box that uses 3D printable parts along with a lot of other hardware, like a hygrometer, bearings, PTFE tubing, and more. You can check out the full bill of materials for this project along with each part’s purchase links on the designer’s Google Sheets document. While this project will likely be more difficult to make than other options due to the large number of parts you’ll have to gather and assemble, it’s also full of useful features that make it worth the effort.
The box has an access hatch on the top for easy access to your spool, designated space for silica gel to keep spools dry, bearings to allow the spool to spin, and holes for a PTFE fitting. The box also has clear side panels so you can see your filament and keep track of how much is left on the spool.
- Approximate cost: $50
- Complexity: Hard
- Number of spools: 1
- Where to find it: Mihai Designs
Source: https://all3dp.com/2/best-filament-dryer-diy-dry-box/