Discover the hidden features of the Cura slicer software. We’ll show you how to take your 3D printing to the next level for perfect prints!
The slicer is an essential software tool in any 3D printing workflow. It prepares digital models for 3D printing by ‘slicing’ them into horizontal layers that can be 3D printed.
Slicers are complex applications. They can take a 3D model of any shape or size and calculate a 3D printing strategy that will faithfully reproduce the model in the physical world. Slicers also do other things: they can generate patterns that fill a model’s interior geometry, so it has extra strength and rigidity. They can also generate support structures for model overhangs, so you get better 3D printing results. There’s a lot more they can do, which we will explore in detail below. While slicers are complex applications, a good slicer will strike a balance between complexity and ease of use.
This article will focus on Cura – one of the most popular slicing applications available today. If you’re familiar with FDM 3D printing, you’ve probably already heard of Cura – you might have even used it already. We’re going to take an in-depth look at it and explore why it’s popular, how to use it effectively, plus hidden features and settings you might not have known about.

AN INTRODUCTION TO CURA
Cura began as a software project by David Braam in the early 2010s. He named it ‘Cura’ because it was intended as ‘the cure’ to the overly complex and technically-involved slicing applications available at the time, many of which were command-line based and intimidating to novices.
Today, Cura is used by millions of people all over the world – both for personal and commercial 3D printing. Cura’s development is sponsored by Ultimaker in the Netherlands, and a new version is released roughly every two months, complete with new features, bug fixes, and lots of other improvements.
FREE AND OPEN SOURCE SOFTWARE
Cura is open-source software, which makes it free to use, distribute, and even modify. In fact, some of Cura’s most frequently-used features are contributions from the community.
Because Cura’s code is open source, other 3D printer manufacturers have copied and adapted the codebase to make versions suited for their own machines. ‘LulzBot Cura’ and ‘BCN3D Stratos’ are two examples of this – each is derived from Ultimaker Cura’s source code. If you’ve ever used either of these, you’ll notice a lot of similarities to Ultimaker Cura.
For simplicity’s sake, this article will only focus on Ultimaker Cura, which is the most well-maintained codebase of them all. We’ll also refer to ‘Ultimaker Cura’ simply as ‘Cura’ going forward – because it’s much easier to say!
Let’s take a look at Cura in more detail…
Why Is Cura Such A Popular Slicer for 3D Printing?
Cura stands out among the competition thanks to its interface, which strikes a balance between ease of use and control.
‘Recommended Mode’ makes Cura a top choice for 3D printing novices. Find pre-configured machine profiles for a vast range of popular 3D printers, load your 3D model, select a quality profile from the recommended settings, and start 3D printing quickly without having to learn lots of complex theory first.
For experienced users who need more control, Cura’s ‘Advanced Mode’ offers over 500 slicing parameters that can be tweaked individually, giving granular control over a range of 3D print characteristics. We’ll explore each of these modes in detail later.
Why else is Cura so popular today? Here are a few reasons:
It has an advanced slicing engine. Cura is more than just a fancy interface – an advanced slicing engine sits at the heart of it. The slicing engine makes it possible to 3D print your 3D model by dividing it into horizontal layers based on the settings you have selected. As of Cura 5.0, the slicing engine has undergone an overhaul, which contributes to more efficient slicing, better-looking 3D prints, and lots of other practical benefits.
It’s free and open-source software. Cura is open-source software, so there are no upfront costs, limited trials, or mandatory logins to use it – it’s completely free to use and always will be. It’s also possible for anyone to make changes to the source code in order to contribute new features and bug fixes or adapt it in any way you please.
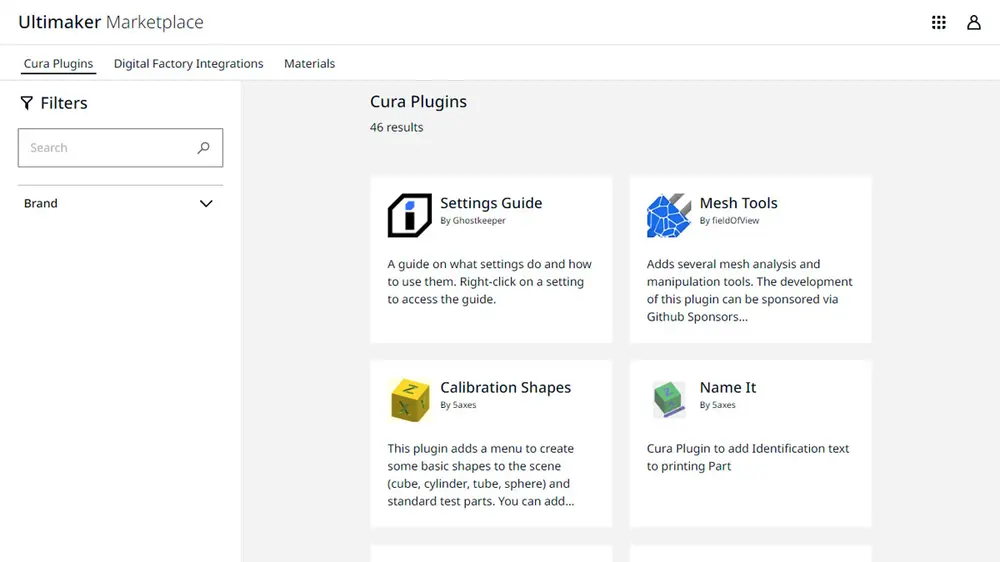
It’s extensible. Cura can be adapted for different workflows using plugins. For instance, a CAD plugin can push designs from CAD software straight into Cura, so there’s less time spent exporting and importing different file types between applications. Cura has a built-in ‘Marketplace’ that allows you to browse, discover, and download plugins in much the same way you might add extensions to your favorite internet browser.
It’s compatible with a wide variety of 3D file formats. Cura works with lots of common 3D model file formats out-of-the-box, including STL, 3MF, OBJ, and X3D. You can even add support for additional formats using plugins.
It’s frequently updated and improved. Cura has a regular update cycle, and it’s also possible to preview new features before release by downloading beta releases, which roll out roughly every two months. Each update brings new features and bug fixes, and because it’s open-source slicing software, anyone is able to contribute code that can be pulled into the next release for everyone to use.
It works on your desktop OS. Cura runs on Windows, Mac, or Linux. As long as your computer runs one of these operating systems, Cura will run on it.
A Typical 3D Printing Workflow
Where does the slicer sit in the 3D printing process? In the next section, we’ll explore a typical 3D printing workflow and where Cura sits within it.
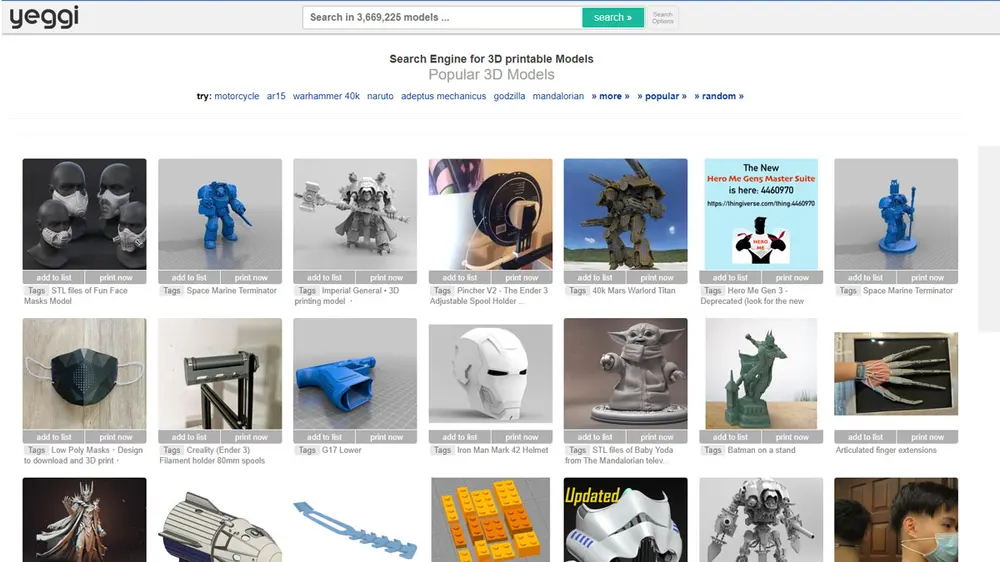
STEP ONE: DOWNLOAD OR DESIGN A 3D MODEL
A design is downloaded from the internet or created using a 3D modeling application.
- If you’re new to 3D printing, it makes sense to download a model instead of designing your own so you can get acquainted with how FDM technology works.
- If you’re a beginner looking for a challenge, you can create your own model in 3D modeling software. Tinkercad is an ideal CAD software for beginners.
STEP TWO: IMPORT THE 3D MODEL INTO THE SLICER AND PREPARE IT FOR 3D PRINTING
The 3D model is downloaded or exported in a format the slicer can recognize, such as STL or 3MF.
- Files made in 3D modeling software are made up of sketches, primitives, or splines, and these can be altered and edited if changes are needed.
- Files exported for 3D printing (such as STL or 3MF) represent the model’s geometry only, and are difficult to edit when changes are needed (although it’s not impossible!)
- STL is the most well-known 3D printing format, but 3MF is increasingly popular – besides model geometry, this newer format contains other characteristics, such as color and texture data.
STEP THREE: EXPORT G-CODE
The 3D model is imported into the slicer, where it is positioned, scaled, and rotated as needed. It is then sliced.
- You can tweak a range of slicing settings, such as layer height or infill density – two settings we’ll explore in detail further down.
- The slicing engine will process the geometry based on the slicing parameters set by the user and will output G-code – a machine language your 3D printer can understand.
What Does Cura Do? All About G-Code
The primary purpose of any 3D printing slicer is to generate instructions for your 3D printer. In most cases, it will output these instructions as G-code.
G-code is used for lots of different types of computer-aided manufacturing (CAM) equipment, including CNC mills, CNC lathes, pen plotters – and 3D printers, of course.
At this juncture, it’s not necessary to have an in-depth knowledge of G-code because the slicer takes care of everything for us. With that said, it can come in handy to know how G-code works, and some basic G-code commands. We’ll explore this below – and remember: don’t be intimidated if it goes over your head! Cura takes care of G-code for us.
UNDERSTANDING G-CODE
As you learn more about 3D printing, you may need to edit your own G-code manually.
Manually editing G-code can be used to customize start and end routines, adjust fan speeds, set different temperatures, and lots of other things. Manually editing G-code can also be handy when you need to troubleshoot problems with your 3D print.
Luckily, compared to other kinds of code, G-code is relatively easy to understand. It can be opened in your favorite text editor, and because the firmware in your 3D printer reads it line-by-line, it’s easy to see the order in which each command is executed. With some practice, you should be able to read G-code and understand what each command does.
Below is a snippet of G-code. A 3D printer will complete these commands in a matter of seconds:
G0 F7200 X19.698 Y28.262 Z0.36
G1 F1500 E0
G1 F1350 X22.467 Y26.175 E0.15654
What do these G-code commands mean? Let’s go through them in order:
Move the axes simultaneously at a speed of 7200 mm per minute. X axis go to 19.698 mm, Y axis go to 28.262 mm, and Z axis go to 0.36 mm
Set the extruder to 0 mm at a speed of 1500 mm per minute.
Move the axes and extruder simultaneously at a speed of 1350 mm / minute. X axis go to 22.467 mm, Y axis go to 25.568 mm, and extruder 1 go to 0.15654 mm.
If you’re confused, don’t worry! Being fluent in G-code isn’t essential to be able to 3D print an object, because Cura takes care of all this stuff for us. We’ve written an extensive G-code tutorial if you’d like to take your understanding of it further.
Enough theory – let’s get practical.
Download And Install Cura Software
Cura is available for Windows, Mac, and Linux operating systems. The easiest way to download it is from Ultimaker.com, but you can also find releases on their GitHub repository.
CURA DOWNLOAD AND INSTALLATION: WINDOWS
- Cura is supported by Windows 64bit operating systems
- On Ultimaker’s website, select Windows from the prompt to download the Windows Installer
- Double-click to open it when it’s finished downloading
- Proceed with the usual steps. When you reach the option to install additional components, you have a few decisions to make
- If you would like to use Cura as the default application to open 3MF, OBJ, or X3D models, or any other formats, check the corresponding boxes to proceed
- Once the installation is complete, you have the option to launch Cura from the installer
- You can also open Cura from the Start Menu launcher, or by clicking the application icon
TOP TIP:
If you already have an older version of Cura installed and are updating it, the installer will ask if you first want to uninstall the previous version. It will then ask if you want to remove your existing settings. Be careful what you click if you’d like to preserve your settings!
A lot of people will absent-mindedly click ‘Yes’ to remove their existing settings when the option is given. They will then soon discover all their carefully-configured machine and material profiles (i.e. their settings) are wiped when the installation is complete. Don’t be this person!
CURA DOWNLOAD AND INSTALLATION: MAC OSX
- Download the macOS software installer
- Double click the installer and run the installation wizard to complete the installation
- You’ll find Cura in your programs folder. Hooray!
CURA DOWNLOAD AND INSTALLATION: UBUNTU
- For Ubuntu, download the latest AppImage from the website
- Move the AppImage to a directory of your choice. Before it can be used, it must first be made executable
- Right-click the AppImage, click properties, click the ‘Permissions’ tab, and click the checkbox that says ‘Allow executing file as program.’
Alternatively, if you prefer the command line:
- Drop into a terminal
- Change the working directory to the directory the AppImage is in
- Run the following command:
chmod +x Cura-x.x.x.AppImage
(Where ‘x’ is the version number, e.g. ‘Cura-5.1.0.AppImage’)
- Now that the AppImage is executable, double-click it to open it. Cura will start!
If you prefer, you can execute the AppImage from the terminal:
- Change the working directory to the directory the AppImage is in
- Run the following command:
./Cura-x.x.x.AppImage
(Where ‘x’ is the version number, e.g. ‘Cura-5.1.0.AppImage’)
Cura is installed! Hieperdepiep Hoera!*
*(That’s Dutch for ‘Hip Hip Hooray’)
Cura Quick Start Guide
It’s time to start slicing. This section will walk through how to 3D print with Cura. We’ll cover setting up machine profiles, and some basic slicing settings for slicing your 3D print.
SET UP A MACHINE PROFILE IN CURA
Not all 3D printers are created equal. Your slicing software needs to know specific hardware details of your machine, such as the print area, build volume, nozzle size, number of extruders, and so on. If Cura doesn’t know these, it can’t reliably produce G-code for your machine, and your 3D prints will probably end up looking a bit rubbish.
This is where machine profiles come in. Machine profiles contain all the information about the machine we are using so Cura can slice objects reliably.
PRE-CONFIGURED MACHINE PROFILES
Cura includes a lot of pre-configured machine profiles, which makes setting up very easy.
Machine profiles for Ultimaker 3D printers are tested and maintained by the development team at Ultimaker. All other third-party machine profiles are tested, contributed, and maintained by the community.
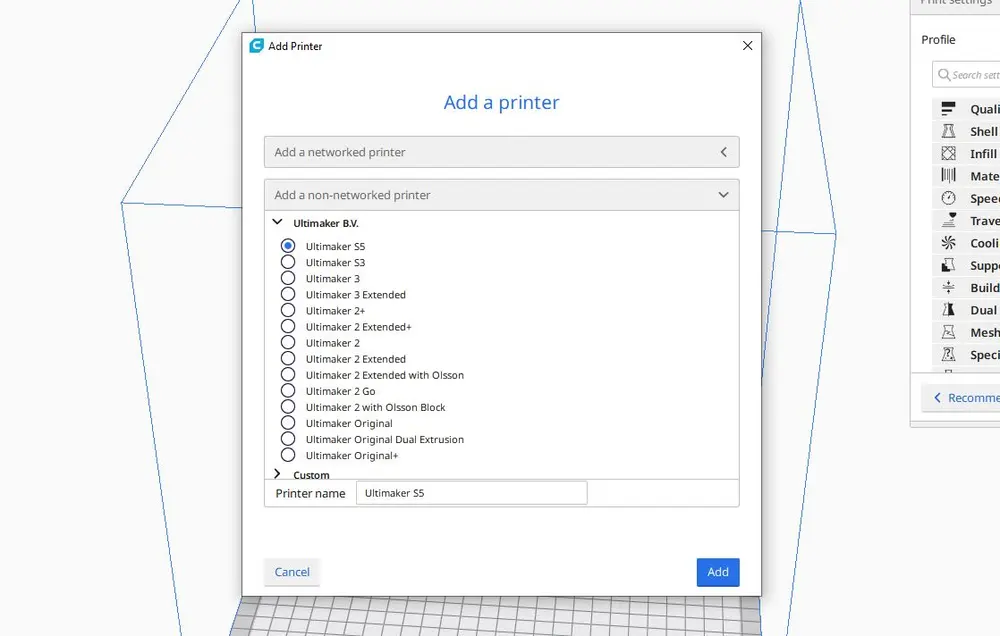
On the first start, you will be greeted with a setup wizard which walks you through setting up a machine profile, plus a bunch of other stuff.
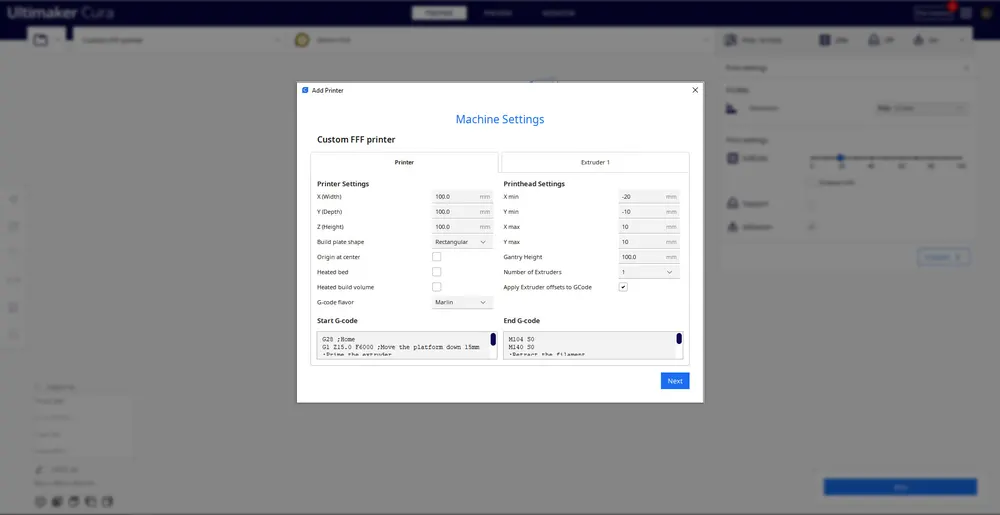
If you can’t find your printer in this list, you will need to set up a ‘Custom FFF Printer’, where you define the machine parameters manually.
TOP TIP:
If you don’t want to measure the printer manually, a good place to find all the specifications is on the manufacturers website. They may even have a machine profile that you can import manually so you can avoid boring data entry tasks! It’s also possible to define your own machine profile in code.
IMPORTING A 3D MODEL TO CURA
Congratulations, you’ve set up your machine profile! Now it’s time to start slicing some 3D models.
As we discussed in an earlier section, the slicing process begins by importing a model – either something you have designed, or something you have downloaded from the internet. This needs to be in a format Cura can recognize, such as STL, OBJ, X3D, or 3MF. If you downloaded your model from the internet, it’s highly likely it will be an STL.
To import a model, you can either click on the floating folder icon in the top left, or select ‘File > Open File(s)’ from the menu. Select a compatible file from your computer and Cura will import it into the scene.
USING CURA’S INTERFACE
THE SCENE
The scene is the 3D view of your model in Cura. You can orbit, pan, zoom, and rotate around your model, reposition your model, or analyze the printing strategy layer-by-layer to make sure it will print as expected.
LAYER VIEW
Layer view is the default view in Cura, and as the name suggests, it shows each layer of the model when it is sliced. If you see a gray shadow outline of your model, this means it hasn’t been sliced yet. To slice the model, click ‘Slice’.
On the right-hand side of the scene is a vertical slider that can be used to navigate through each layer of your print. This is a useful ‘pre-flight check’ to see if your print is going to work as you expect it, or if you need to change some settings.
You can drag the top and bottom handles to view a range of layers. You can also use the arrow keys to navigate through each layer. If you hold shift and use the arrow keys, the slider will advance ten layers instead of one.
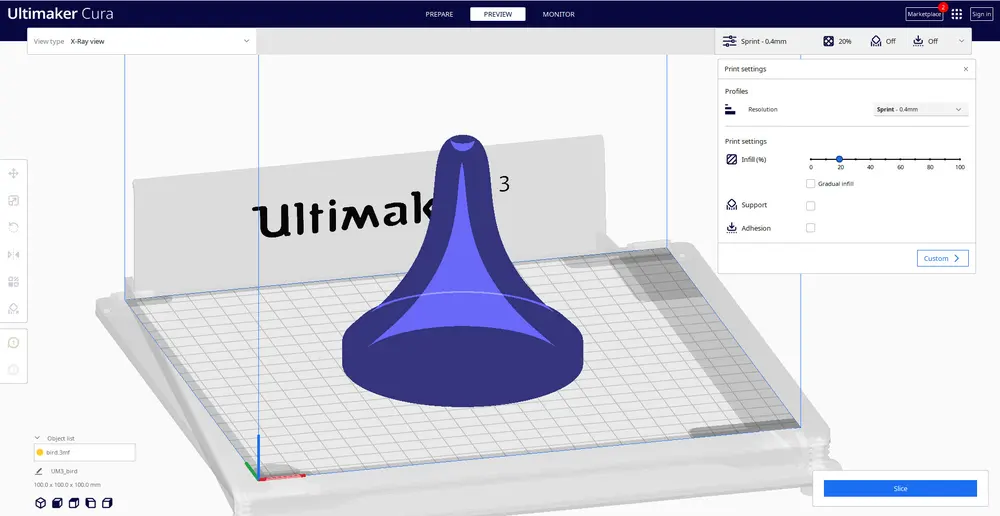
X-RAY VIEW
X-ray view lets you view the internal structure of your model. It comes in handy if your print has manifold edges – these are edges that intersect other edges. X-Ray view helps you see what needs to be reworked.
PAN, ZOOM, AND ORBIT
Middle click and drag to pan around the scene. Scroll the mouse wheel to zoom in and out. The scene will zoom towards the cursor’s screen location.
Orbit around the scene to check the model from every angle. In Windows, hold the right mouse button and move your mouse around to orbit around the scene. If you’re using macOS or Linux, press the left mouse button and drag to orbit. You can also use the keys on your keyboard if you prefer.
IMAGE
QUICK-CHANGE VIEW BUTTONS
If you want to change the view quickly, you can use the quick-change view buttons to jump to top, left, right, front, and isometric views of the scene.
MOVING, SCALING, AND ROTATING
A model’s orientation can be the difference between a successful 3D print and a print failure.
Maybe you want to print an odd geometry but avoid using support material. Maybe you need to arrange a lot of different objects on the build plate. Or maybe your model is far too large in the scene, and you need to scale it down to be able to 3D print it. Cura can do all of this and more.
Click your model. A blue contour will appear around it to show it is selected. Now you can start to manipulate it. The toolbar on the left has all the options you need to do this.
Click the rotate button, and you’ll see some rotation hoops appear around the model. Click an arrow within the hoops to rotate the model on the respective axis by 90 degrees. Drag the hoop to move the model an arbitrary amount. If you hold shift as you drag, it will move a more gradual distance.
If you need to revert the model’s position, right-click the model and select ‘Reset all model positions’.
Maybe you want to print more than one model. With the model selected, right-click and select ‘Duplicate’. Cura will automatically reposition the models. If there’s enough space to print two or more, then all models on the platform will display in color. If there isn’t enough space, the model will be grayed-out.
SETTINGS PANELS IN CURA
Cura’s user interface has several panels. The ‘Printer Settings’ panel is on the left, and this is where machine profiles are selected and edited. If you use Cura with several 3D printers, you can quickly and conveniently switch between different machine profiles here using a dropdown menu.
In the middle of the interface, you’ll find the ‘Material and Temperature Settings’ panel, where you can quickly select the materials and nozzles that your printer is using.
The part of Cura’s interface you’ll probably use most frequently is the ‘Print Settings’ panel on the right, which lets you select different settings to control the quality of your 3D print, enable or disable adhesion and support material, and change the infill density of the print.
The print settings panel has two modes: recommend mode and custom mode. Recommended mode has the most frequently used settings to get printing quickly. Custom mode has over 500 settings to tweak for granular control over your 3D print process.
Using Recommended Mode In Cura
SETTING THE LAYER HEIGHT IN CURA
The Layer Height slider in Cura controls the height of each individual layer. Layer height varies depending on the nozzle size you are using.
You need to make a trade-off between quality and print speed and pick your own sweet spot.
Most 3D printers use a 0.4 mm nozzle, so a layer height of 0.2 is usually the default, and gives good results.
The smaller the distance between layers, the better the print quality, but the longer print will take. On the other hand, a larger layer height will print faster but with reduced quality.
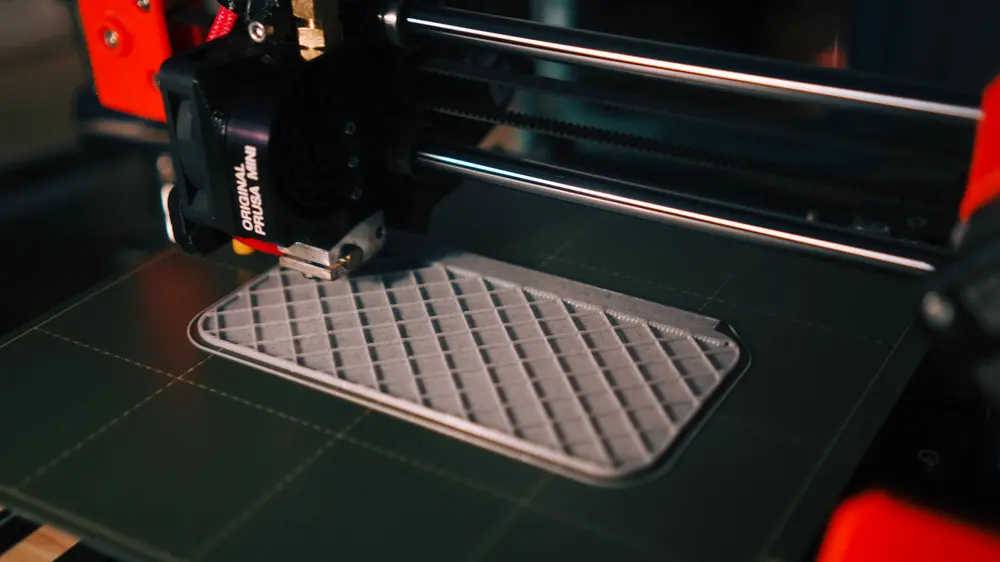
SETTING INFILL DENSITY IN CURA
You can change the density of infill to make your 3D print lighter or denser.
Setting an infill density of 0% means you don’t want any infill, and the print will be hollow. Anything in the range of 10% – 40% is known as a light infill. The 50% – 90% range is called a medium infill. Setting the slider to 100% will produce a model that is completely solid. 20% infill is a good guideline.
USING GRADUAL INFILL IN CURA
When the infill slider is set to above 0%, an ‘Enable Gradual’ checkbox appears. This is gradual infill, which will print low-density infill at the base of the model and gradually increase the amount of infill towards the top of the model.
USING HELPERS IN CURA
Helpers are temporary structures that will support your print while it is printing and can be removed later. These are controlled by two checkboxes: ‘Generate Support’ and ‘Build Plate Adhesion’.
If ‘Generate Support’ is selected, support will be generated to support sections of your model that overhang. 3D printing is a bottom-up process, so material placed under parts of the model that overhang will prevent these sections sagging, for a better-looking final result.
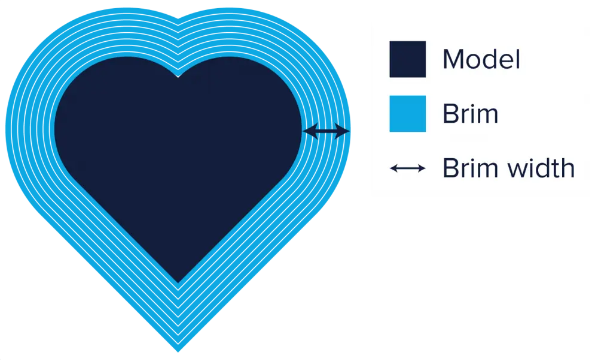
Adhesion increases the surface area of the first layer of the print. Some plastics like ABS will warp and pop off the bed mid-print, so a brim is an adhesion method that will minimize the chance of this.
If this is your first print, it’s recommended to switch adhesion and support on. As a rule, if your 3D model has plenty of contact with the print platform, then it’s safe to switch to disable adhesion. If your model doesn’t have overhangs, then it’s safe to switch off Support in Cura’s Helper Settings.
HOW TO SLICE IN CURA
The model is now ready to print. Click ‘Slice’ and Cura will process the model into G-code.
At this point, you need to decide how to get it onto your 3D printer.
Some 3D printers have network connectivity, so you can send G-code directly to the printer over your local network – or even a cloud connection. Other 3D printers use removable media such as SD cards or USB sticks. Cura can manage each of these scenarios.
‘Save to Disk’ will save G-code to your computer’s hard drive.
‘Save to Removable Drive’ will save to an SD card or USB stick if one is detected.
‘Print Over Network’ will send G-code directly to a networked machine if one is detected.
‘Print via Cloud’ will send G-code over a cloud connection – but this feature is limited to Ultimaker 3D printers and will only show if a compatible machine is detected.
‘Print with OctoPrint’ will send G-code directly to OctoPrint if you have the Cura OctoPrint plugin installed and an OctoPrint instance is detected.
Choose whatever method you want, and it’s time to start 3D printing!
Using Custom Mode In Cura
Recommended mode in Cura will produce decent prints, but as you gain experience with 3D printing you might encounter some limitations with it.
For example, you might find imperfections with the surface finish of a print. In some cases, the surface might contain a seam along the edges, known as a ‘Z-Seam’.
Perhaps your printer nozzle oozes material during travel moves, leaving ugly blobs of filament in places where there shouldn’t be any.
There are plenty of other problems that you might encounter when using the basic settings in Cura: the print speed is too slow, the finished print isn’t durable enough, the bottom surface is warped, and so on.
Each of these problems can be solved by using Custom Mode in Cura.
To access Cura’s Custom Mode, click ‘Custom’ in Cura’s settings panel.
Custom settings are divided into nine sections – Quality, Shell, Infill, Material, Speed, Cooling, Support, Build Plate Adhesion, and Special Modes. Each section contains a few settings under them. You can even modify which settings are visible so you only show the ones you use, and hide others. Some of them are actually hidden by default.
If you want to find a setting quickly, there is a convenient search field to search for the setting you need.
ENABLING HIDDEN SETTINGS IN CURA
To show hidden settings, click the gear icon next to a section header. A window will pop out, which will show all of Cura’s Custom settings. There are about 150 different settings here, but don’t worry, you will need to use only a handful of them to solve the most common problems.
In order to make a hidden setting visible, simply check the checkbox corresponding to that setting, and then close the window. From now on, this setting will be visible anytime you access the Custom settings panel.
USING MATERIAL PROFILES IN CURA
Much like machine profiles, material profiles in Cura contain all the ideal settings to 3D print with a given material. Not every 3D printer or material is made in the same way, so there are lots of variables to account for – however, using an existing material profile as a base is a good starting point to tweak different settings to get your ideal material setup. To tweak settings, you can select a material profile and use Cura’s Custom Mode.
In the following sections, we will dive into some of Cura’s custom settings and explain how you can use them to improve print quality and solve some common 3D printing problems.
Control Print Quality in Cura – Enhance The Resolution Of Your 3D Prints
We’ve encountered this setting before in Recommended Mode, although this time it’s not a slider – it’s an input field where you can specify an exact number.
The section below explores the influence different layer heights can have on your 3D prints.
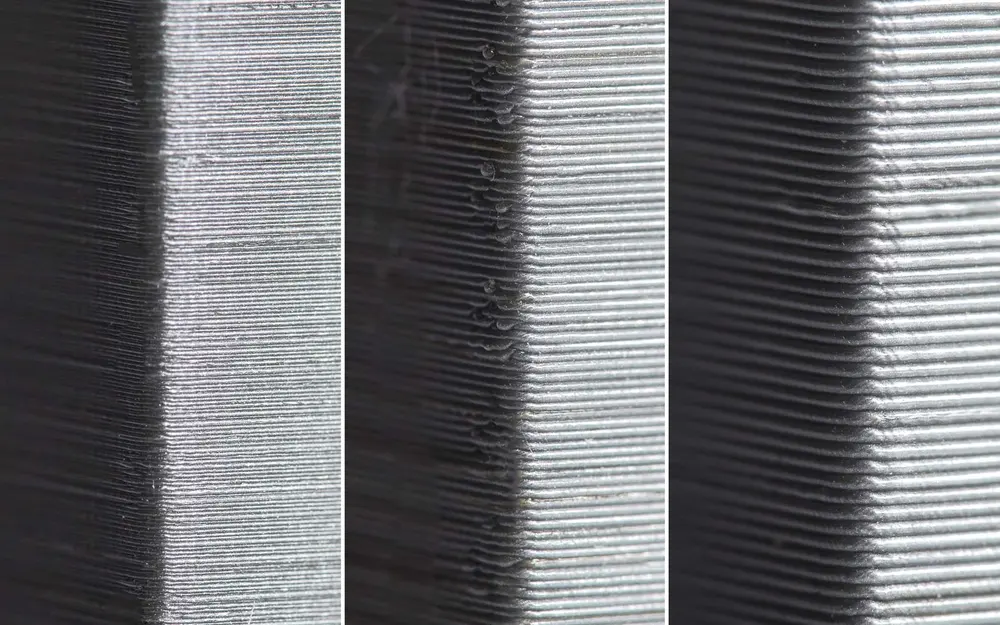
The Layer Height setting controls the height of each individual printed layer in millimeters.
The general rule of 3D printing layer height: the finer the layer height, the better the print quality. However, setting a finer layer height value means the print is going to take longer to complete.
The ‘correct’ layer height depends on the application your 3D print will be used for. If it is a practical object, it probably doesn’t need to look beautiful, but it might need to be robust. If it’s intended to be an ornament or visual prototype, you probably want it to look nice. You need to make a trade-off between quality and print speed and pick your own sweet spot.
If you’re using a 0.4mm nozzle, generally, a 0.2mm layer height will produce decent-looking prints. If you need finer print quality, 0.15mm should produce something more aesthetically pleasing. If you want really fine print quality, 0.06mm is about as fine as most 3D printers go, but this depends on the mechanical setup of a machine. Also, note a print at this layer height can take 24 hours or more to complete!
Walls and Gap Filling In Cura – Increase The Outer Strength Of Your 3D Print
Wall Thickness adjusts the thickness of walls in the horizontal direction. Note that it doesn’t have an influence on the top or bottom surfaces of your print – this is controlled by the ‘Top/Bottom Thickness’ setting.
The Wall Thickness value should be a value that’s a multiple of the nozzle size of your printer. For example, if the nozzle size of your printer is 0.4 mm and you set a wall thickness of 1.2 mm, then the printer will essentially print three walls, where each wall has a thickness of 0.4 mm.
In general, a wall thickness two or three times the nozzle diameter is sufficient. Wall thickness is a useful setting to play with if you want to decrease print time – you can have thicker walls and turn off infill altogether, saving a significant amount of printing time and material.
HORIZONTAL EXPANSION – COMPENSATE FOR SHRINKAGE
All plastics shrink as they cool. Plastics such as PLA only shrink a little when printed, while plastics such as ABS or Nylon shrink quite a lot.
When you are printing an object that needs to have good dimensional accuracy, shrinkage can be a big frustration because it can cause your print to lose its dimensional accuracy.
The Horizontal Expansion setting will allow you to adjust the size of your 3D print in the X/Y dimension to compensate for the change in size that happens when the plastic shrinks as it cools.
A positive Horizontal Expansion value will increase the dimensions of your model. You should use a positive value when your printed model is smaller than you expected – which is common with shrinkage.
A negative Horizontal Expansion value will reduce the dimensions of your model. Use a negative value when your printed model is larger than expected.
Z-SEAM ALIGNMENT – HIDE UNSIGHTLY 3D PRINT ARTIFACTS
A Z-Seam is where the start and end of a printed layer join together, forming a small blob. As the print progresses, these can form a prominent artifact along the Z-height of your 3D print.
Using the Z-Seam Alignment setting lets you choose where in the 3D model surface this line appears. It can even attempt to get rid of the seam altogether by hiding it within corners of the model’s geometry.
Z-SEAM ALIGNMENT CHOICES
There are four choices for Z-Seam Alignment: ‘Shortest,’ ‘User Specified,’ ‘Sharpest Corner,’ and ‘Random.’
‘Shortest’ is Cura’s default value. When selected, the software instructs the printer to start printing a new layer from the endpoint of the previous layer. This often leads to a visible seam, so you may want to avoid this option.
‘User Specified’ lets you specify exactly where on the model surface you want the Z-Seam to appear. When selected, two more settings become available: ‘Z-Seam X’ and ‘Z-Seam Y.’ These Cura settings correspond to the X-Y coordinates of the Z-Seam.
‘Sharpest Corner’ instructs the printer to start printing each layer from the sharpest corner on the model’s surface. A corner can cover up a Z-Seam in many cases, but if your model doesn’t have sharp corners, this option isn’t much use.
The ‘Random’ Z-Seam setting will start each layer at a random position. This will eliminate the seam completely but will also lengthen the print time as the print head will require additional time to move to a new position between each layer. You might also notice random blobs on your print where the lines join.
FILL GAPS BETWEEN WALLS – PREVENTS GAPS IN THE 3D PRINT SURFACE
Sometimes when you print thin walls with Cura, the areas between the inside and the outside of the wall are left unfilled. This might happen when the width of your wall isn’t divisible by the nozzle diameter value you’re using.
Cura leaves the inside and outside walls unfilled to prevent putting too much plastic into that section of the object, but it also means that gaps can show up in the print.
Automatic Gap filling algorithms in Cura has been significantly improved since Cura 5.0, although it’s still useful to know the right settings to change if you’re not getting the results you need.
The ‘Fill Gaps Between Walls’ setting lets you choose how Cura handles these gaps. This is another setting hidden by default, so it will need to be enabled first.
ALTERNATE EXTRA WALLS – ADD STRENGTH TO YOUR 3D PRINTS
This setting lets you add strength to the outer walls without putting too much burden on print speed. We’ve already discussed how you can make a model stronger and more durable by adding more walls (i.e. increasing wall thickness to be a higher multiple of the nozzle diameter). However, the thicker the wall, the more time it takes to print it.
Cura offers a compromise between wall thickness and print speed via the Alternate Extra Wall setting. When enabled, Cura will add one extra interior shell to every other layer. For example, if your print is set for two nozzle diameters, Alternate Extra Wall will add an extra nozzle diameter on every odd-numbered layer.
‘WALL SPEED’ HELPS YOU IMPROVE SURFACE FINISH
If you aren’t satisfied with the surface finish of the model, ‘Wall Speed’ might be worth a try. This setting controls the speed the print head moves when printing walls.
There are two separate sub-settings: ‘Inner Wall Speed’ and ‘Outer Wall Speed’. The default outer wall speed for PLA is 30 mm/s. Setting the outer wall speed a little lower than the default (try reducing in steps of 10 mm/s) can improve the surface finish of the model. Of course, decreasing the outer wall speed means that you are signing up for longer print times as well – so keep this in mind.
Different Infill Patterns In Cura – Increase Model Strength, Reduce Material Consumption and Print Time
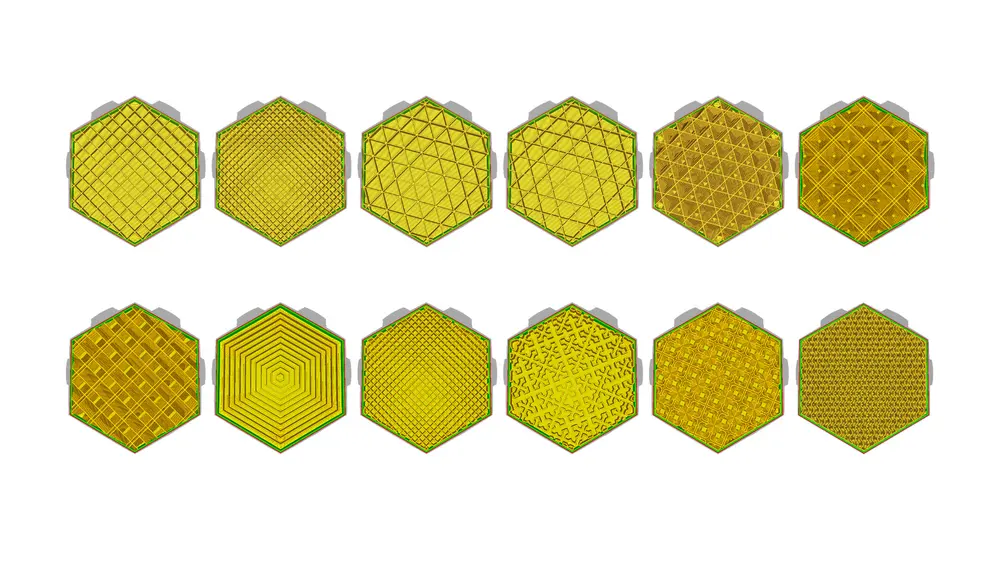
- Line
- Zig Zag
- Grid
- Triangle
- Tri-Hexagon
- Cubic
- Quarter Cubic
- Cross
- Concentric
- Gyroid
- Octet
- Lightning
Grid, Triangle, Tri-Hexagon, Cubic, Octet, Quarter Cubic, Cross, and Concentric Patterns are fully-printed on every layer. Gyroid, Cubic, Quarter Cubic, and Octet infill change with every layer to provide a more equal distribution of strength over each direction.
Line and Zig Zag infill swap direction on alternate layers, reducing material cost.
Lightning infill tries to minimize the infill by only supporting the ceiling of the object.
Different infill patterns can be used to achieve different mechanical properties, which we explore below.
WHICH INFILL PATTERN SHOULD I USE IN CURA?
When choosing an infill pattern in Cura, consider the following:
- Is the part going to be used for mechanical purposes?
- Does the model have a large ceiling?
If the part is going to be used for aesthetic purposes, you might get away with using thicker walls and not using infill at all. However, if the same 3D model has a large ceiling, it will require support to prevent the ceiling sagging. Lightning or Concentric infill might be good choices for this situation because they use minimal material, are fast to print, and provide support internally.
If the part needs the model to have reasonable strength, even if you are not going to use it for mechanical purposes, then the best option is to select a 2D pattern such as Grid, Lines, or Triangles.
Line infill provides the least amount of strength but does not consume a lot of material and prints fast.
Grid infill consumes material and can be slow to print, but has an excellent strength-to-weight ratio. Other types of Infill can create ‘bulkheads’ inside your model, but Gyroid does not, making it a good choice if you want to try things like filling a 3D print with epoxy resin for extra strength. It’s also quite hypnotic to watch print!
Triangles offers great strength for high lateral loads, so this is a good choice when you need good wall strength for long, slender structures.
If the model is going to be used for mechanical purposes, a 3D pattern such as Cubic or Tetrahedral infill is worth considering. Both of these patterns provide excellent internal support and near-isotropic mechanical properties.
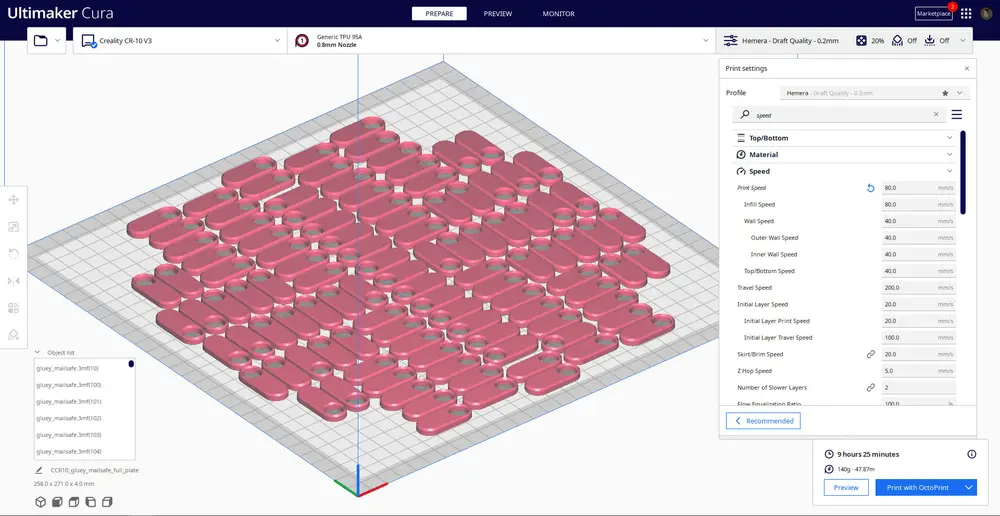
Control Print Speed In Cura – Improve Print Time and Print Quality
Printing something simple like a coffee mug can take several hours. Long print times can be very frustrating at times. Therefore, Cura offers a setting to control the overall print speed and several other sub-settings to control the print speed of special structures like walls, infill, support, and so on.
Cura’s ‘Print Speed’ setting can be found under the ‘Speed’ section of the Custom settings.
This setting refers to the speed at which the printer head moves during the print. The default value is 60 mm/s.
To reduce print time, simply increase this speed. However, you should take note that increasing the print speed affects other things as well, and you should make necessary adjustments accordingly.
- When the print head travels faster, the filament might not have sufficient time to melt as it comes out of the nozzle, which can result in brittle models. You can usually solve this problem by increasing the extruder temperature so that the plastic can melt properly.
- Faster print speeds can compromise quality. This is because a faster print speed will cause the print head to vibrate, which can show up as artifacts on the 3D print in the form of ripples on surfaces.
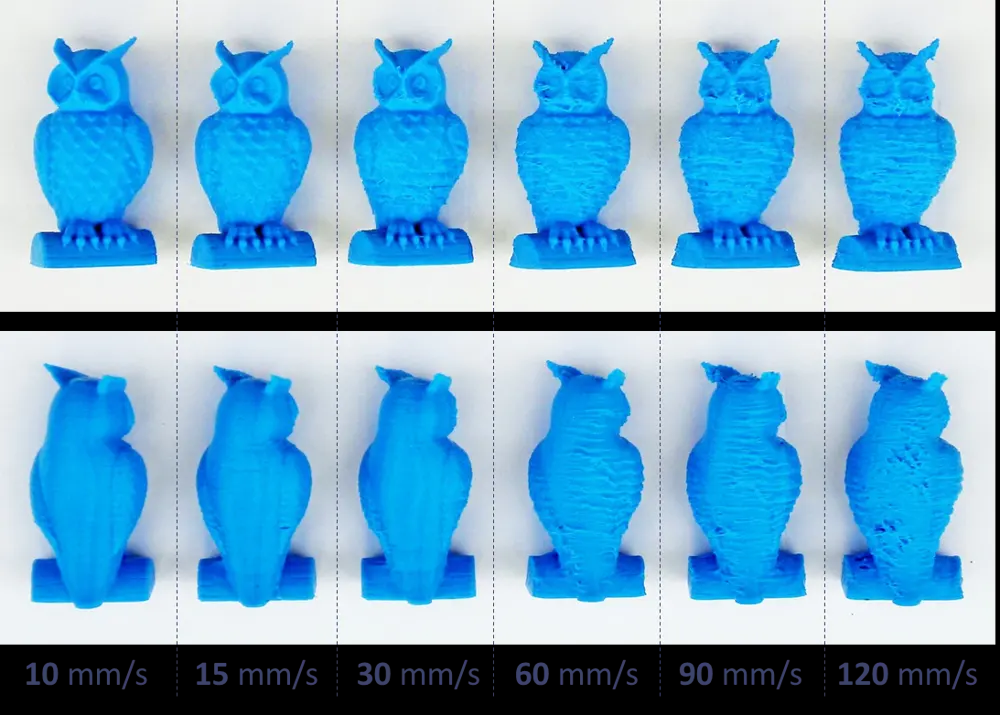
OPTIMIZING PRINT SPEED IN CURA
To find the optimum speed in Cura, it’s recommended to increase speed in steps of 5 mm/s.
Try 65 mm/s, check if you like the result. If you do, go up to 70 mm/s. At some point, the print quality will suffer, so you should choose a print speed that’s 5 mm/s below this point.
If you find you can’t increase speed without losing quality, try increasing the ‘Infill Speed’ setting. This setting controls the speed at which the Infill is printed without affecting the print speed of other parts, like the walls or top/bottom surfaces of the model. Since infill won’t be visible in the finished 3D print, the surface quality isn’t important.
In some situations, you might need to decrease print speed. If you are printing highly-detailed models, a reduced print speed will help to reproduce fine details accurately. There are also filaments such as PET+ or Flex PLA, which require lower print speed settings. Filament manufacturers will often have a recommended print speed for specialist filaments listed.
To slow down the print speed, simply lower the value of the ‘Print Speed’ setting in Cura. For highly detailed models, start lowering the print speed by 10mm/s, then adjust it up or down in increments of 5 mm/s as necessary.
Prevent Excessive Cooling by Using the Fan Speed Setting
Extruded filament is malleable for a surprisingly long time after it has left the heated nozzle, so many 3D printers use cooling fans to speed up the cooling process. This causes the extruded filament to harden as it’s laid down. A good cooling system also prevents any distortion to the previous layer as a new, hot layer is laid down.
Cura enables cooling by default, except for the first layer. This is because cooling the first layer would interfere with build plate adhesion, which relies on heat in most cases.
When cooling is turned on, you might find the nozzle will fail to reach the temperature required to melt material. This is a case of excessive cooling, and when this happens, it will trigger a failsafe in your 3D printer’s firmware that will halt the print.
Cura offers a way to solve excessive cooling problems via the ‘Fan Speed’ setting. The value of this setting is set as the percentage of the fan’s maximum speed. If you need to adjust the setting in Cura, start by modifying the value to 80%. Be aware that for values below 20%, the fans may not have enough power to turn on.
Using Cura’s ‘Minimum Layer Time’ Setting To Prevent Distortion of Small 3D Printed Layers
For really small prints, a layer can print so fast that the fans don’t have time to cool it before the next layer starts. When this happens, the layer will likely warp due to the heat of the next layer on top of it.
The ‘Minimum Layer Time’ setting in Cura can help solve this. It allows you to give the fan more time to cool down very small layers. The value of this setting is the minimum time for a layer to print. For very small layers, Cura will slow down the print speed so that the layer takes at least the minimum time to finish printing.
The default value for this setting is five seconds. If you are running into distorted small layers, start by increasing it to ten seconds, then continue to make adjustments in five-second increments as required.
Disable Cooling for Filaments that Don’t Need it
Some materials like Nylon, Polycarbonate, and PET+ need to be printed in an enclosed environment to stop contact with cool air flow – which causes warping. If cooling is enabled while printing with these materials, the model will warp and distort in unexpected ways, and the print will fail.
It’s strongly advised to turn off cooling in Cura when printing materials like these. Simply look for the ‘Enable Print Cooling’ setting under the Cooling section and uncheck the checkbox. Alternatively, use a material profile that is tested for the material you are using.
Use ‘Build Plate Adhesion’ To Prevent Warping and other Cura Settings To Prevent Warping
When polymers are 3D printed, they expand slightly before contracting as they cool. If material contracts too much, this causes the print to warp, or lose its adhesion from the build plate entirely. Some materials shrink more than others, for example: ABS, PET+, PC, and Nylon have a higher shrinkage factor than PLA.
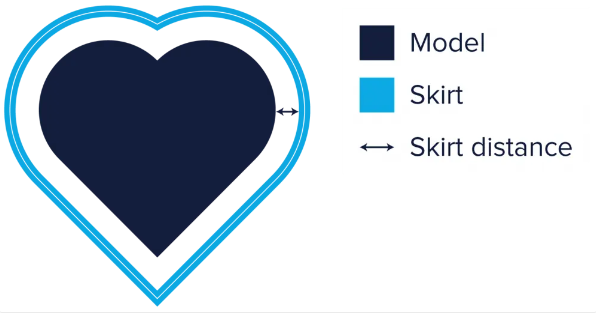
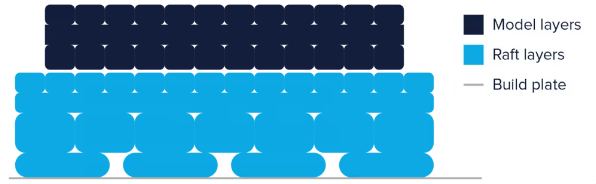
Cura offers some settings to help prevent warping. The most important of these is the ‘Build Plate Adhesion Type’ setting, found under the ‘Build Plate Adhesion’ section. There are three options for this setting – ‘Skirt,’ ‘Brim,’ and ‘Raft.’
‘Skirt’ is the default option in Cura, and works by printing some lines around the perimeter of the base of the print. It’s also useful as it helps to prime the extruder.
OTHER WAYS TO PREVENT WARPING IN CURA
- A thicker first layer can help to improve adhesion. You can make the first layer thicker by changing the ‘Initial Layer Height’ setting.
- It’s important not to set the initial layer speed too high, as the material may stick to the nozzle and get dragged around with it. To slow down the first layer, reduce the value of the ‘Initial Layer Speed’ setting.
- The ‘Number of Slower Layers’ setting can help improve build plate adhesion. This setting will slow down the bottom layers and defines the number of layers it will take the printer to reach the set print speed. The speed, based on the initial layer speed and print speed, will increase over the number of layers specified. A higher value will reduce the chance of your print warping, but note this setting can also significantly increase print time.
- The print head cooling fans are usually turned off (fan speed = 0) for the first layer to ensure optimum build plate adhesion. Cura offers another setting called ‘Regular Fan Speed At Height’, which turns on the fan gradually, from 0 to maximum power at the specific height. In this sense, this setting is equivalent to ‘Number of Slower Layers’, but for cooling. Try a value slightly higher than the default and this should improve plate adhesion.
FIX HARDWARE ISSUES FIRST
Warping can happen for many reasons, such as bad calibration, uneven build surfaces, or an insufficiently heated build plate. Not all of these issues can be addressed by the slicer, so you should ensure that you have fixed these issues before you alter settings in Cura.
Prevent Pillowing by Using a Combination of Shell, Cooling and Quality Settings
Sometimes, top surfaces of a print have openings or show small bumps, which is known in 3D printing speak as ‘pillowing’. This issue stems from incorrect Shell, Cooling, or Quality settings. Below we’ll explore how to remedy it.
If the material does not cool properly, it may sag or curl at the points it crosses infill lines. This creates an uneven surface for the next layer, ultimately leading to bumps on the top surface.
It seems thinner layers have the tendency to curl up. If increasing ‘Top Thickness’ doesn’t solve the problem, try increasing the Fan Speed.
Prevent Stringing by Using a Combination of Material and Print Settings
Stringing is a common 3D printing problem where the nozzle oozes plastic from one point to another during a travel move.
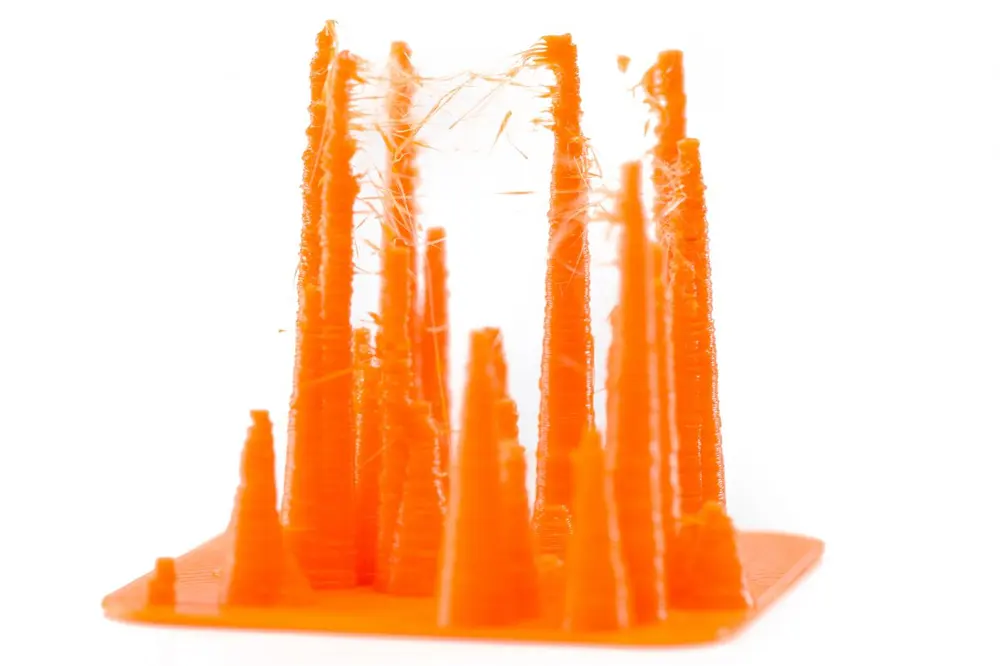
To counteract stringing in Cura (or any other slicer), the extruder needs to have retraction moves enabled. Retraction is the opposite of extrusion: instead of pushing filament out of the nozzle and extruding it, filament is pulled back through to reduce the extrusion pressure in the nozzle.
Enabling retraction on its own isn’t necessarily enough to fix this issue. Sometimes the retraction distance needs to be increased. The retraction distance is the distance the extruder will retract filament on a retraction move, so if you are still experiencing stringing on your prints, a higher retraction distance will counteract this.
TWEAKING TEMPERATURE AND SPEED TO PREVENT STRINGING IN CURA
Printing temperature plays a big role in nozzle oozing. If the temperature is too high, filament will liquify and drip from the nozzle. Reducing the print temperature can help, but it’s difficult to say what the ideal printing temperature is as all machines and materials are different. It’s recommended to reduce the temperature in steps of ten degrees until you get results you’re happy with.
Support Structures – Improve Prints With Overhangs
Many 3D models have overhangs, which is where features of the model extend outwards so there’s no material underneath to support them. These 3D models require additional support structures to print successfully. Cura can generate these support structures automatically in most cases. When the print job completes, the support structures can be removed by breaking them off the model.
- Is the support structure correctly placed and strong enough to provide the required stability during the print job?
- Is the support structure easy to remove?
- Does the support structure negatively affect the surface quality of the final print?
Cura offers a host of support settings under the ‘Support’ section of Custom mode. Using these settings, it is possible to create support structures that provide the necessary stability, are not too hard to remove, and that do not affect the surface finish of the model. Let’s dive in and see how to make adjustments.
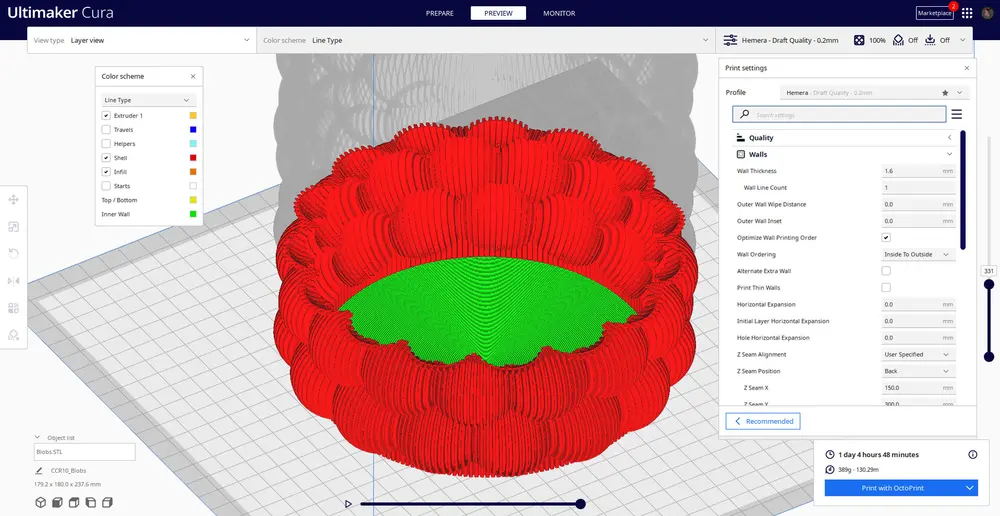
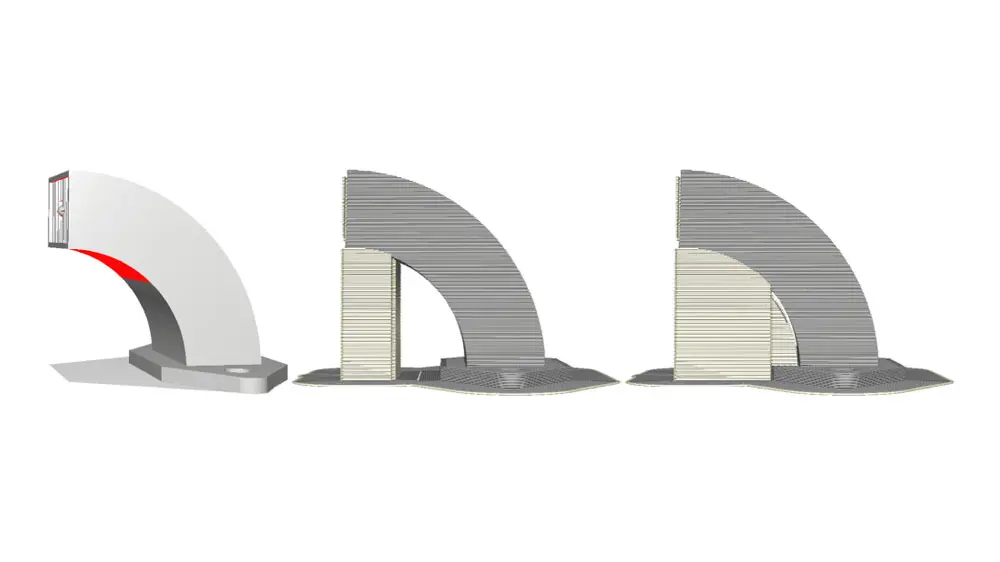
GENERATING SUPPORT IN CURA
Cura makes generating support structures easy. Once you have imported your model and positioned it, look out for sections of the model that are highlighted red (you may need to orbit around the model to see these). Red-highlighted sections are overhangs, and they will need support material beneath them to print successfully.
To generate support material, click the ‘Generate Support’ checkbox under the ‘Support’ section. Cura will automatically generate support material beneath the red sections.
Cura does not show the support structures until slicing has taken place. Support material (lines and volume) will be displayed in a different color. Move the layer slider up and down to see where Cura has generated support structures.
HOW TO CONTROL WHERE SUPPORT IS GENERATED IN CURA
When you enable support in Cura, a ‘Placement’ setting appears in the ‘Support’ section. This setting lets you control where the support structures are placed. There are two options: ‘Everywhere’ (which is the default option) and ‘Touching Buildplate’.
When ‘Everywhere’ is selected, Cura generates structures wherever necessary.

If ‘Everywhere’ is selected for a complicated model, it may end up encased in support material. To avoid this, you can change the setting to ‘Touching Build Plate’. This will create support structures underneath overhanging sections of the model only between the build plate and the model.
The ‘Enable Support Roof’ setting can improve the surface finish of overhangs, but at a cost.
Since a model’s overhangs are always printed on top of support structures, you don’t always get the best surface finish for these parts. Using the ‘Enable Support Roof’ setting can help with that.
A support roof is a dense skin at the top of the support structure which does not compromise the surface finish of overhangs. When you enable this setting, you will get a better finish quality. This improvement comes at a cost, as it makes the support structures harder to remove. Only use this option only if the surface finish of the overhang is critical to the function of the finished part.
PREVENT SUPPORT STRUCTURES FROM DAMAGING OUTER WALLS
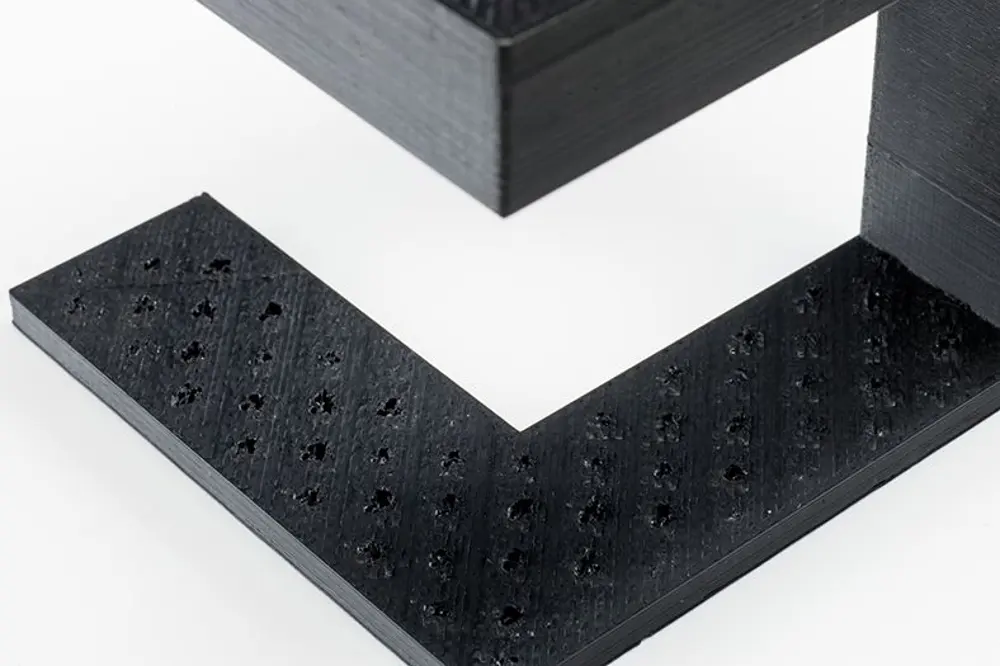
Sometimes, the support structures are built too close to the model’s outer wall and leave marks on the model’s outer surface. You can prevent this from happening by using the ‘Support X/Y Distance’ setting under the ‘Support’ section.
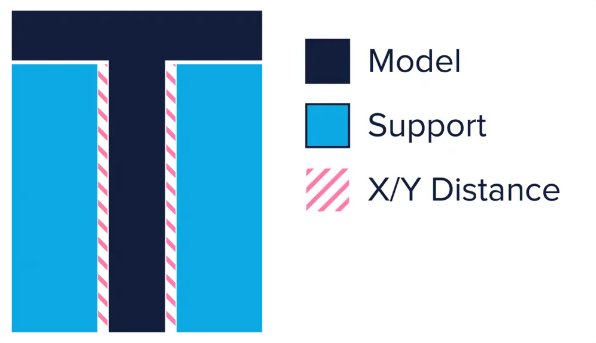
The ‘Support X/Y Distance’ setting in Cura controls the minimum allowed distance between the model’s vertical walls and a support structure in the XY plane. If your support structure is damaging the walls or sticking to them, you can increase the value by increments of 0.2 mm until the walls come out smooth.
Make sure there are no small overhangs sticking out of the outer walls that will go unsupported if you put a little bit of distance between the support and the walls. If small overhangs exist, you might even have to decrease the XY distance instead of increasing it. Otherwise, you will get a failed print.
MAKE SUPPORT STRUCTURES EASIER TO REMOVE USING THE ‘Z DISTANCE’ SETTING
To break support material away cleanly without damaging your 3D print, the interface between the support material needs to be weaker than the layers of the mode. Cura creates this weaker connection by leaving a space between the top and bottom of the support structure and the model. This space is known as Z-Distance.
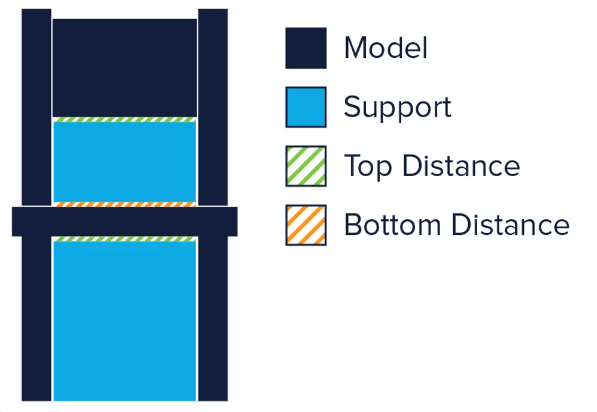
You can make the support structures easier to detach by controlling the Z-Distance hidden settings under the Support section. The default value for this setting is the same as layer height. So if your layer height is 0.1 mm, the default Z Distance will be 0.1 mm too.
If your support material is difficult to break away from your model, increase this value in increments of your layer height until it comes away cleanly. Cura can either add support on any given layer, or not add support. Unfortunately, there are no ‘half layers of support’, so if a 0.2 mm Z Distance setting for a print with a layer height of 0.1 mm is too much, and the Z Distance of 0.1 mm is not enough, you’re out of Z Distance options.
Cura Support Patterns: Striking A Balance Between Strength And Easy Removal
Cura can generate several different types of support patterns. You can change the pattern by editing the ‘Support Pattern’ setting.

Special Modes in Cura
Cura has some special modes which let you print in unconventional or experimental ways, which we will explore a little below:
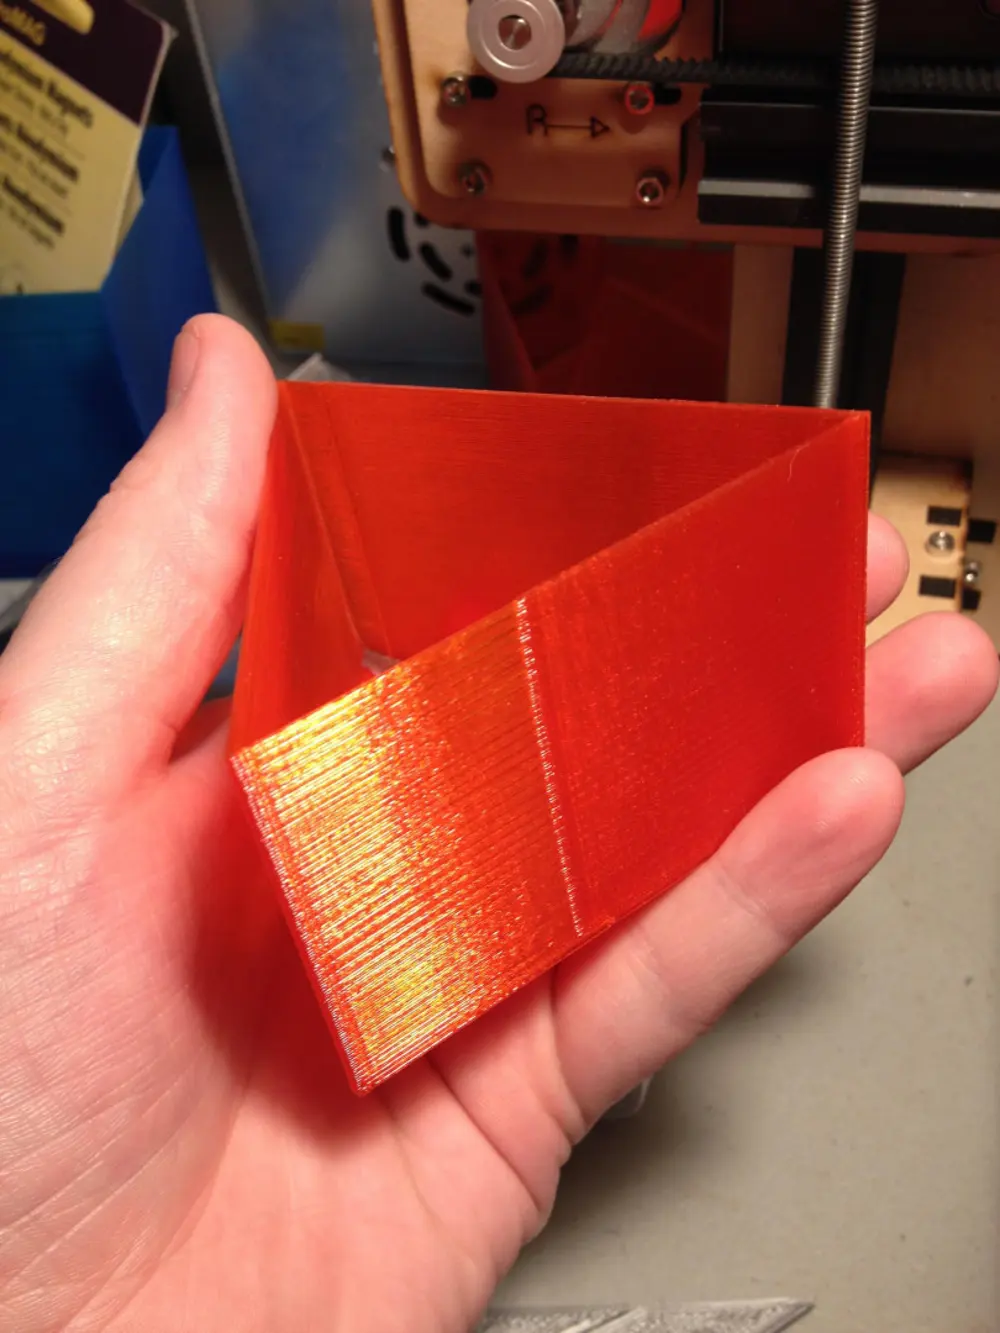
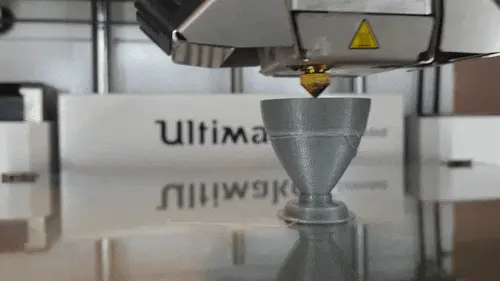
SPIRALIZE OUTER CONTOUR (A.K.A. ‘VASE MODE’)
Spiralize Outer Contour will print a hollow model instead of a solid model. The extruder will trace a continuous path that spirals upwards along the walls of the model, printing a solid base and a one-nozzle-width-thick wall. It will not print any infills or support.
This mode is very different from standard layering in 3D printing as the extruder moves in the Z direction at all times, instead of stepping up only when a layer is complete. Since the extruder moves continuously and prints only the walls, this reduces the print time to a fraction of normal. It also enables you to save a lot of material because you’re not using infill.
However, this setting isn’t ideal for parts that need durability, because they are only one wall thick and don’t have any infill.
There are a few caveats to using this mode:
- ‘Spiralize Outer Contour’ doesn’t work if your model has overhangs exceeding 45 degrees
- Flat areas parallel to the build platform cannot be printed with this mode
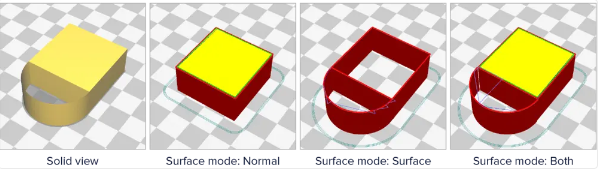
CURA’S SURFACE MODE LETS YOU PRINT NON-MANIFOLD DESIGNS
If you want to print non-manifold designs or orphaned geometry, ‘Surface Mode’ can help with this.
It has three options: ‘Normal’, ‘Surface’, and ‘Both’. When ‘Normal’ is selected, Cura tries to print the object normally. When you select ‘Surface’, Cura only prints the XY walls and makes them one nozzle width thick. This lets you print walls that are not connected to any solid volume. When you select ‘Both’, Cura prints solid parts of the model normally and prints only the walls for non-manifold areas or orphaned parts.