3D printing layer height is a simple setting that affects print speed and detail. Keep reading to find out more!
What & Why
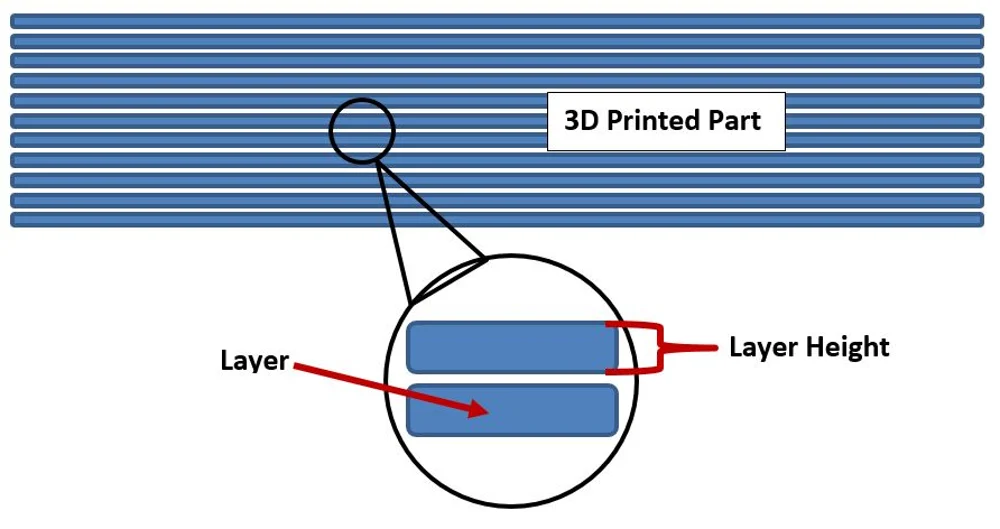
Layer height is exactly what it sounds like: the exact height of each layer of plastic extruded, cured, or sintered by a 3D printer. This setting is adjusted through a slicer program and has many more effects on the final print than one might think at first. Used properly, this setting will increase your print’s speed, resolution, and smoothness.
Note that 3D printer layer height is typically measured in microns, with one micron being equivalent to 0.001 mm. Another important thing when playing with layer height on FDM printers: A shorter vertical layer results in a thicker horizontal line, and a taller vertical layer results in a thinner horizontal line. This can throw off precision in the horizontal plane, especially in small moving parts sometimes used by print-in-place mechanisms.
Different printers have different maximum resolutions for layer height. The standard smallest height is generally between 50 and 100 microns (0.05 and 0.1 mm). Lower-cost printers usually do not have as much precision, with the Ender 3 V2 having great results with a minimum layer height of 0.1 mm, but even Prusa Research advises not to go lower.
One should therefore consider minimum layer height when buying a 3D printer. Resin- and laser-based printers typically have a much smaller minimum compared to FDM printers, which is what accounts for the insanely detailed prints they typically create.
Now that we know a bit more about what layer height is, let’s look at how to dial your setting in just right with respect to speed, resolution, and smoothness.
Optimizing Print Speed
One of the most common reasons for changing 3D printer layer height settings is to increase print speed. A larger layer height means the printer doesn’t have to print as many layers to achieve the same total height, resulting in a much faster print.
Generally, increasing layer height will decrease the resolution and quality of your print. This “hack” is therefore better for large prints, where close-up details will either be ignored or touched up during any post-processing.
Layer height can be optimized for each print in order to attain the fastest print speed while maintaining a certain amount of resolution. However, this is something that should be assessed on an individual printer-by-printer basis, as a lot of fine-tuning is required to print efficiently.
Raising the Resolution

A little-known fact within the 3D printing community: Most 3D printers have a higher vertical resolution than horizontal. Why? The lead screws, in taking longer to move, offer the printer a much more accurate vertical position than the timing belts used for the other axes. As such, the printer can create better details on a vertical surface than on the horizontal.
This is one of the reasons that the “Fillenium Malcon” design from aaskedall is so popular among Star Wars enthusiasts; it maintains amazing detail when printed across a wide variety of machines. Other designers have started to realize and take advantage of this fact, and now you can too.
A lower 3D printer layer height will of course slow your print down, but the printer will be putting down more layers for a given height, allowing for much, much higher detail.
Smoothing the Surface
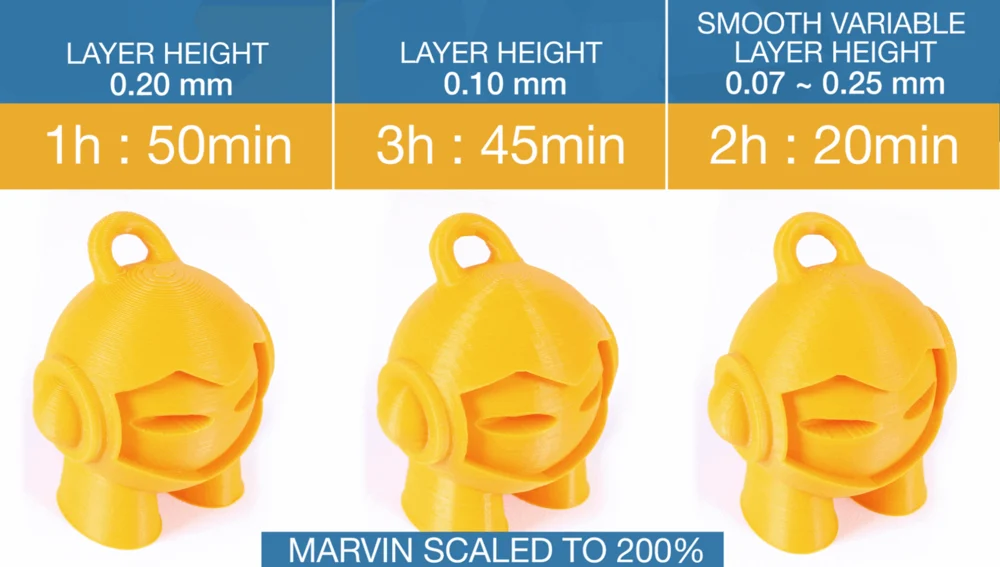
Another use of the extreme detail available with smaller layer heights is to smooth out prints. With a lower layer height, the layers become less obvious and prints become smoother. With a larger layer height, the surface of a print becomes rough and the layers clearly visible.
With this knowledge, you can ensure that prints requiring a very smooth finish, i.e. axles or print-in-place mechanisms, are as smooth as possible by reducing 3D printer layer height. This, as you can probably guess, increases detail, but decreases print speed, so be wary of long print times on large parts.
Professionals have noticed this factor, and PrusaSlicer even added a setting to increase smoothness on a print by varying layer height, as detailed by this article on smooth variable layer height.
For more information on how to smooth prints, check out this easy guide to smoothing PLA.