
Black anodizing can give an aluminum part a durable, professional appearance, but it does not make every surface look the same.
When an SLM-printed aluminum part is anodized, its final color, gloss, texture, and visible imperfections still depend heavily on the surface condition established before anodizing. A sandblasted surface, a manually polished surface, and a mass-finished surface can all receive the same black anodizing treatment yet produce noticeably different results.
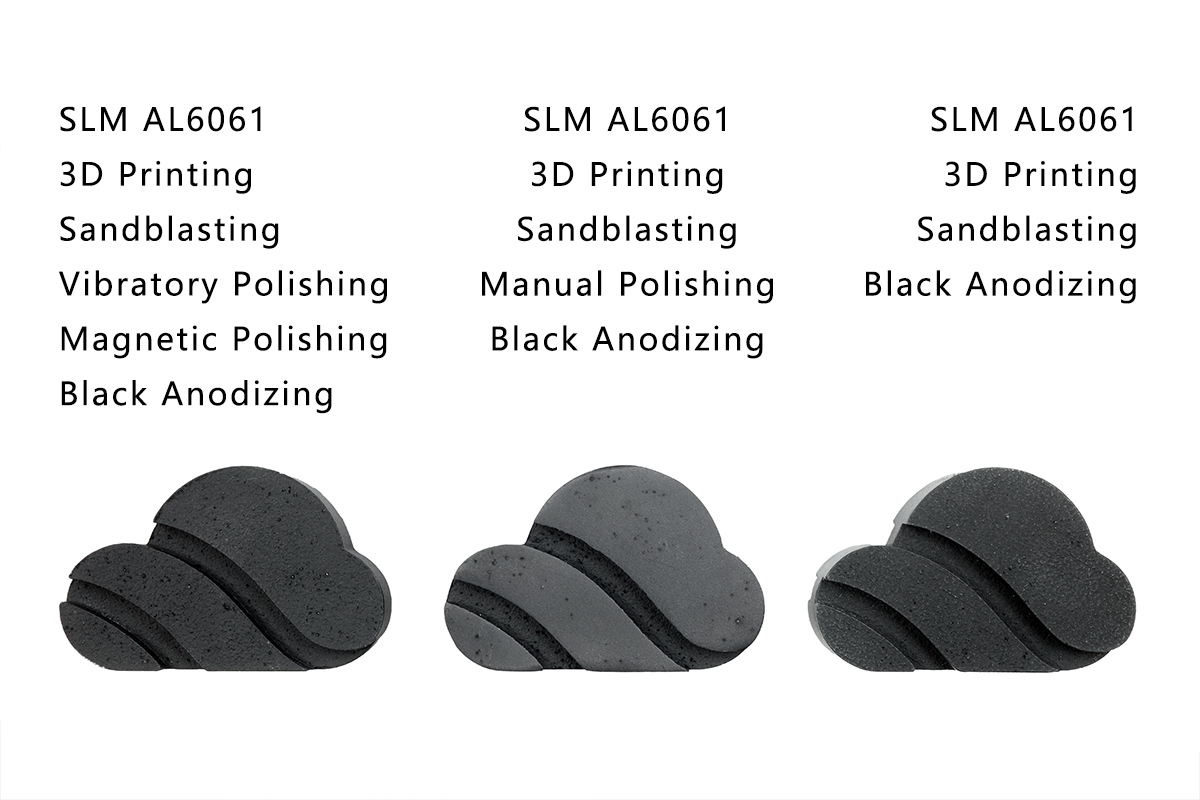
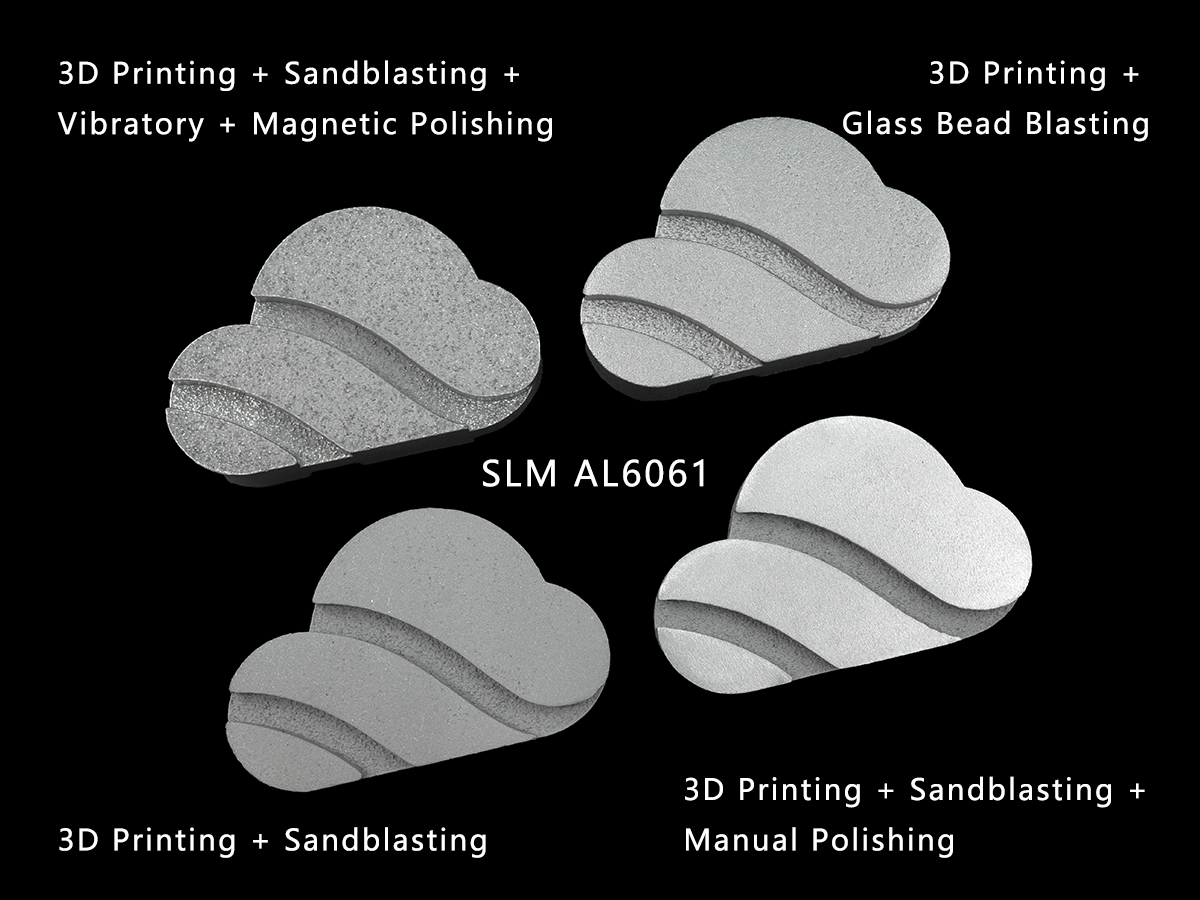
To demonstrate this effect, FacFox printed three identical 3DP logo models in AL6061 and prepared them using three different finishing routes:
- Sandblasting followed by black anodizing
- Sandblasting and manual polishing followed by black anodizing
- Sandblasting and vibratory and magnetic polishing followed by black anodizing
Because the material and geometry remain the same, these samples provide a useful visual comparison of how mechanical surface preparation influences the final anodized appearance.
The photographs in this article show visual differences only. They should not be interpreted as measured surface roughness, coating thickness, color tolerance, or corrosion-performance data.
Why Surface Preparation Still Matters After Anodizing
Anodizing is not the same as painting or applying a thick leveling coating. It is an electrochemical process that converts the aluminum surface into an integrated aluminum oxide layer.
For dyed black anodizing, the general process includes cleaning, pretreatment, anodizing, coloring, and sealing. The porous anodic oxide accepts the black coloring, after which the pores are sealed to improve durability.
However, the anodic layer follows the existing surface topography. It does not normally fill printing texture, polishing lines, pits, scratches, or other surface irregularities. Consequently, the finish applied before anodizing continues to influence:
- How much light the surface reflects
- Whether the part looks matte, satin, or comparatively smooth
- How visible small pits and printing texture remain
- Whether different faces appear visually consistent
- How strongly recessed areas contrast with raised surfaces
This makes surface preparation part of the anodizing specification—not merely a separate cosmetic step.
Sample 1: Sandblasting + Black Anodizing
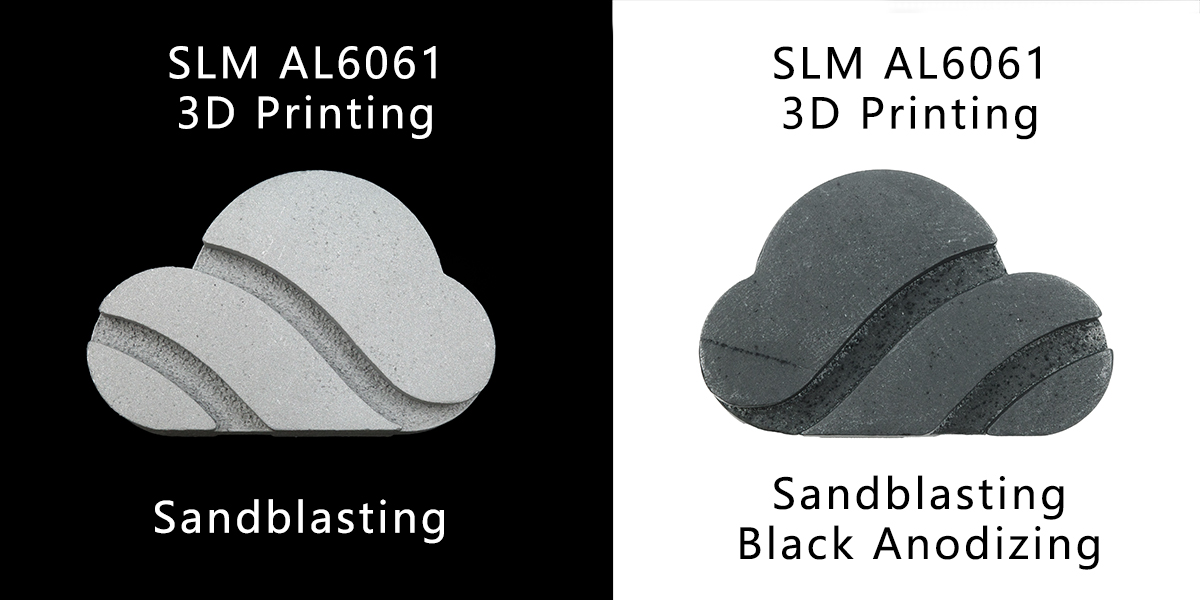
Sandblasting is the default surface preparation for the SLM AL6061 samples in this project. Abrasive media is projected against the surface to remove loose residue and create a more consistent matte texture.
After black anodizing, the sandblasted sample has a dark, low-reflection appearance. The broad raised faces and outside edges share a relatively consistent visual character, making this route a practical general-purpose finish.
The surface is still visibly textured. Fine graininess remains on the raised faces, while the recessed channels retain more pronounced irregularities. The anodizing changes the color and surface properties, but it does not conceal the underlying SLM texture.
What this route is good for
- Uniform industrial matte appearance
- Functional prototypes and production parts
- Parts that do not require high-gloss cosmetic faces
- A practical balance between appearance, processing time, and cost
What to expect
- A dark gray-to-black matte appearance
- Low reflectivity
- Visible fine surface texture
- Greater texture inside recesses than on open faces
“Black anodized” does not necessarily mean an absolute, featureless jet black. The perceived shade can change with lighting, viewing angle, surface roughness, anodizing conditions, dyeing, sealing, and the original material condition.
Sample 2: Manual Polishing + Black Anodizing
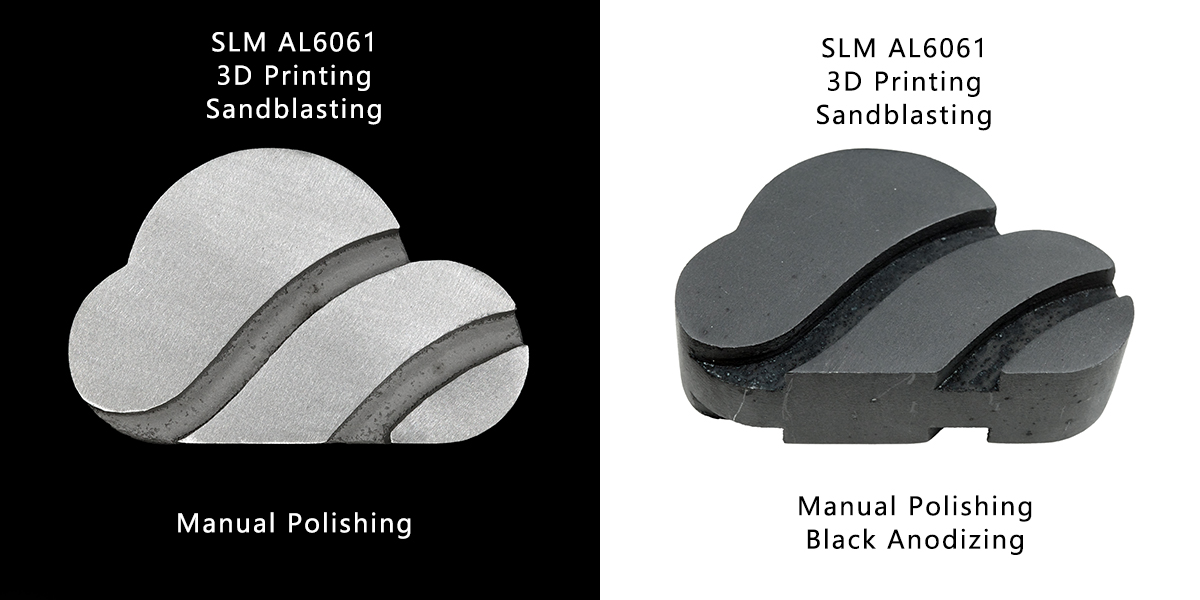
For the second route, the part was sandblasted and then manually polished before black anodizing.
Manual polishing selectively removes surface peaks from areas that an operator can reach. On the 3DP logo, the broad raised faces are comparatively accessible, while the curved recessed channels are much harder to polish evenly.
Before anodizing, the manually polished sample appears brighter and smoother across its raised faces. After black anodizing, those faces continue to reflect light differently from the standard sandblasted sample. The final surface looks more refined in accessible areas, but it is not uniformly smooth across the entire part.
The recessed channels retain more of the original printed texture and therefore appear darker and rougher. Light directional marks may also remain on the polished faces because manual polishing follows the movement of the abrasive tool.
What this route is good for
- Selected cosmetic surfaces
- Low-volume display parts and premium prototypes
- Parts with large, accessible exterior faces
- Applications where the principal visible surfaces need a more refined appearance
What to expect
- Smoother-looking accessible faces
- Different light reflection from a purely sandblasted surface
- Possible directional polishing marks
- Stronger contrast between polished faces and unpolished recesses
- More labor and cost than standard sandblasting
Manual polishing should be specified by surface rather than requested for the entire part without qualification. A drawing should identify which faces are cosmetic, which edges must remain sharp, and which dimensions cannot be altered.
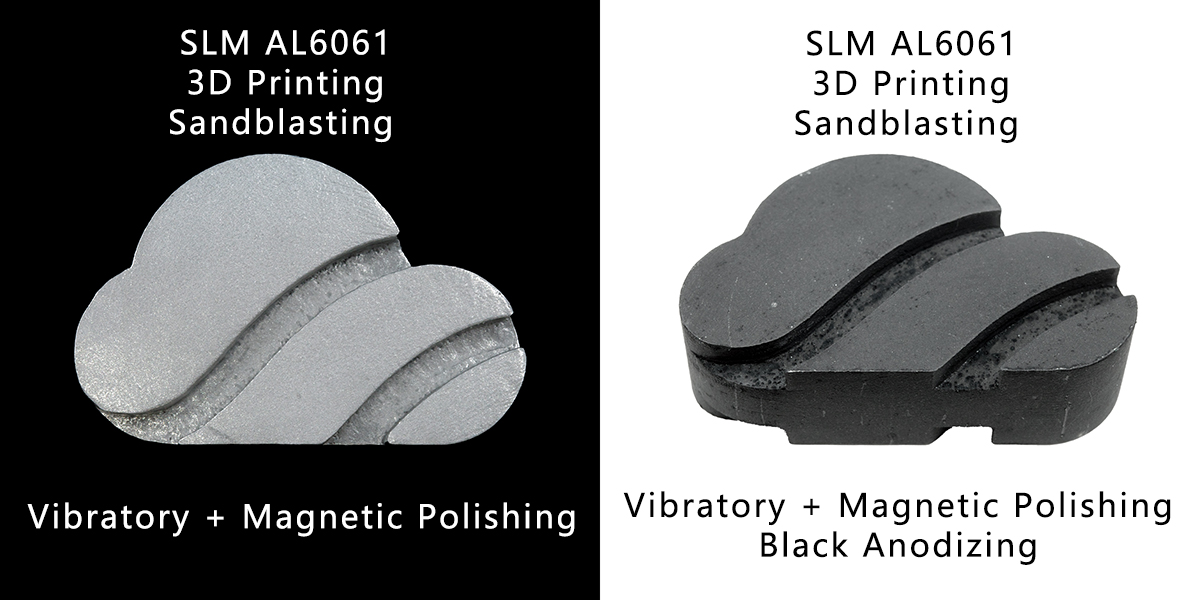
Sample 3: Vibratory and Magnetic Polishing + Black Anodizing
For the third route, sandblasting was followed by vibratory and magnetic polishing before black anodizing.
These mass-finishing methods are intended to treat multiple exposed surfaces with less dependence on an operator polishing one face at a time. They can improve overall consistency, remove small burrs, and soften the feel of accessible edges.
After black anodizing, the sample has a more broadly processed appearance than the sandblasted baseline. However, the finishing media still cannot contact every feature equally. The recessed channels remain rougher than the raised faces, and small pits or local variations can still be seen.
This result demonstrates an important limitation: mass finishing can improve the general surface condition, but it does not act like precision machining or a filling coating. Low areas remain low, and protected areas may receive less finishing action.
What this route is good for
- Batches of small or medium-sized components
- General deburring and edge softening
- Improving several exposed surfaces in one process
- Parts that need a repeatable production finish rather than a hand-polished show face
What to expect
- More extensively treated exterior surfaces
- A consistent low-gloss or satin-like anodized appearance
- Remaining pits and printing texture
- Reduced effectiveness in deep or protected features
- Possible rounding of small edges and delicate details
Side-by-Side Comparison
| Surface preparation | Appearance after black anodizing | Main advantage | Main limitation |
|---|---|---|---|
| Sandblasting | Uniform industrial matte with visible fine texture | Practical and cost-effective standard finish | Does not remove the underlying printed texture |
| Sandblasting + Manual Polishing | More refined accessible faces with geometry-dependent contrast | Best control over selected cosmetic faces | Labor-intensive and difficult in recesses |
| Sandblasting + Vibratory and Magnetic Polishing | Broadly consistent low-gloss finish across accessible surfaces | Suitable for repeatable batch finishing | Can leave pits and protected areas comparatively rough |
Why Small Pits Can Become More Noticeable
Several samples show small dark dots or pits after polishing and anodizing. It would be unsafe to diagnose their exact cause from photographs alone.
Possible contributing factors include pre-existing printed surface topography, shallow subsurface features exposed during material removal, retained texture after blasting, or variation introduced during subsequent processing. Anodizing can make these features easier to notice because the dark finish and changing light reflection increase their visual contrast.
For this reason, polishing should not automatically be described as a process that “removes all defects.” It primarily removes surface peaks. If material is removed around an existing low point, that low point can remain visible or even become more apparent.
If the component has a high-value cosmetic surface, the appropriate approach is to establish an acceptance sample and inspect the surface before anodizing. Once the part is anodized, correcting an appearance problem usually requires stripping and reprocessing the finish, which adds time and risk.
How to Choose the Pretreatment
| Your priority | Recommended starting route |
|---|---|
| Economical matte black engineering finish | Sandblasting + Black Anodizing |
| More refined principal cosmetic faces | Sandblasting + Manual Polishing + Black Anodizing |
| Repeatable finishing of multiple exposed surfaces in a batch | Sandblasting + Vibratory and Magnetic Polishing + Black Anodizing |
| Tight-tolerance sealing or mating surface | Controlled machining and inspection, with appropriate masking or finishing allowances |
The correct route depends on more than appearance. Production quantity, edge requirements, part geometry, dimensional tolerance, target roughness, and inspection requirements should all be considered.
What to Specify in Your RFQ
“SLM AL6061, black anodized” is not a complete cosmetic specification. To reduce uncertainty, include the following information with your CAD model and drawing:
- Anodizing requirement: State the required anodizing type, color, coating thickness, sealing requirement, and applicable standard when these are critical.
- Cosmetic surfaces: Mark the faces that will be visible in the final assembly.
- Gloss and texture: Describe whether the desired appearance is matte, satin-like, directional, or highly polished.
- Surface roughness: Add a measurable roughness requirement where function depends on it.
- Critical dimensions: Identify holes, threads, fits, sealing faces, and edges that must be masked or protected.
- Rack-contact areas: Indicate where electrical contact or handling marks are acceptable.
- Color tolerance: Use an approved physical sample when batch-to-batch cosmetic consistency is important.
- Inspection: State whether you require a first-article review, roughness measurement, dimensional report, or visual acceptance standard.
Final Takeaway
Black anodizing does not replace surface preparation. It preserves and emphasizes many characteristics of the surface beneath it.
Sandblasting produces a practical matte baseline. Manual polishing refines selected accessible faces but cannot reach every recess equally. Vibratory and magnetic polishing can improve multiple external surfaces in a repeatable batch process, while small pits and protected textures may remain.
The three SLM AL6061 samples show why the desired final appearance must be considered before anodizing begins. Instead of requesting only “black anodized,” define the cosmetic faces, acceptable texture, protected features, and measurable requirements.
If you are planning a black-anodized SLM aluminum part, upload your CAD model and mark the critical surfaces. FacFox can evaluate the geometry and recommend a suitable combination of printing, blasting, polishing, anodizing, masking, and inspection.