Vase mode, also known as spiral mode, is a slicer setting that tells your printer to print the outer edge of your model in a continuous single extrusion. It can produce spectacular models with low print times and very little filament expenditure.
3D Printing in Vase Mode
Vase mode settings can be found in your slicer by searching ‘vase’, ‘spiral’ or ‘spiralise’, check the box and your slicer will do the rest. Models printed in vase mode have no z seams and no infill.
The majority of models designed for vase mode are completely solid but you don’t actually need a solid model. Slicers use the outside contour of the model to generate the gcode so many ‘normal’ vase and container models will also print well in vase mode – Give it a try.
Common Issues with Designs
Vase mode relies on a continuous single outer contour so models that have several bed anchor points or that split into multiple parts will not print correctly in true vase mode. Looking at my box pig in Prusaslicer’s spiral mode you can see that only one of his legs will be printed and that the near horizontal top of his head will also cause problems.
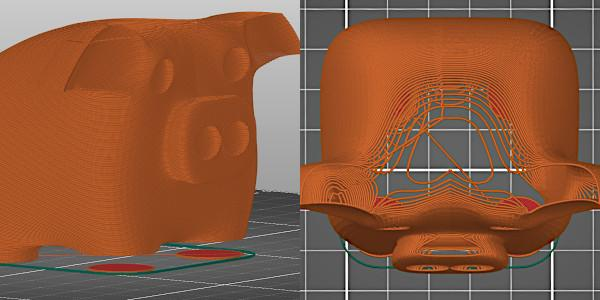
The Cura slicer software, when faced with slicing a model with multiple anchor points in vase mode, will print ALL anchor points, in this case my box pig’s legs. It achieves this by converting that part of the print to ‘normal’ mode with 1 perimeter and no infill.
Ok so that is standard vase mode but what happens when we start to play with the slicer settings or the design characteristics and when (and why!) might we want to do this?
Playing with the Slicer Settings
Layer Height
The first slicer setting we can play with is the layer height and we see that larger heights produce more obvious layer lines and can reduce the detail of the model the same as when using other slicer profiles. These vases were printed at 0.1mm and 0.35mm layer height.

WHEN to use and WHY.
- Use a small layer height for models with a lot of detail or to produce a smoother less ‘printer’ look.
- Use a large layer height for a faster print or if you love your layer lines.
Layer Width – Wall Thickness
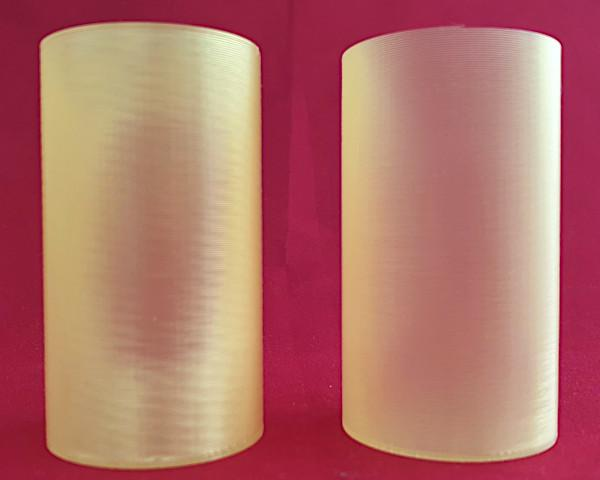
We can also change the width of the extrusion and this can be very useful when printing in vase mode. Models printed with a larger width are sturdier with thicker walls. Width can also influence the models depth of colour and translucency. The two pictures show the same vase printed at 0.4mm and 1.0mm extrusion widths.
WHEN to use and WHY
- Use a larger extrusion width for a sturdier print, a deeper colour and less translucency.
- Use a smaller extrusion width for a more delicate print with increased translucency – (example lightshade or tealight holder).
Playing with design
Intentional holes
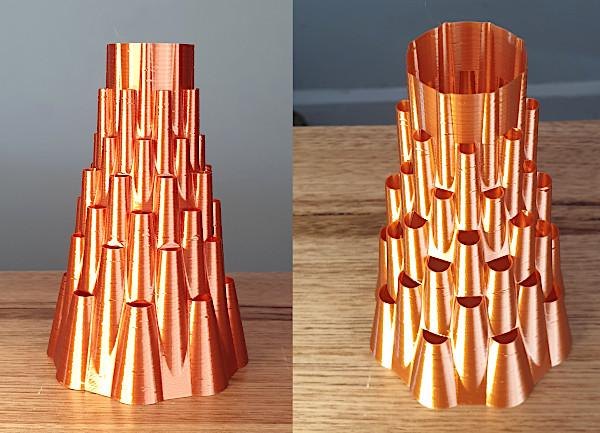
You might think that because vase mode prints as a continuous extrusion it would be impossible to print models with holes in. In general this is the case but there is an exception and it utilises the limitation we saw on the top of my box pigs head. Vase mode cannot print flat or close to flat surfaces. If we purposefully design a model with flat sections we know these surfaces will not print and therefore we can utilize this limitation to create holey models. I had a go at designing a Volcano vase.
WHEN to use and WHY
- Use flat surfaces in your model designs to create vases and containers with multiple openings. The technique is also useful when designing tealight holders or lampshades to create gaps for the light to shine through.
Loops
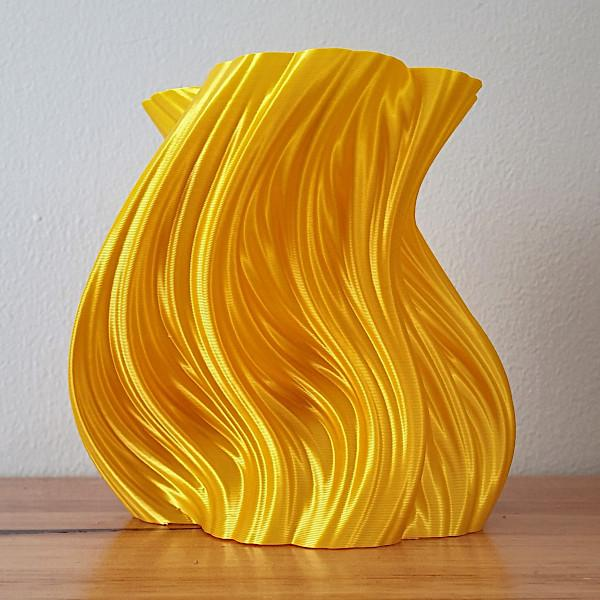
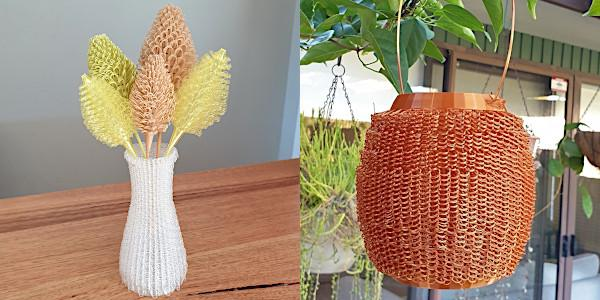
We know that any 3d print model with a significant overhang will need supports, but vase mode cannot be printed with supports, so what happens when we add overhangs into a vase mode model? Well, as long as we use sharp and sudden promontories and each layer has some cross over with the one above, the model will print, and it will print with loops! If you imagine that any long thin sold block you add to your model will become a series of downward drooping loops you can begin to visualise how your model will print, so give it a go! Let’s look at my flower model as an example. The flower model has a solid centre with petals protruding. The petals are not on every layer and do not touch each other and this is what ensures the model will maintain its integrity.
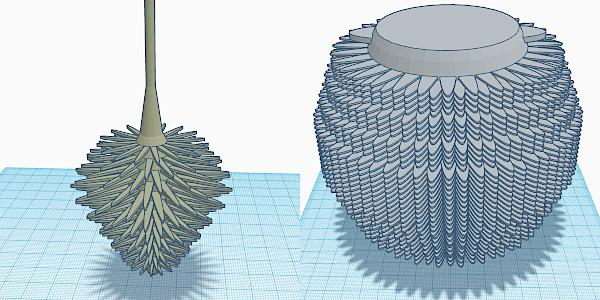
WHEN to use and WHY
- Use sharp promontories to create loops across the surface of your design to soften, ‘fuzzify’, or add fun to your models.
- You can also add loops to specific parts of your design as edgings, patterns or characteristics such as hair or petals.
Conclusion
I love 3D Printing and I love experimenting. Tweaking slicer and design settings can produce unexpected results and sometimes they are really cool. So have a play with Vase mode – it’s soooo much fun.
Let’s use 3D scanning and vase mode 3D printing to achieve a real tree texture effect for functional or decorative items.