A laser cutter is a prototyping and manufacturing tool used primarily by engineers, designers, and artists to cut and etch into flat material. Laser cutters use a thin, focused laser beam to pierce and cut through materials to cut out patterns and geometries specified by designers. Apart from cutting, laser cutters can also raster or etch designs onto work pieces by heating up the surface of the workpiece, thus burning off the top layer of the material to change its appearance where the raster operation was performed.
Laser cutters are really handy tools when it comes to prototyping and manufacturing; they are used in machine shops on the industrial scale to cut large pieces of material, they are used by hardware companies to create cheap, quick prototypes, and they are tools used by makers and artists as a DIY fabrication tool to bring their digital designs into the physical world. In this guide I’ll explain what laser cutters are, what they can do, and how you can use them, and I’ll also provide some resources if you want to learn and do more with laser cutters.
Step 1: What Is a Laser Cutter?
A laser cutter is a type of CNC (Computer Numerical Controlled) machine, meaning that it is controlled via a computer. A designer can design something in some sort of design software, and then send it to a laser cutter to have it cut out automatically, with just the push of a button. Once a design is sent to a laser cutter, the machine uses a laser beam to cut into or etch into the material on the cutting bed. Laser cutters are a great all around tool because they can be used to make so many different styles of design; laser cutters are used for anything from cardbaord prototypes to rastered artwork. Common laser cutters are primarily used to cut materials like wood, some plastics, and paper and cardboard, although there are more powerful laser cutters that can cut through metals and much thicker materials.
Laser cutters can be very quick, and can churn out designed parts in just a few minutes. Like 3D printers, laser cutters are rapid prototyping machines; they allow designers to quickly and cheaply iterate on their designs before they produce products on a larger scale.
Step 2: How Do Laser Cutters Work?
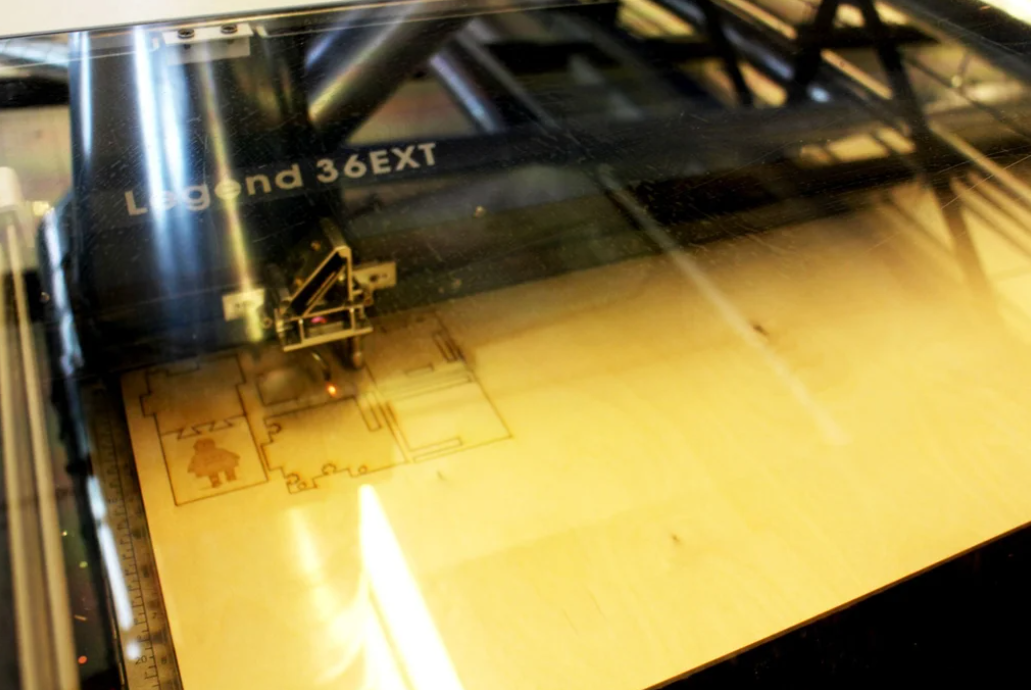
There are a few different types of laser cutters, but they all essentially use the same process of using a laser to cut material. The laser originates from a laser resonator, which sends out a beam of intense light through reflects through a system of mirrors to the cutting head. Within the cutting head, the laser is focused through a lens and narrowed down to an extremely thin, concentrated beam. This beam is projected down at the material and can cut or raster the raw stock, which I’ll cover in more detail later. The cutting head is usually mounted on what is called an XY gantry, which is a mechanical system driven usually by belt or chain that allows for the precise movement of cutting head within a given rectangular area, which is the size of the work bed. The gantry allows the laser head to move back and forth and forward and back over the work piece so that it can make precise cuts anywhere on the bed. In order for the laser to actually cut, the focal point of the lens, where the laser would be at its finest, needs to be on the surface of the material it is cutting through. All laser cutters require a focusing procedure before making their cuts to ensure that the laser cuts well.
The difference between different types of laser cutters comes from what types of lasers the machines have. The type of laser defines what type and thickness of material it can cut through, because different laser types have different power ranges. Usually, higher power lasers are used on the industrial scale to cut out large sections of sheet metal or plastics, while lower power lasers are used for a wide range of thinner, more potentially flammable materials like paper and card stock, wood, and some plastics. I’ll cover the main types of laser cutters as well as the important settings laser on.
Step 3: Types of Laser Cutters
There are three main types of lasers used in laser cutters; CO2 lasers, fiber lasers, and neodymium lasers. Although the laser cutters are all built very similarly, they are distinct in that each type of laser has a specific power range, thus each can be used to cut through different material types and thicknesses.
CO2 Lasers: The laser is generated from electrically stimulated gas mixtures (mostly comprising of carbon dioxide). CO2 lasers are the most common types of laser cutters because they are low power, relatively inexpensive, efficient, and can both cut through and raster a wide variety of materials.
Materials: wood, paper based products (cardboard, etc), leather, acrylic, glass, some plastics, and some foams (can raster on anodized metals)
Neodymium Lasers: The laser is formed from neodymium doped crystals. These lasers have a much smaller wavelength than CO2 lasers, meaning they have a much higher intensity, and can thus cut through much thicker, stronger materials. However, because they are so high power, parts of the machine wear and tend to need replacing.
Materials: metals, plastics, and some ceramics
Fiber Lasers: These lasers are made from a “seed laser”, and then amplified via special glass fibers. The lasers have an intensity and wavelength similar to that of the neodymium lasers, but because of the way they are built, they require less maintenance. These are mostly used for laser marking processes.
Materials: metals and plastics
Step 4: Laser Cutting Design Software
A Laser cutter works very much like your everyday inkjet printer. Laser cutters come with specific drivers that allow them to take what is on the computer, convert it into a format that the laser cutter can read, and then allow the laser cutter to do its job. Many design software packages support laser cutter drivers; it is pretty common among 2D design prorams, and some 3D design software can also support laser cutter drivers when dealing with 2D drawings or sketches. Here are a couple you may already be familiar with or may want to try out:
2D Design:
- CorelDRAW: graphic design software with an extensive number of tools and applications
- Adobe Illustrator: Powerful graphic design software used to create high quality designs
- AutoCAD (free for students): Great drawing software, primarily used by engineers and architects to create detailed drawings and product representations
- Inkscape (free):Free, open source graphic design software
3D Design:
- Solidworks:Engineering 3D design software with multiple packages for aiding in design for specific applications
- Autodesk Inventor (free for students): Professional mechanical design software used to create and optimize designed systems
- Autodesk Fusion (free for students): Cloud-based CAD platform used to help designers through the entire designing, engineering and manufacturing processes
Step 5: Vector Cutting
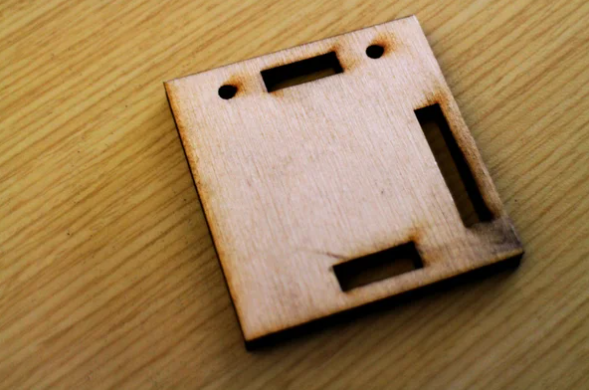
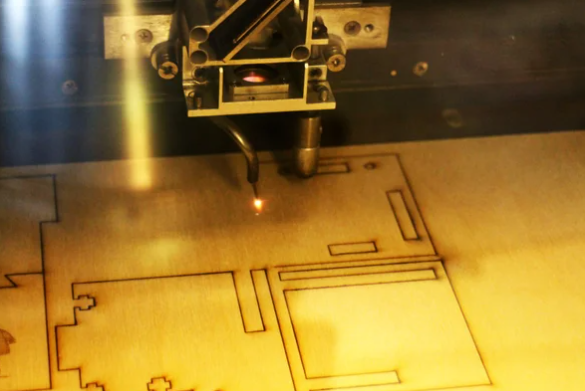
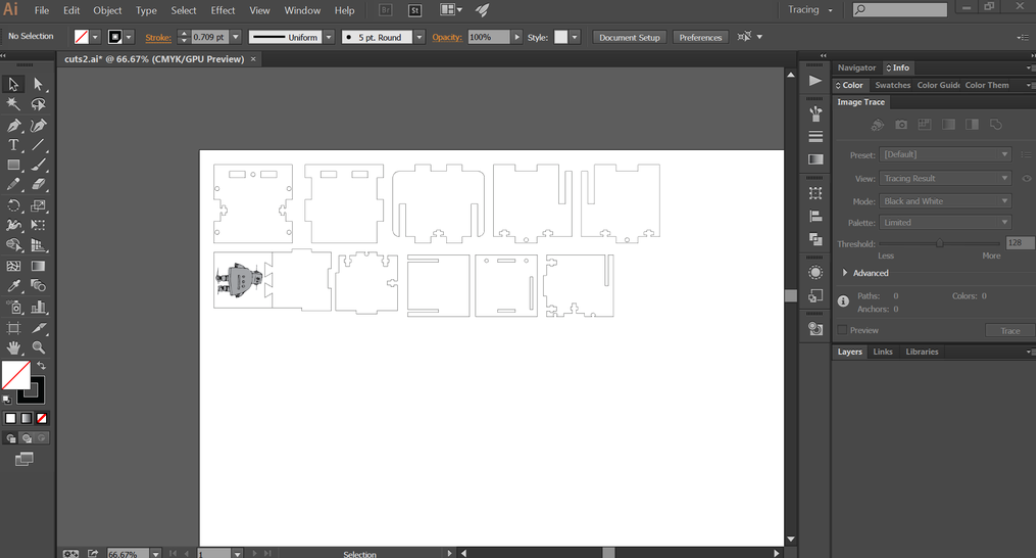
During a cutting operation, the cutting head fires a continuous laser at the material to slice through it. In order to know where to cut, the laser cutter driver reads all of the vector paths in the designed piece. Once you send your file to a laser cutter, only lines that register as only hairline or vector graphics with the smallest possible line thickness will be cut by the laser. All other graphics, like any images or thicker lines, will be rastered, which I’ll explain in a bit. The laser, when supplied with the right settings, will cut all the way through your material, so vector cutting is normally used for cutting out the outline of the part as well as any features or holes that you want to cut out of the material.
Step 6: Laser Rastering
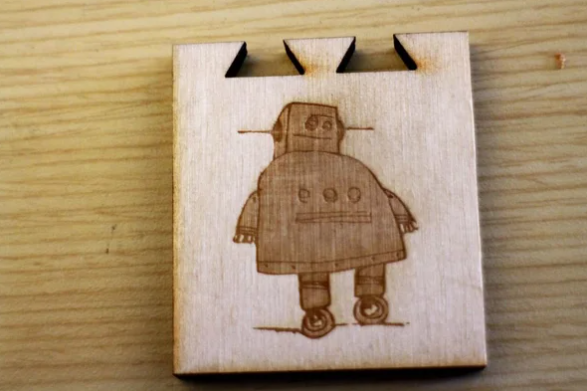
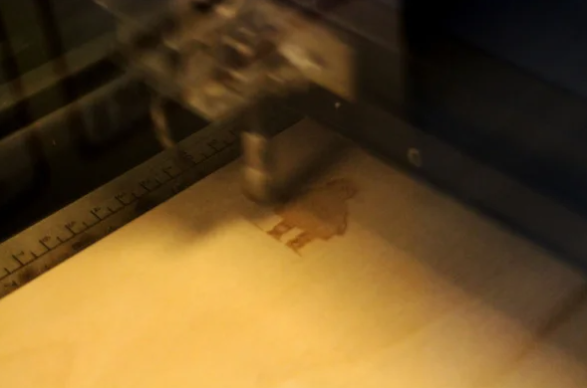
Rastering is a lot different than vector cutting; instead of cutting all the way through the workpiece, the laser will burn off the top layer of the material you are cutting to create two color (and sometimes grayscale) images using the raster effect. In order to raster materials, the laser will usually be set to a lower power than it would when vector cutting material, and instead of shooting down a pulsing beam, it creates fine dots at a selected DPI (dots per inch) so that the laser doesn’t really cut all the way through. The DPI directly correlates to the image resolution and affects how fine an image appears, exactly like image resolution on a computer. By adjusting the DPI you can control the laser’s effect on the material. Rastering on some materials comes out really clearly, while you may not get exactly what you expected on other materials. Before you raster for the first time, make sure you experiment with the settings until you get the desired effect!
Step 7: Laser Cutter Settings
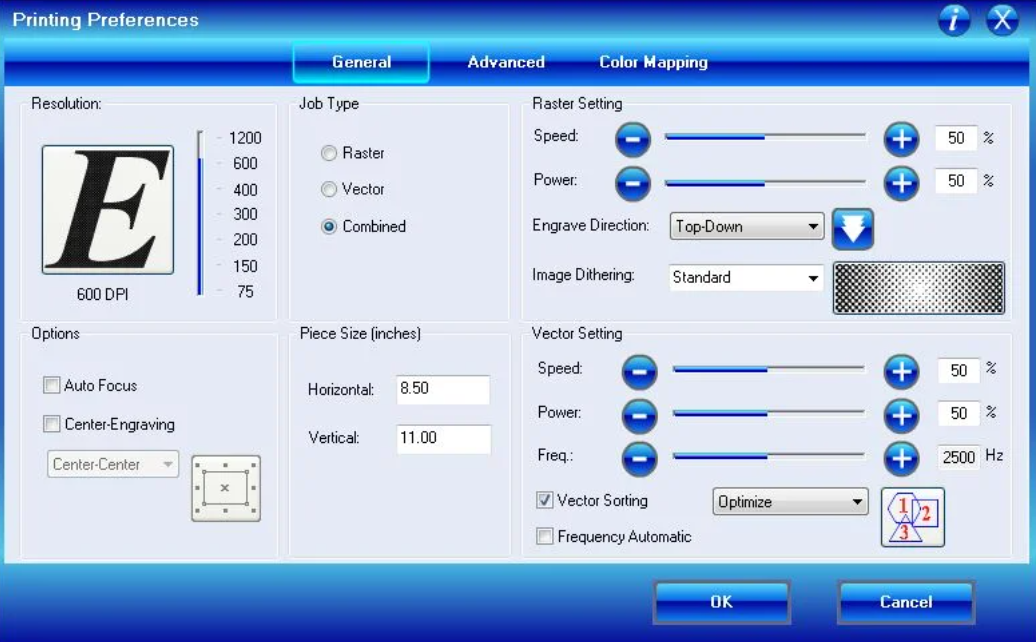
Before I start going into the processes of vector cutting and rastering, I want to quickly cover the settings you will encounter. A laser cutter has four primary settings, as listed and described below. While power and speed apply to both vector cutting and rastering, frequency only applies to vector cutting and resolution only applies to rastering. The settings need to be changed based on your material in the laser cutter “Print Properties” dialogue box before you “print” your job (remember, laser cutters connect to computers like normal printers). based on the material you are cutting through or rastering on: for example, harder, thicker materials require higher power and lower speed so that the laser can actually be strong enough and move slow enough to successfully cut all the way through the material, while thinner, weaker materials can be cut with lower power and higher speed.
Power: How strongly the laser fires. A high power will cut through stronger, thicker material, but may end up burning thinner, more flammable stock. A low power may not be strong enough to get all the way through the material. During rastering, higher power will burn more layers off of the material, creating a darker image.
Speed: How fast the head of the laser cutter moves along its gantry. A high speed will cut faster, but may not cut all the way through if you have thicker or stronger materials. A low speed will definitely cut through, but has the potential to burn or melt the edges of the material as it slowly cuts. During raster operations, the laser moves back and forth very quickly, so a high speed on a large piece may wear out the gantry.
Frequency (only for cutting): Determines how fast the laser pulses during a cutting operation. The laser turns on and off rapidly when it makes cuts, so a higher frequency will create a cleaner cut, but if the material is flammable it may end up catching fire, so a lower frequency would be preferable.
Resolution (only for rastering): Determines the resolution and quality of the raster operation. A higher resolution will produce a better, darker image, but if there is too much heat concentrated in one area, it may severely melt, burn, or damage the work piece.
Step 8: Design for Laser Cutting
As I’ve already mentioned, laser cutters have defined material ranges and limitations. While some of this is due to the power it takes to cut through certain materials, some of the material limitations come from the gases that certain materials make when burned or cut with a laser. Other materials can be cut, but respond poorly to heat and may shrivel or melt. Like any other machining technology, there are definitely things that you can and can’t do on a laser cutter. Laser cutters may seem pretty limiting because they can only cut out flat objects, but there are a surprising amount of things that you can do with laser cutters that you may not have expected. I’ll cover a couple design techniques, cool ideas, and design limitations so that you can get familiar with the technology and start designing!
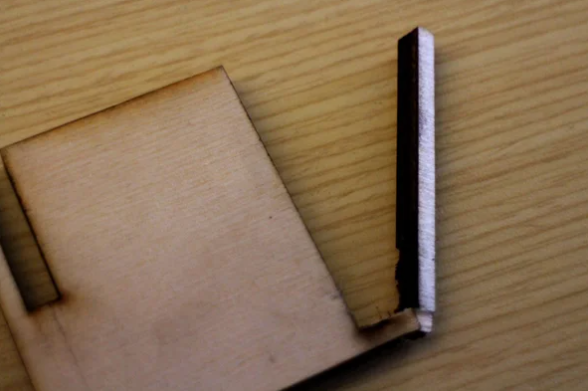
Step 9: Kerf and Material Thickness
As I explained earlier, the focal point of the lens of the laser cutter focuses the laser on the surface of the material it is cutting. This means that on the other side of the material, the laser isn’t as focused, and its beam is actually slightly larger than the beam at the focal point. The gap that the laser makes when it cuts through material is called its kerf. All cutting machines have kerf because the cutting tool has thickness. For example, the kerf on a saw blade is usually a rectangle the width of the blade. The kerf of a laser cutter is slightly trapezoidal. Because the laser beam gets wider after its focal point, the width at the bottom of the material is wider than at the top. The kerf of a given laser cutter determines the maximum thickness of material that it can cut, because on thicker materials the beam will either get too unfocused to cut well, or it will have an angled kerf, which may be unsatisfactory for the designer. Most smaller scale laser cutters can only cut material up to about a quarter of an inch, because after that point the kerf width gets too large.
Step 10: Thin Features and Detail

Because the laser beam itself is very small when cutting, laser cutters can usually create very fine, small details, even when rastering. The kerf of a laser cutter is much thinner in general than the kerf of a sawblade or a milling bit, for example, so laser cutters can do some really nice detail work. However, there is a limit to how small features can be made. Just because the laser cutters can do small features, doesn’t mean the material will handle it well.
Small features and details concentrated in a specific place means that the heat from the laser will dwell in that area for a long time. This creates a lot of concentrated heat, which may cause the part to catch on fire or melt, especially if the material is flammable. Usually a good rule of thumb is to leave at least an eighth of an inch between two approximately parallel lines you will be laser cutting to prevent the laser from damaging the part.
Additionally, be careful about creating very thin features in your designs. Thinner features have a much higher tendency to break, just because they have very small cross sectional areas, and most parts cut out on a laser cutter, like wood, acrylic, and plastic, tend to be very brittle, so they will snap very easily if designed features are too thin.
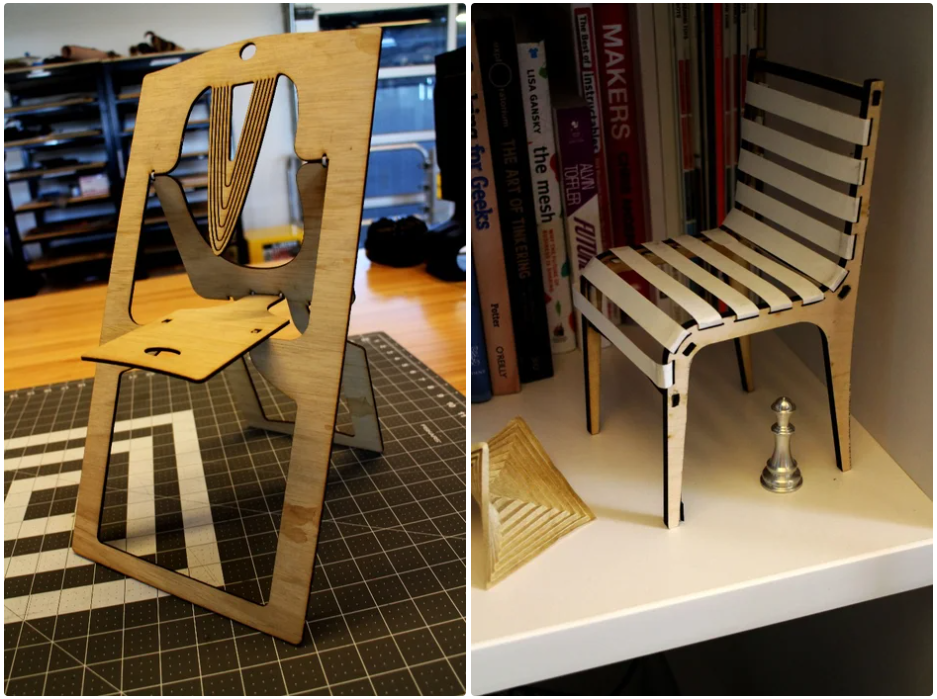
Step 11: Joints
There are a lot of different ways to make joints from flat pieces, and not all are limited to laser cutters, but a lot of the techniques carry over from fields like woodworking and metalworking. Here are a few simple joining techniques for two pieces of flat stock. There are much more if you’re willing to explore and experiment, but lets start with the basics!
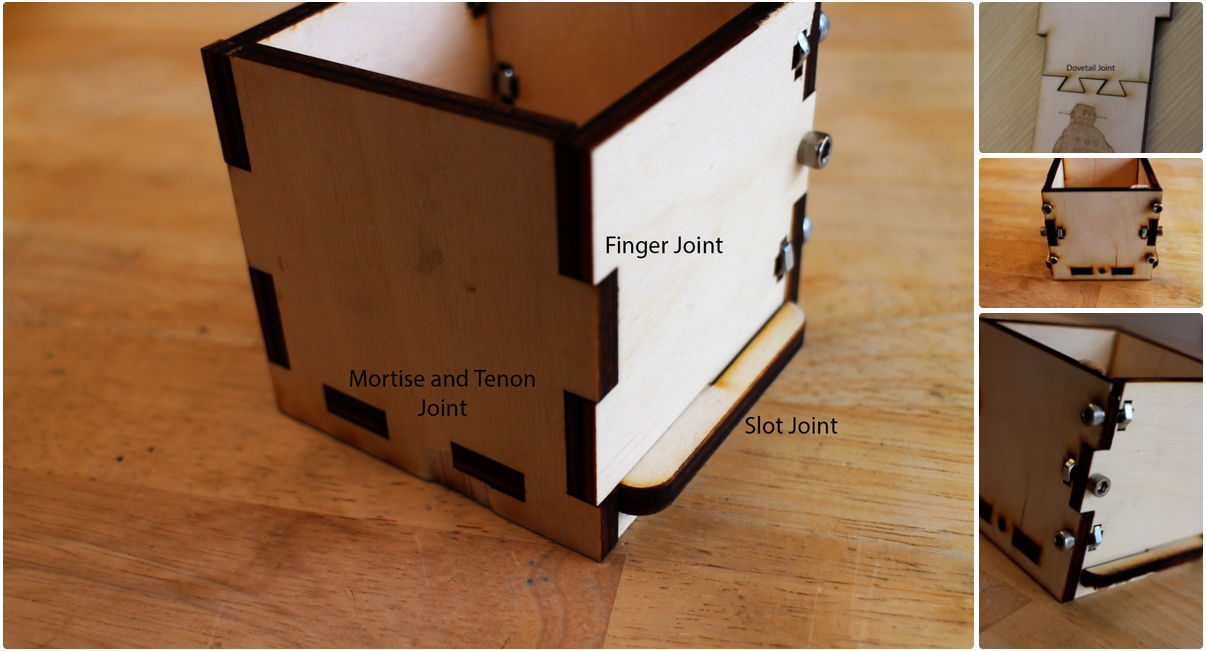
Finger Joints
Finger joints are the basic joint for putting two flat plates together at a perpendicular angle to make a corner. It basically consists of tabs on the mated sides that interlock. The tabs are usually as long as the material is thick to make a nice, clean seam.
Mortise and Tenon Joints
Mortise and tenon joints are very similar to finger joints, except the “fingers” on one piece of material stick through holes in the other piece of material. These are useful for creating “T” like structures and easily mounting internal support beams for more complicated laser cut structures.
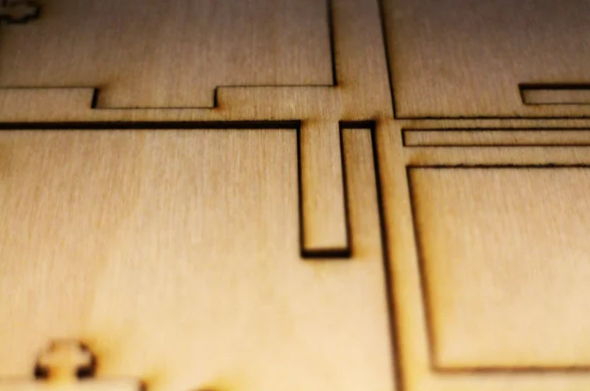
Slotted Joints
Slot joints are another pretty common type of simple laser cut joint. The two connecting pieces each have slots cut halfway through them, which can slide into each other to form “X” like structures out of the laser cut material.
Dovetail and Jigsaw Joints
Dovetail joints and jigsaw joints are usually used in laser cutting to mount two materials flush to one another, with even top and bottom surfaces. Although these are more widely used in woodworking, they can come in handy if you’re looking for a certain effect.
Using Bolts
The above joints will work just fine with some glue around the edges, but you may not want to make such a permanent seal on your parts. By creating a hole for a bolt to slide through and a slot for a nut to be press fit into, you can secure the joints of laser cut parts easily.
Step 12: Stacking
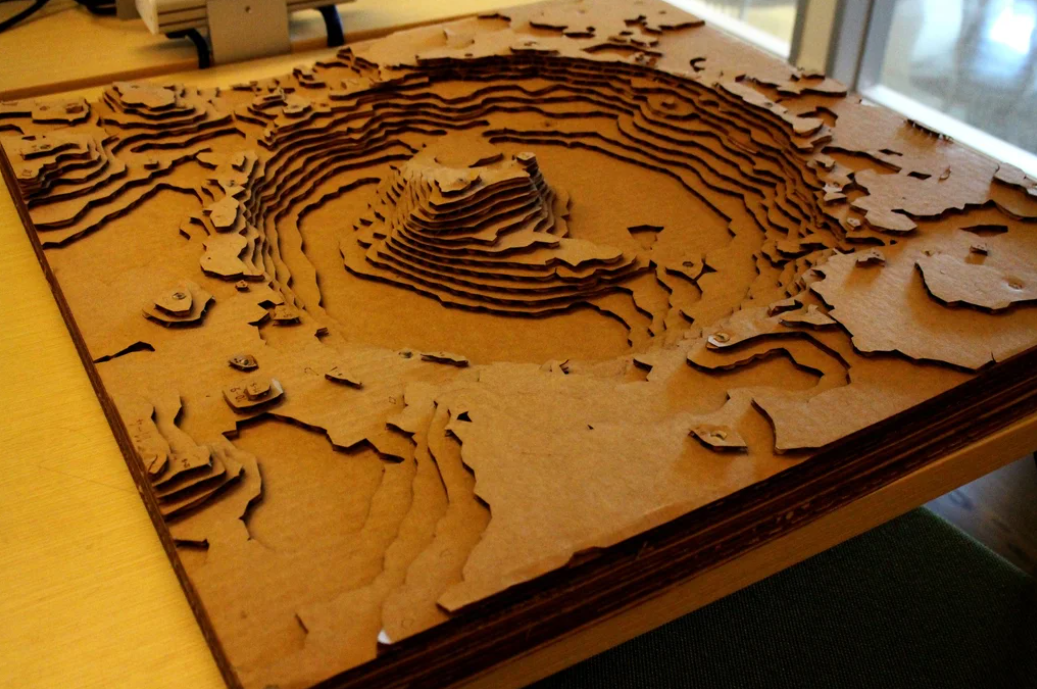
Apart from joining laser cut pieces by their edges to create 3D shapes, you can also stack laser cut pieces on top of one another to create sculptures. This has a contour-map like effect as the entire 3D shape is defined by the differences in the cut lines between each layer. Autodesk’s 123D Make software allows you to take a 3D model and slice it up into layers of laser cut pieces that you can cut out and then assemble into a scale model. If you’re designing your own pieces to stack, make sure you label each piece and create some sort of guide to ease the assembly and alignment process.
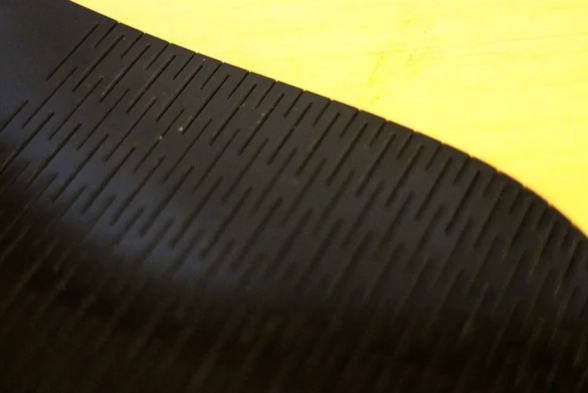
Step 13: Living Hinges and Flexible Materials
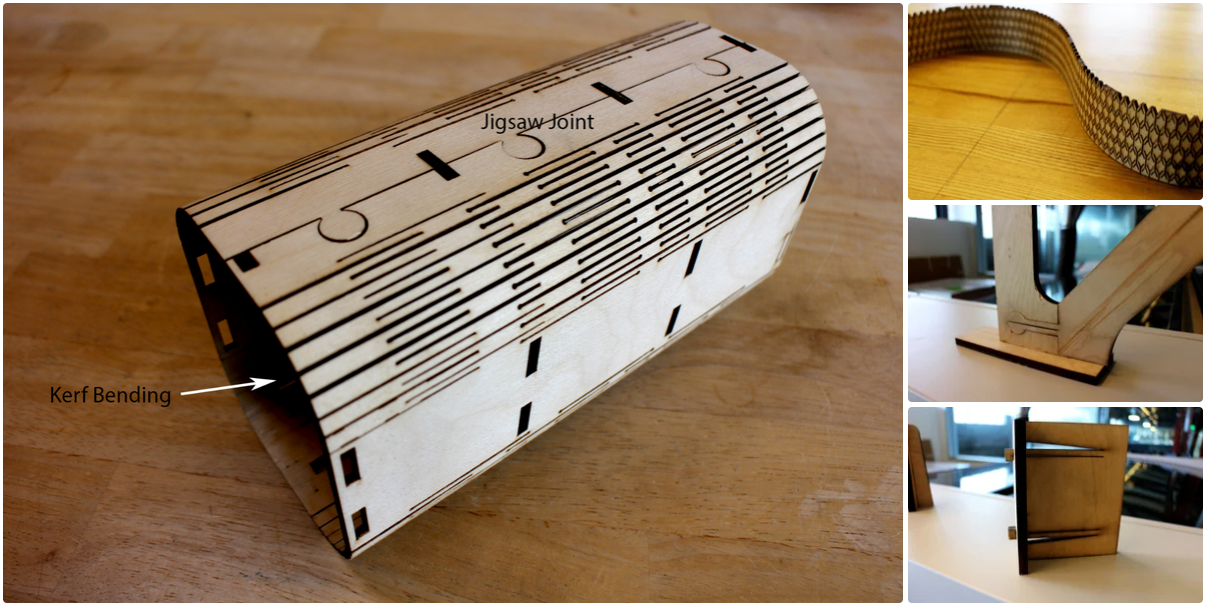
Most materials that you can cut on the laser cutter will be pretty brittle. However, by cutting out sections and patterns from the material, you can actually make them quite flexible! These flexes are called kerf bends or living hinges. They usually utilize the kerf of the laser cutter to create notches in the material, which relieves tension in the material and allows it to bend. The notches are patterned along the area where you want your material to bend, and this loosens up the material enough to allow it to flex pretty nicely. Other design techniques can be used to take advantage of the flexibility as well, to create snap fit hinges that keep the parts locked together.
Step 14: Related Technologies
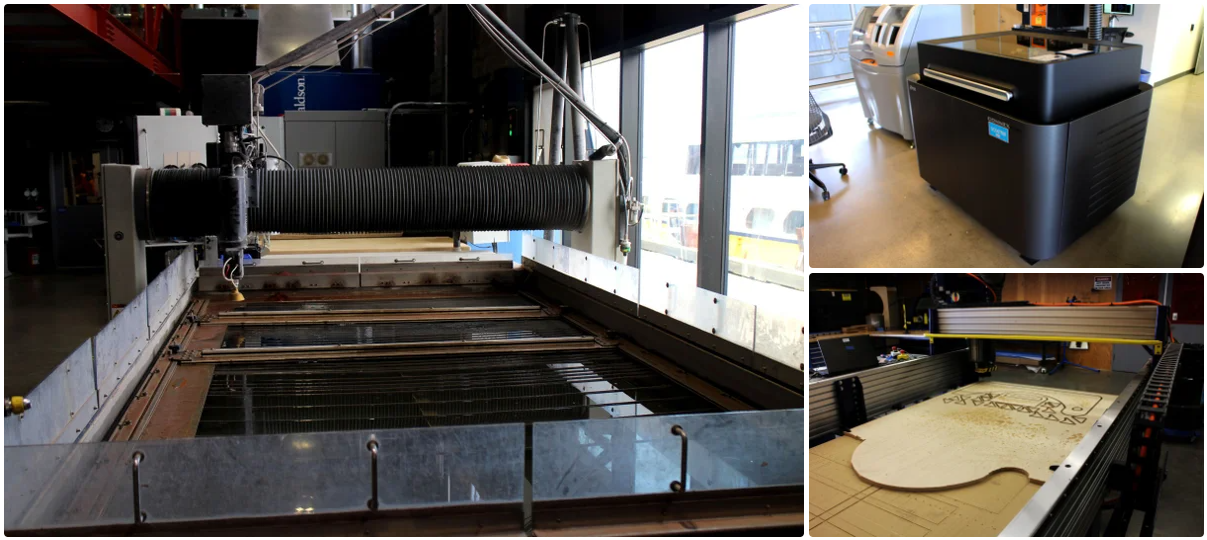
Other 2D CNC Machines
Apart from laser cutters, there are a handful of other 2D CNC machines that use a cutting head mounted on a gantry or arm to cut through various materials. Machines like waterjet cutters cut with a high powered, concentrated stream of water. Waterjets are high power and have a huge bed size, so they are great for cutting out huge, thick pieces of metal and wood. Plasma cutters are another example of high power 2D cutting machines, they use a plasma beam to cut metal by melting it away. On a much smaller scale, machines like vinyl cutters have a pointed cutting tool used to cut through thin materials like paper, card stock, and vinyl.
3D Printers
Laser Cutters and 3D printers are really the benchmark rapid prototyping machines. They both are CNC machines that have a very wide range of applications. While laser cutters are very versatile when it comes to 2D geometries, 3D printers build up 3D geometries layer by layer to create intricate models, prototypes, art, and more.
If you’re interested in learning more about 3D printing, check out this Instructable for an introduction.
CNC Routers
CNC routers are another type of computer controlled machine. Like waterjets and laser cutters, they have a cutting head that travels on a gantry and is used to cut the material. Routers differ in that they use metal cutting heads, and the cutting head can move up and down on a third axis, giving it another degree of freedom and allowing it to create more complicated shapes with the third dimension.
Step 15: Resources
Laser Cutters
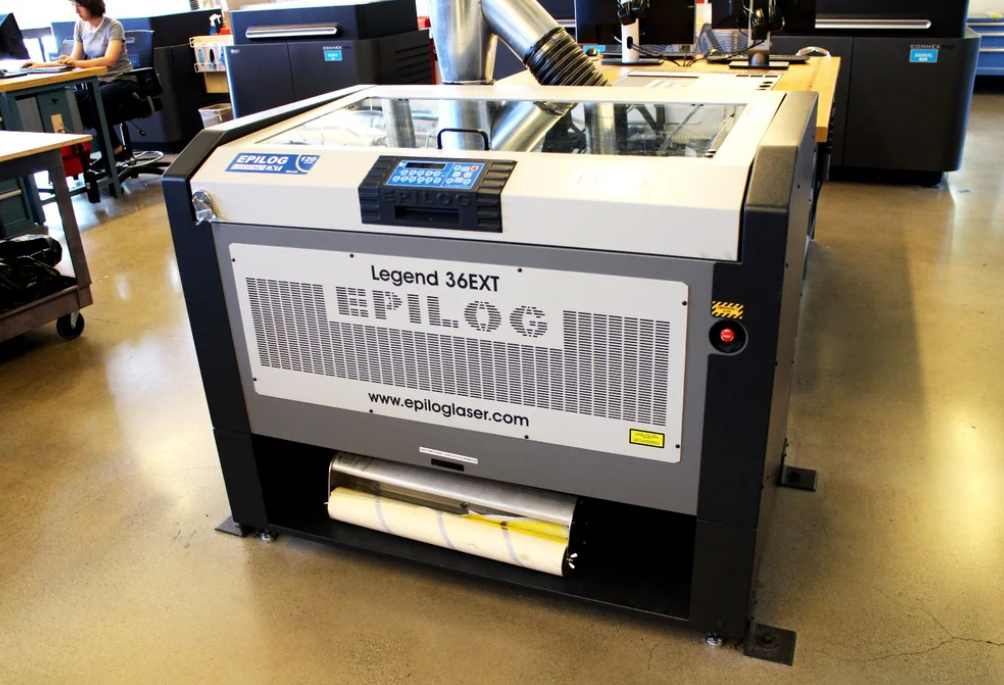
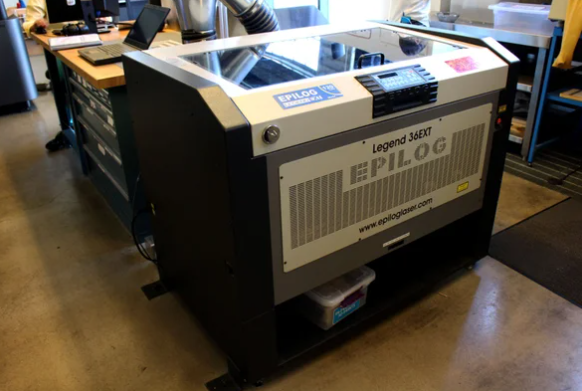
- Epilog: Many different sizes of laser cutters, from desktop machines to industrial scale cutters and markers
- Trotec: Huge range of many different types and sizes of fast, efficient laser machines
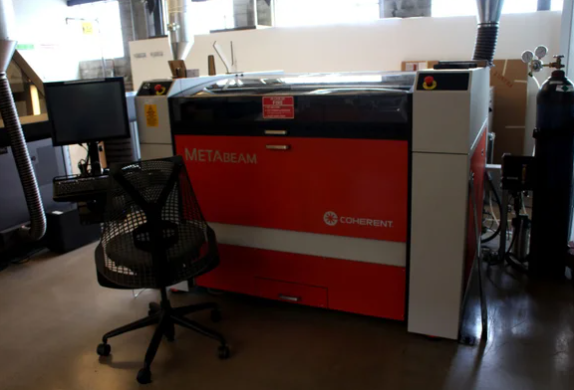
- Coherent: High power laser cutters and laser machines with a large range of materials, including metals
- Full Spectrum: Affordable, small production laser cutters
- Rofin: Huge range of different types of laser cutters and other devices
- Jamieson Laser: Wide range of affordable laser devices from desktop cutters to high production systems
Laser Cutting Services
- Ponoko: Fast and cheap laser cutting and 3D printing service
- The Make Lab: Design and manufacturing service with printing, laser cutting, and 3D printing capabilities
- Laserage: Laser manufacturing service with laser cutters and other laser technologies
- Laser Logik: Laser cutting service with main focus on paper and card stock materials
2D Design Software:
- CorelDRAW: graphic design software with an extensive number of tools and applications
- Adobe Illustrator: Powerful graphic design software used to create high quality designs
- AutoCAD (free for students): Great drawing software, primarily used by engineers and architects to create detailed drawings and product representations
- Inkscape (free): Free, open source graphic design software
- DraftSight (free options): Professional 2D drafting and design software
- LibreCAD (free): Open source, community-driven 2D CAD program
3D Design Software with Laser Cutting Capabilities:
- Solidworks: Engineering 3D design software with multiple packages for aiding in design for specific applications
- Autodesk Inventor (free for students): Professional mechanical design software used to create and optimize designed systems
- Autodesk Fusion (free for students): Cloud-based CAD platform used to help designers through the entire designing, engineering and manufacturing processes
- Autodesk 123D Make (free):Allows you to import 3D models and slice them into laser cut sheets that can be cut out and assembled
Laser Cutting Resources
- Inventables: Materials vendor with all sorts of interesting materials, especially for laser cutting
- Epilog Laser Resource Page: Resource page with materials sites, vendor sites, and samples