3D printed parts are heavily dependent on the CAD design and materials. A poorly designed part will break and will not sustain enough load. But sometimes even a well-designed part will show weakness. This is due to ignorance of other important and simple ways to increase the strength of the 3D printed parts.
By using a good quality filament, designing for 3D printing and fine-tuning the slicer settings we can achieve better print strength every single time.
We share 5 simple ways to strengthen 3D printed parts.
Part Orientation
3D printing is a layer-by-layer deposition process for building an object from ground-up. The layers are deposited in the z-direction are typically weak. While process and material research is helping overcome this inherent drawback, but still every enthusiast must understand to properly orient the print as per the strength he aims to achieve after printing.
A proper orientation can go a long way in achieving a stronger 3D printed part.
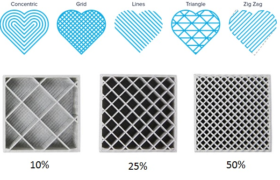
Appropriate Infill Pattern & Percentage
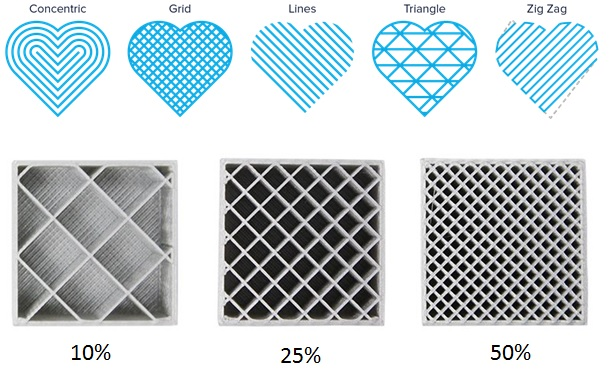
Infill is the material filled inside the outer walls of a 3D print. The amount of the infill can be controlled in terms of the material percentage and the pattern. A 100% infill percentage will make the part completely solid but it will unnecessarily increase the material consumption, increase the weight of the object and ultimately increase the cost of the product. Therefore is it recommended to use optimum infill pattern and percentage. Proper control over infill settings will strengthen 3D printed parts.
Optimum Print Settings
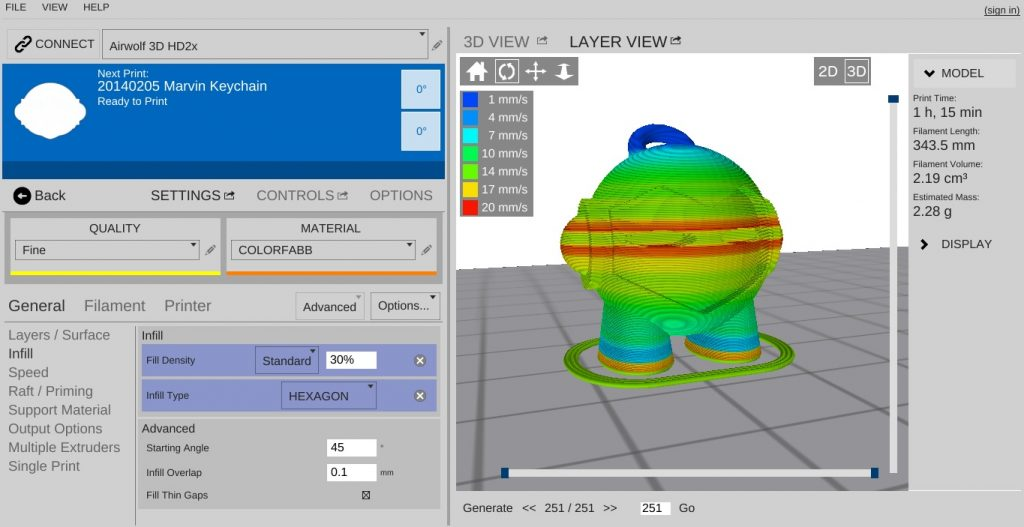
Adjusting and customizing the print settings suitable for every print will result in better quality prints. By selecting the optimum temperature, fine-tuning the fan speeds, adjusting the layer height and the infill percentage with the pattern, etc. will result in strengthening the 3D printed parts.
High-Quality Materials
High-quality materials that offer engineering-grade and high-performance properties should be used for better prints. The print will only be as good as the material used, so the optimum selection of material is important. The selection should also depend on the application of the part to be printed.
Anneal or Post-Process
Annealing is a process of heating a metal, glass or even some polymers and allowing it to cool down steadily so as to remove the internal stresses and toughen the part.
Even PLA can be subjected to annealing and the prints can be made stronger. In a typical test, annealed PLA shows around 40% increase in its stiffness. For annealing, PLA is baked at 80oC (temperature depends on the temperature properties of a specific brand of PLA) for 20 minutes and then allowed to cool down.
ABS can also be annealed and it can be baked at 100oC (temperature depends on the temperature properties of a specific brand of ABS) for 30 minutes and then allowed to cool down.
Nylon12 is baked at 130oC (temperature depends on the temperature properties of a specific brand of Nylon filament) for 30 minutes and then allowed to cool down.
3D printed parts can be easily strengthened by simple aforementioned measures. By exploring more printer settings, the print quality and strength can be further improved.
We encourage hobbyists and enthusiasts to share their experiences and observations for strengthening 3D printed parts. Comment on the article to share how you strengthen your 3D printed parts.