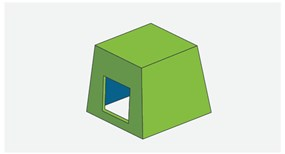
How would you make the part shown in Figure 1 if you were using FacFox’ injection molding services? Well, considering that FacFox supports up to four side-actions per mold, one answer is to use a mold with a side-action to create the bottomless box with the window. After all, without a side-action, a mold feature that protrudes inward from the A-Side of the mold (or outward from the B-Side) would be entrapped in the window when the mold opened, right? Well, that is one correct answer.

However, this part can also be made in a two-part, straight-pull mold without side-actions. It works for one simple reason: the side walls are drafted. That means that the mold surface will begin to pull away from the part surface as the mold begins to open. So if your design can support the draft and you’d like to save a little money and skip the side-action altogether, it’s worth taking note. Take a look at Figure 2 to see how this can be applied.

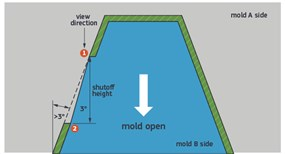
Figure 2 shows a cross-section of the window area in the closed mold in which:
- the gray areas are the mold walls
- the window is being formed partially by an extension of the mold’s A-side and partially by an extension of the B-Side
- the dotted line represents the plane of the outside surface of the wall
- the red line is the shut-off where the metal faces of the two mold halves meet when the mold is closed
Note that the shut-off runs at an angle across the window, dividing the parts of the window that will be produced by the A and B mold halves. Because the wall is drafted, the two mold halves move away from the part (and from one another at the shutoff) as the mold opens and the part is ejected. No part of either mold half is entrapped in the window; hence, no side-action is required.
There is one important consideration when designing a part using this technique: the draft angle of the shut-off. To avoid damage to the mold the shutoff must be drafted a minimum of 3 degrees. Because the shut-off is angled slightly relative to the wall itself, the draft of the wall must be greater than 3 degrees to allow a 3-degree draft of the shutoff. The required amount of wall draft will vary directly with wall thickness and inversely with window height (“shut-off height,” as shown in Figure 2). Most CAD programs can help determine the proper degree of wall draft to create a minimum of 3 degree draft at the shutoff.
If you have questions on side-actions or any other design consideration, please contact an applications engineer at info@facfox.com