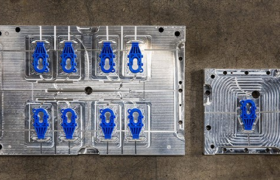
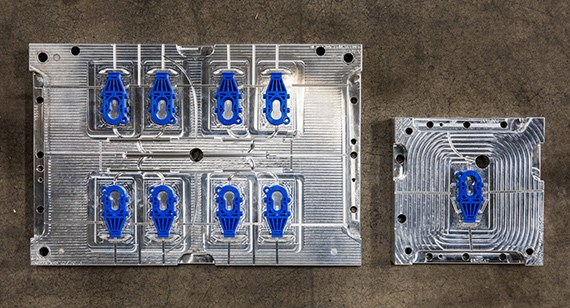
Moving from a single-cavity mold to one that produces two, four, or eight parts at once seems like an easy way to increase production volume and reduce part costs. This can be true in many cases, but only if the right steps are taken and the requisite homework done first. Designing a part for multi-cavity molding is not as simple as copying the CAD file for a single-cavity mold multiple times.
The physics encountered when forcing molten plastic through a mold’s sprues, runners, and gates change as molds become larger and more complex, something that can impact molding performance and part quality. Also, thermal variations within a multi-cavity mold body become more of a concern, and plastic must travel longer distances to reach the finish line, both of which increase the risk of partially-filled cavities and sink as well as part deformation after ejection.
When moving from single- to multi-cavity tooling, it’s important to recognize that parts that behave perfectly in a single-cavity mold might not play well with others, at least not without first making some adjustments or tweaks to the part, the process, or even the material.
Optimize your multi-cavity mold design by:
- adjusting the mold gate
- using side-actions
- including pickouts
- using a family mold
- opting for liquid silicone rubber.
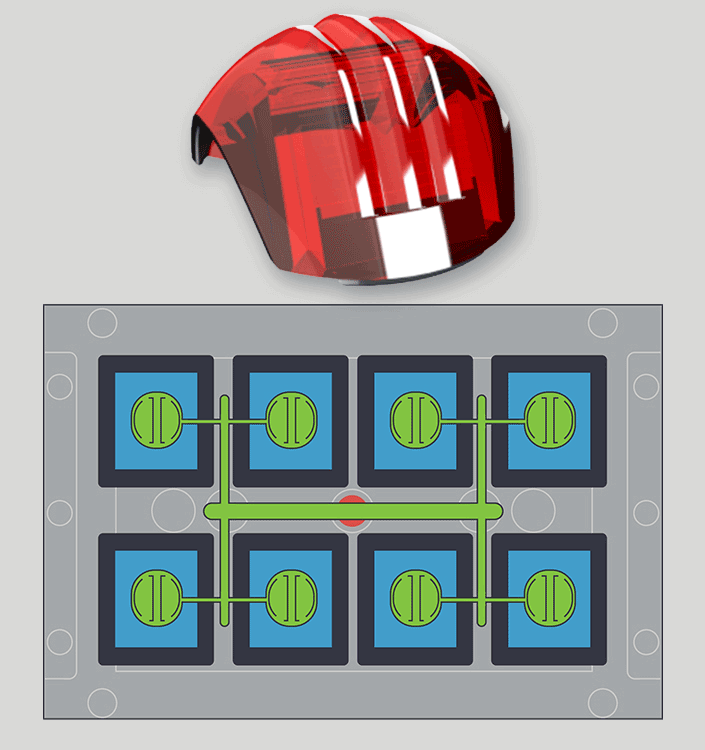
Hold the Gate
One of these tweaks is the gate. Cattle gates, child gates, Gate E24 at the airport—each is designed to control traffic.
The gates used in plastic injection molding are no different. They allow molten plastic to flow into the mold at the beginning of the injection cycle, and then hold it under pressure until the mold cools, the plastic has solidified, and the part is subsequently ejected.
In mold making, there are more types of gates than there are players on a baseball team. Protolabs relies on three: pin-style, hot tip, and tab. Pin-style and hot tip gates are often employed on single-cavity molds to solve challenges with complex part geometries and to reduce gate vestige—the small remnant of runner material that must be trimmed from the finished workpiece—but these are rarely if ever used on multi-cavity molds. Here, tab gates (also known as edge gates) are the rule. Not only is gate placement far more flexible—something very important when trying to squeeze multiple parts into a mold—but the larger vestige that comes with tab gating works well to absorb residual flow stress around that section of the mold.
Another example where costly part redesign can be avoided when making the jump to multi-cavity is gate placement. Consider a mold for a plastic water bottle lid. Initial limited production expectations might dictate placement of the gate in a single-cavity mold gate at a certain mold location. But when production ramps up and the head of supply chain decides it’s time to invest in a multi-cavity tool, the original gate location may be impossible to achieve because of the changes in part orientation required for multi-cavity molding. By discussing product expectations with Protolabs’ applications engineers early in the design cycle, hiccups like this can potentially be avoided.
Note that we also advise against designing your own runner and gate system to create your own multi-cavity tool—Protolabs can help facilitate the design of your multi-cavity mold.
Side-Actions and Pickouts
Similar situations can occur with a side-action. Let’s say that you’ve designed a lightweight bobbin with holes like Swiss cheese running through each flange to reduce mass. This is a perfect use for side-actions, which slide into place prior to the plastic entering the mold—thus restricting material flow—and pop back out before part ejection. While side-actions can work great for a single-cavity mold, this sewing machine accessory most likely wouldn’t qualify for multi-cavity tooling due to that very requirement.
Manually loaded inserts, or pickouts, should also be given careful consideration. Placing a small block of metal into a mold cavity to create a cutout on an internal feature, for example, is fairly straightforward in single-cavity molding. That same approach on an eight-cavity tool, however, is time-consuming, and should be avoided if large quantities are in your product’s future. If this is the case, let us know and we’ll help you design a more efficient mold from the start.
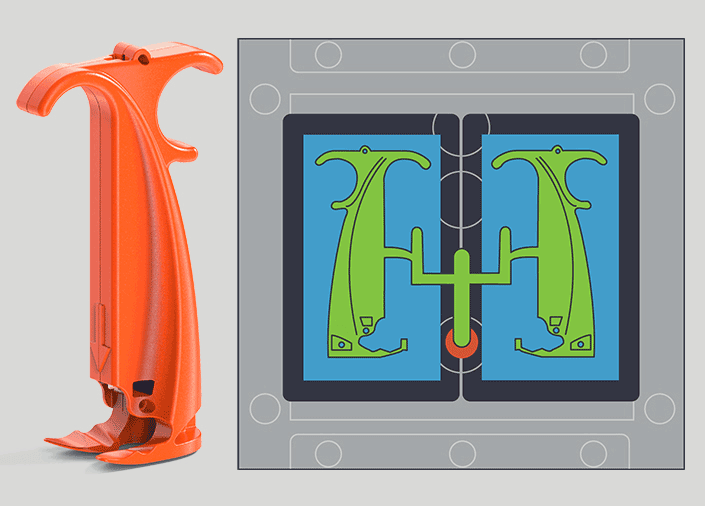
Family Style
Customers at Protolabs occasionally employ family molds for low-volume production needs. This type of mold is used to manufacture different components of a multi-part assembly, or multiple variations of a single component, in a single shot. If you’ve ever assembled a plastic model of a Ford Pinto as a kid (or a “Star Wars” TIE-Fighter replica as an adult), you’ve handled family-molded parts. If this is the approach you want to take for your project, be prepared for some additional work and a greater tooling investment.
Due to the different size and geometry of parts, family molds bring added design challenges, and it might make sense to investigate alternative molding options (e.g., multiple single-cavity tools) until larger production volumes warrant higher tooling costs. That said, Protolabs has successfully tackled many projects involving family molds–part geometry and family size permitting.
Easy Flow
Materials that flow well, like liquid silicone rubber (LSR), are typically well-suited for a multi-cavity situation. Because silicone flows more easily than nickels at a Las Vegas casino, most of the challenges faced with multi-cavity and family molds are greatly reduced. If your project requires a flexible material with excellent strength and dimensional stability, good performance at extreme temperatures, chemical resistance and biocompatibility, LSR is a solid option.
For Your Consideration
Beyond the design elements unique to multi-cavity tooling, there of course are common injection molding guidelines to keep in mind like draft, wall thickness, material choice, and surface finish. The likelihood of success increases—especially as the number of cavities increases—with part designs that account for these variables and others. See our recent Design Tip on leveraging low-volume injection molding for a more thorough examination of design considerations for plastic injection molding.
The bottom line is this: Efficient injection-molded part design is about reducing part costs. This is true whether you’re making 5,000 parts or 5 million. Some designers and manufacturers aim to shortcut the mold development cycle by jumping feet first into multi-cavity tooling, skipping the critical prototyping phase. Protolabs advises against this approach, not because we want to sell you another mold, but because testing parts using a single-cavity mold is an excellent way to vet design, improve quality, and likely save some money in the long run. Some customers test multiple iterations of the same molded part in parallel with multiple single-cavity molds, select the winner, and then move into a multi-cavity mold. This can increase your overall speed to market by helping you avoid development speed bumps along the way.
An On-Demand Option
When you do make that decision to move into using a multi-cavity mold, you can take advantage of an option at Protolabs called on-demand manufacturing (ODM), which straddles the fence for injection molding customers who aren’t quite ready to pull the trigger (and may never need to) on a production mold, but who have steady low-volume production needs beyond prototyping. ODM offers a long-term injection molding option with substantially lower cost of ownership. Risk goes down and flexibility goes up. For ODM, single- or multi-cavity molds apply, inspection reporting options are available, and you’ll want to consider: what your different part design requirements might be, the expected lifespan of the part or product, and cost issues including how ODM compares to prototyping tooling, and how ODM might impact the per-piece price.
All of the aforementioned design considerations for multi-cavity molds can be discussed with a Protolabs applications engineer, at info@facfox.com, who can help direct you to the right tooling.