If 3D prints cool unevenly, they can curl away from the build plate. Check out 3 easy ways to fix 3D print warping with PLA, PETG, & ABS.
Why Does It Occur?
Filaments used in FDM 3D printing are usually thermoplastics, materials that can melt (turning to liquid), cool (turning to solid), and still keep their mechanical properties. In 3D printing, we heat the filament to somewhere beyond its melting point so that, in its liquid form, it can be extruded onto a build plate.
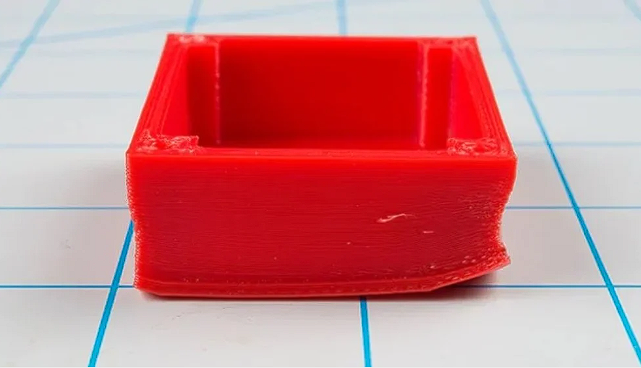
While heating, thermoplastics expand, shrinking again when they cool down and return to a solid. This transformation creates some movement in extruded plastics, which is the root of 3D print warping: colder layers pulling on hotter layers as they contract. And if this occurs when the hotter layers are below the colder ones, the 3D printed object will be forced to let go of its grip on the build surface, and curl upwards.
To make matters worse, the problem can (literally) pop up after a good portion of the print job is already finished, ruining an otherwise perfect print!
If we could keep the whole 3D printed model at the exact same temperature at all times, not even a tiny corner of the model would try to warp. But this is pretty much impossible. What we can do is try to keep the 3D printed model’s temperature as even as possible. And we can also do our best to convince the model to hold on to the build surface like its life depends on it!
Below, we’ve covered three methods to attempt to combat warping and save your prints.
Rare Case: Print Bed Warping
Some hobbyists have reported the print bed warping along with the print, and this seems to mostly occur with large prints (with broad first layers) on spring steel surfaces. This likely occurs because the large print accumulates even more warping forces than usual and the flexible build plate – though sticking well to the print – bends along with it! If you experience this problem (or are worried you might) and aren’t able to apply the following solutions to mitigate it, consider switching to a glass build plate.
Regulate the Temperature
Temperature, not just of the filament but of the bed and the surrounding air, is perhaps the most important factor in preventing warping. Here are some tips on maintaining the optimal temperature conditions:
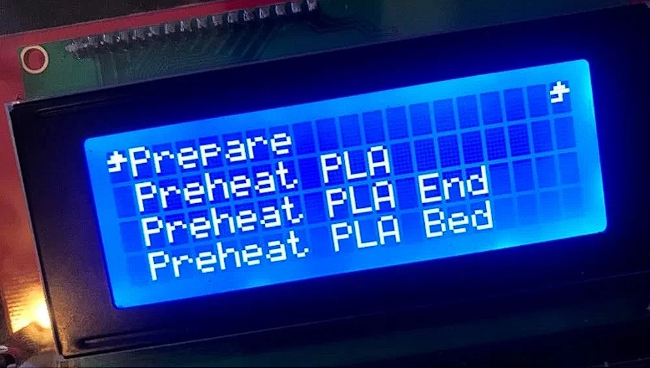
- Use a heated bed: This helps even out the temperature in the model. A heated build plate also helps with bed adhesion. Usually, the filament manufacturer gives recommended bed temperatures.
- Use an enclosed print chamber: This helps maintain a constant ambient temperature throughout the printing process. If your printer doesn’t have an enclosure, check out our article on how to build your own.
- Control room temperature: Do this by keeping windows and doors closed. (Just remember that you still need air to breathe!) Prevent any kind of cold air from suddenly touching the 3D print.
- Adjust the cooling: This can be tricky, as you still need to cool the filament for better bridging, less stringing, and to allow the melted plastic to return to a solid fast enough to build an accurate geometry. But turning off or lowering the speed of the cooling fans that are directed at the 3D print, at least for the first few layers, may help to even out temperatures enough to keep your model flat on the build plate.
Use Adhesives
As we mentioned, improving the adhesion of your bottom layer on the print bed can be enough to prevent the corners from lifting. This usually involves coating the bed in a layer of something sticky before starting the print.
With any adhesive, it’s best to do a test print of a small part to make sure it’s not working too well. You don’t want it to be so stuck that you damage the part (or even your bed) when you remove it!
- Use hair spray: This helps to establish a good grip for most types of filaments. You can also use a specially-formulated 3D printing bed spray like 3DLac.
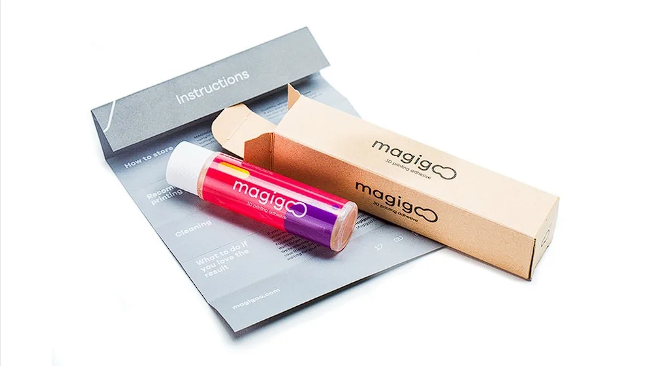
- Use a PVA glue stick: A plain old glue stick is another popular option. There are also specific bed adhesion products, like Magigoo 3D Printer Bed Adhesion. This should help PLA and many other filaments stick to the build plate. Whatever you choose, you should only need a thin, even layer on your build plate.
Change Your Slicer’s Settings
Finally, there are some slicer settings that can assist in preventing warping and holding the print in place on the bed:
- Print more slowly: You would be surprised how often slower print speeds can help solve the most stubborn printing problems, like warping and curling. Remember to also lower the nozzle temperature accordingly.
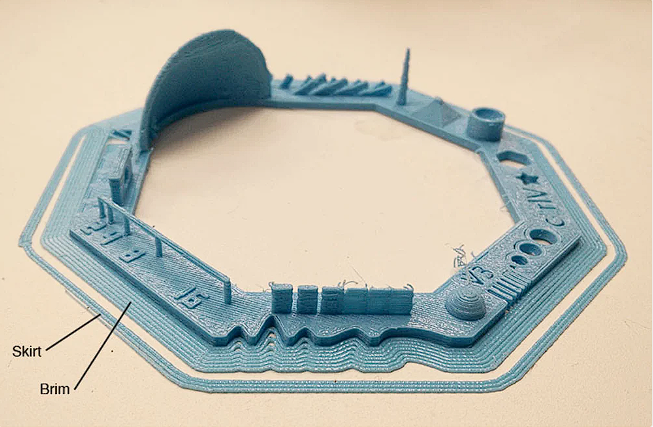
- Create a brim or skirt in your slicer: A skirt is a perimeter offset from the edge of the part, while a brim is one or a few extra layers of outlines attached to the edge of the base. This gives your model a wider bottom area, enhancing the grip on the build surface.
- Add a raft: A raft is a structure that makes the base of your 3D printed model bigger, similar to a brim, but also continues underneath the whole base of the part. This again creates a better grip on the build surface but should be easier to pry off the model.
- Add mouse ears: Mouse ears are small discs, a couple of layers high, that you print under your model to enhance bed adhesion on corners. Place the discs on the build plate in your slicer so that they barely touch each corner of the model. Then it will be a piece of cake to remove them from your model when your print job is done. You can download some ready-made mouse ears from tugeagon on Thingiverse, or use CAD software to draw your own.