Perhaps the most common question we get from new 3D printer owners is, “How do I get rid of oozing and stringing on my prints?”
Extruding thermoplastic is a complicated process with dozens of variables in play. However, understanding what causes oozing/stringing on your prints doesn’t have to be that complicated.
What is Retraction?
First, let’s start with the most common misconception about what retraction does and how it works.
Myth – Retraction “sucks” filament back up through the hot end. So, the more retraction you use, the less oozing you’ll get.
Fact – Once filament has melted in the “melt zone” of your hot end, it cannot be retracted. Retraction does not create negative pressure. Hot ends are not sealed/airtight. If they were, then the negative pressure would “suck” molten filament back up through the hot end. This would likely lead to lots of jams and other extrusion issues, but this is not the case.
Think about candle wax. If you were to put a small cylinder of wax into a pool of melted candle wax and then pull it out, would the melted wax come with it? Of course not. While a small amount of wax will stick to the cylinder when you remove it, it does not pull the pool of molten wax up with it.
In the same way, the solid filament above the melt zone does not retract the molten filament with it.
Ok, so if retraction doesn’t pull filament back up through the nozzle, what does it do?
The purpose of retraction is simply to relieve pressure from the melt zone so that filament isn’t being forced through the nozzle during non-print moves.
What are the Best Retraction Settings?
There is a lot of misinformation out there about how much retraction you should have. I’ve seen recommendations from .1mm all the way up to 20mm. So what is the correct amount?
The correct amount is the minimum amount required to reduce the most stringing on your part. Some machines and hot ends require more retraction than others, and each material has different requirements. In general, though, it’s unlikely you should need more than 5mm or less than 1mm.
Settings to Tune
There are a few other important settings that affect oozing/stringing on parts. We’ll go through the process of adjusting your machine to get the least amount of oozing possible, but it’s critically important that you start out with a properly calibrated extruder. If you haven’t calibrated your extruder before, read this before you start adjusting retraction settings.
There are only 2 settings we’ll be adjusting for retraction in this article:
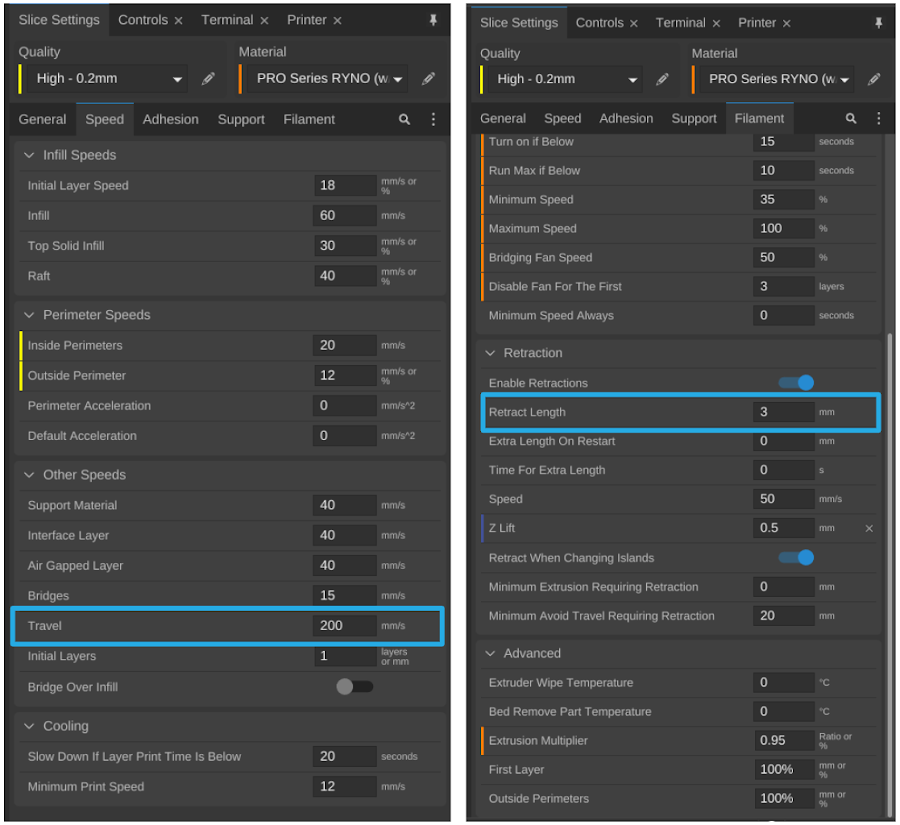
- Retraction: Length on Move
- Speed: Travel (speed for non-Print moves)


These settings were used for all test prints:
- Layer Height: 0.25mm
- Infill: 25% – Triangle
- Perimeters: 2
- Solid Top Layers: 2
- Solid Bottom Layers: 2
- Infill and Perimeter Speeds: 40mm/s
- All parts were printed with a skirt, but the skirt was removed for some of the pictures in order to more clearly visualize the oozing/stringing
Start Dialing in the Settings
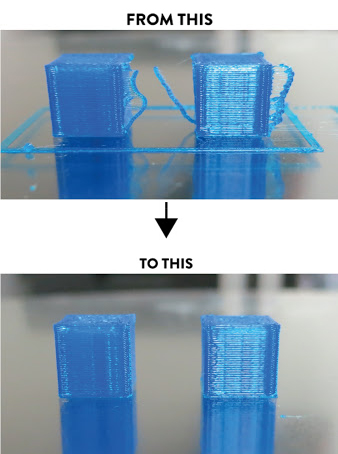
This print had 0 retraction and 40mm/s travel speed (non-print moves). This represents about the worst oozing/stringing possible on this machine

This print had 0 retraction, but the travel speed was increased from 40mm/s to 150mm/s.

This print has 1mm retraction with 150mm/s travel speed:


3mm retraction, 150mm/s travel speed

Perfect! No stringing, no oozing. Just perfectly printed cubes.
So, it looks like 3mm is the right amount of retraction for PLA on this machine.
To quickly and easily tune your settings to achieve optimal retraction, download the cube retraction print here, and print it with your current settings.
Based on your results, adjust either the travel speed or the retraction distance and reprint. Only change 1 setting at a time. That way, you can easily see the effect of each change.
Adjust your retraction distance up/down by either 0.5 or 1mm increments. We don’t recommend distances greater than 5mm, or less than 0.5mm.
Lastly, you may need to perform this test and adjust for different materials. Some materials may ooze more than others, and may require increased retraction distance & travel speed to achieve the same results.
Happy Ooze-Free Printing!
Source: https://www.matterhackers.com/articles/retraction-just-say-no-to-oozing