At some point, you may encounter a filament jam or a clogged nozzle where your 3D printer is not extruding. This guide is intended to help you prevent such jams, or fix them as painlessly as possible.
If you arrived at this article, I have to assume you’re either a seeker of knowledge or an unfortunate soul with a 3D printer that is not extruding. In either case, we are here to enlighten you with some techniques for making your 3D printer run like a dream.
Understanding Jams
The best way to prevent 3D filament jams is to notice them ahead of time. This can be achieved in many ways including, but not limited to: understanding the anatomy of the 3D printer (including understanding the extruder), learning the tolerances of your printers, and properly storing your filament.
We’ll start by understanding what causes 3D printer jams in the first place – no matter what kind of printer you have, jams and clogs are usually universal issues.
Nozzle Height
Proper nozzle height is key to successful 3D extrusion. If your nozzle is too close to the bed when you start printing, it’s going to cause retrograde extrusion, which in turn jams the nozzle. If your nozzle is too far, your filament will be printing in the air, which means that your filament will not adhere to the print bed. To make it clearer, we have an illustration that demonstrates this point. Further guidance can be found in our article 3D printing 101 Series – Bed Leveling.
| Nozzle Height | View | Info |
Y/N |
| Too High | 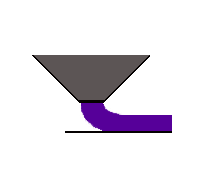 |
Too much distance will cause the filament to extrude into the air. This is wil not stick to the bed. |  |
| Perfect | 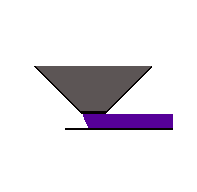 |
The tip of the nozzle is adding slight pressure to the top of the filament, greatly increasing how much filament is securely sticking to the bed and subsequent layers. |  |
| Too Low | 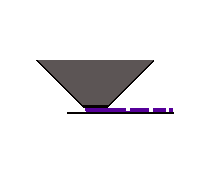 |
The filament is not flowing properly, which can cause retrograde extrusion. Layers are predominantly choppy and short. Continued printing in this manner will likely cause a jam. | |
How nozzle height can affect a print.
Temperature
Proper temperature is a must, and each filament requires a different printing temperature. For some quick guidance take a look at this Filament Comparison Guide – there are temperature recommendations for each type of filament. This may seem obvious, but it never hurts to check and double-check what temperature your filament optimally extrudes. If your hotend is too cold, it can cause two different kinds of jams. I’ll call them Jam 1 and Jam 2.
Jam 1 – your hotend is too cold, you filament cannot extrude at the proper speed (or at all). As a result, the hobbed bolt grinds away the filament, leaving nothing behind to pull on. This is one of the easier jams to clear by increasing the extruder temperature. Before raising the temperature of the hotend, take a moment to clear any debris from the extruder motor/hobbed gear.
Jam 2 – your hotend is too cold and just warm enough for the filament to heat and fill the extruder, but not hot enough to extrude quickly, leaving your hotend filled with rapidly cooling plastic. If this goes on long enough it can harden, leaving you with the most difficult kind of jam to clear.
If your hotend is too hot, it typically won’t cause a jam as long as you keep it flowing, but it can cause your filament to extrude poorly, i.e. dripping out or leaving bubbles.
If you leave 3D filament in the hot nozzle for a long period without extruding, it can cause a jam similar to Jam 2 above – this is called heat creep.
What is heat creep?
Heat creep is when 3D filament plastic heats up beyond the ‘Melt Zone’ and melted plastic ‘creeps’ into the heat break area (see image below for zone definitions). PLA filament is particularly prone to heat creep because of its low melting temperature and high heat capacity. Remedies for heat creep can be pushing filament though manually, or increasing the temperature for a moment, extruding, and then decreasing temperature. There are different kinds of hotends but in all cases, be sure you have an active cooling fan on the Peek or metal heat sink area when the hot end is at temperature.
Filament Tension
Make sure that your 3D filament is loading into the printer properly, with minimal tension outside of the extruder. Be sure that the spool of filament is mounted and is able to spin freely – often tension from the filament leading to the extruder can cause a printer to stop extruding. Every printer has a different way to load the filament, so just make sure that you’re using your optimally!
Bed Leveling Calibration
We have written an article on software bed leveling here, but I think we can cover some of the basics.
You want your print bed to be as level as possible, so calibration is a must if you’re looking to prevent jams. As we covered already, if your nozzle is too low, you will cause retrograde extrusion which will very likely cause a jam. If it’s too high, you probably won’t cause a jam, but you will have a big mess of plastic on your hands later.
Hardware calibration varies from printer to printer, so you’ll have to check with your manufacturer for tips and tricks. Software bed leveling, however, is available for most printers through our program MatterControl. Though easier than hardware calibration, it is still recommended that you get your printer as calibrated as possible in conjunction with software bed leveling.
Clearing Jams
There are a few techniques for clearing 3d printer jams and we’ll go over them each in turn.
The first thing that you should try in the event of a filament jam is heating your hotend up to a slightly higher temperature than you normally would, for whatever material you were printing with. Typically 5-10°C higher is a good place to start. After it heats up, take your filament and try to push it through the hotend by hand. If your filament is too malleable, it is fine to use a small screwdriver or other such tools to push with. Note – when using a tool, be careful not to damage the hotend by pushing too far.
This technique will clear the vast majority of your jams, if the problem persists, there are two more things to try.
If you find that your filament has been ground away, you can typically check your printer’s extruder and find that the teeth on your hobbed bolt are filled with plastic. (If you can, always check with the manufacturer of your 3D printer before any major maintenance – you don’t want to accidentally void your warranty.) Take a small pointed tool (something like a toothpick will work), and gently scrape the plastic out of the teeth. Your bolt will have a renewed ability to pull your filament. Tightening your drive block a couple of turns may help as well. Once again, you will probably want to review the dynamics of your extruder before attempting this.
If neither of these things is working, there is another method. Depending on the size of your nozzle, you can take a steel high E string (the kind you would find on any standard acoustic guitar) or an acupuncture needle (can be purchased online). Insert the string/needle into the nozzle tip, heating the extruder if need be, and slide it back and forth inside. This can dislodge little pieces of hardened plastic, and hopefully allow your filament to extrude smoothly. Note – though effective, this is somewhat risky. Do not try it unless you’re confident that you don’t require any outside help.
Full disassembly of the heating unit is possible for most machines, but as stated earlier, may void warranties. If you are able to get the nozzle free, it is possible to melt out the residual filament using a heat gun or blowtorch (do not do this without taking the proper safety precautions or under supervision). Once the extrusion path is clear, you can reinstall the nozzle.
I’ve tried everything to fix my clogged nozzle, and my 3D printer is still not extruding. Now what?
Printer manufacturers typically offer support for a time, and they will know their individual printers the best. If they still can’t help you, odds are you may have to purchase a new hotend. Don’t worry, this isn’t the end of the world. They aren’t too expensive, and they’re fairly easy to replace – sometimes it’s even best to upgrade your extruder or hotend right away in an attempt to avoid clogging.
Good luck, and happy printing!