Got 3D printing issues? Check out our 3D printing troubleshooting guide to all common 3D printing problems and their solutions. Includes both FDM and SLA.
It’s amazing what your 3D printer can produce. However, we’ve all had those infuriating moments when, despite everything, a seemingly simple model just refuses to print successfully.
We’ve had our fair share of print failures here at FacFox. With that, direct from our 3D printer troubleshooting experience, we’ve put together what we hope is the most comprehensive guide available to diagnose and fix common 3D printing problems. And (since this most recent update) we’re not just talking about FDM problems anymore.
Issues with warped prints, print bed adhesion, layer shift, and other 3D printing errors are not unique to FDM, with SLA 3D printing prone to its own particular set of printing woes. Fear not though as we’re starting to expand this guide to reflect the rise in affordable desktop SLA printing, offering comprehensive 3D printing troubleshooting advice for those of you up to your elbows in resin with nary a print to show for it.
Use the appropriate links below to jump to your particular situation.
FDM 3D PRINTING PROBLEMS
SLA 3D PRINTING PROBLEMS
Or for an item-by-item look at each 3D printing problem, just use the article content list. Good luck with your next print!
FDM 3D PRINTING PROBLEMS: NOTHING IS PRINTING
Try as you might, your print just refuses to get off the ground. No filament extrudes from your hot end; the possible causes for this type of 3D printing problem are numerous.
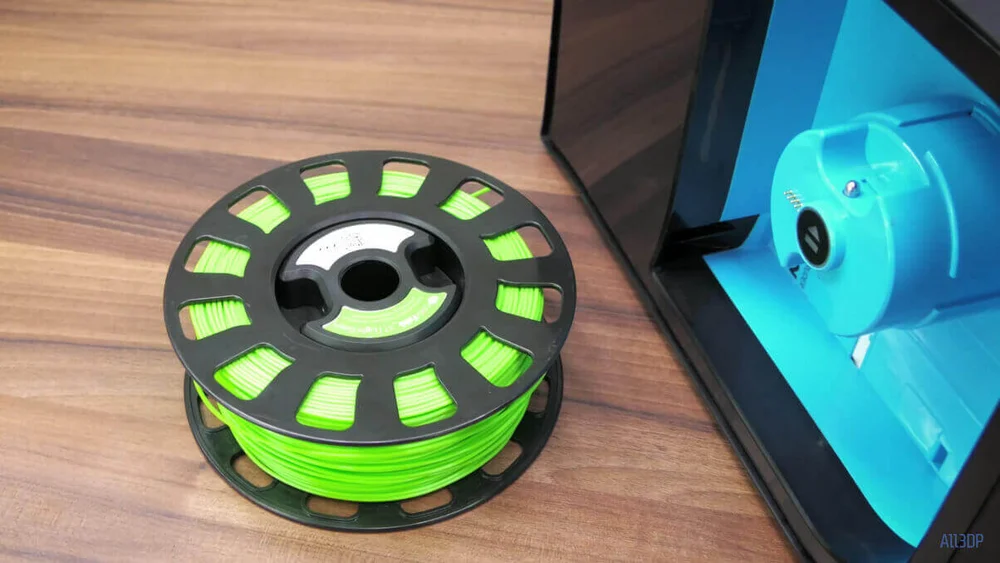
Out of Filament
What’s the 3D Printing Problem?
Nothing is printing even though the model has been set and configured correctly in the slicing software. However, try as you might when repeatedly sending the print to the printer still nothing happens bar the odd spit of filament emerging from the nozzle.
Alternatively a model is part way through the print and the filament extrusion stops but the nozzle continues to print into air.
What’s Causing this 3D Printing Problem?
It’s an obvious problem that’s unmissable in many printers such as the Prusa i3 style machines where the filament reel is in full view, but on other printers such as XYZ DaVinci, Cel Robox and Ultimaker machines, the issue isn’t always immediately obvious.
These and many other printers either encase the filament within the design of the printer, or the filament is hidden round the back.
Of course, some printers feature smart spools that feed back data to the software and highlight if the filament reel is close to, or out of material. However we all like to tinker and use our own tweaked firmware or third party software, and these sometimes work around such failsafes. And then there are other printers that simply don’t feature any type of failsafe at all.
In all cases, especially with Bowden style extrusion systems, you’re going to have to extract some remaining filament and then feed in fresh material.
3D Printer Troubleshooting: Out of filament
3D PRINTING TROUBLESHOOTING TIP: CHECK THE FILAMENT REEL
Look at the filament reel and see if there’s any filament left. If not load a new reel. Easy.
3D Printing Problem Checklist: Out of filament
- Check the filament reel
Nozzle Too Close to Print Bed

What’s the 3D Printing Problem?
Inexplicably, despite loading the filament and the print head moving without a hitch, no filament is depositing on the print bed.
What’s Causing this 3D Printing Problem?
Quite simply, your nozzle may be too close to the print bed. If you’ve somehow tuned your print bed to mere microns from your nozzle opening, it’s unlikely the melted filament has room to escape. At best your print will be missing its first layers, and have a higher chance of not sticking once the filament does extrude. At worst, you’ll cause a backup of melted filament in your hot end, possibly leading to a blockage.
3D Printing Troubleshooting: Nozzle Too Close to Print Bed
3D PRINTING TROUBLESHOOTING TIP: Z-AXIS OFFSET
Just raising the height of the nozzle slightly can often help. Most 3D printers in their system settings will allow you to set a Z-axis offset. To raise your nozzle away from the print bed you’ll need to increase the offset into the positive value. This also works for the reverse, with a negative offset helping to address your prints not sticking to your bed.
Be careful though, too high of an offset and it won’t stick to the platform.
3D PRINTING TROUBLESHOOTING TIP: LOWER THE PRINT BED
Alternatively if your printer allows for it, you can achieve the same effect by lowering your print bed. This is the more troublesome fix though, as it requires you to re-calibrate and level the bed for even prints.
3D Printing Problem Checklist: Nozzle Too Close to Print Bed
- Z-Axis Offset
- Lower Print Bed
Blocked Nozzle
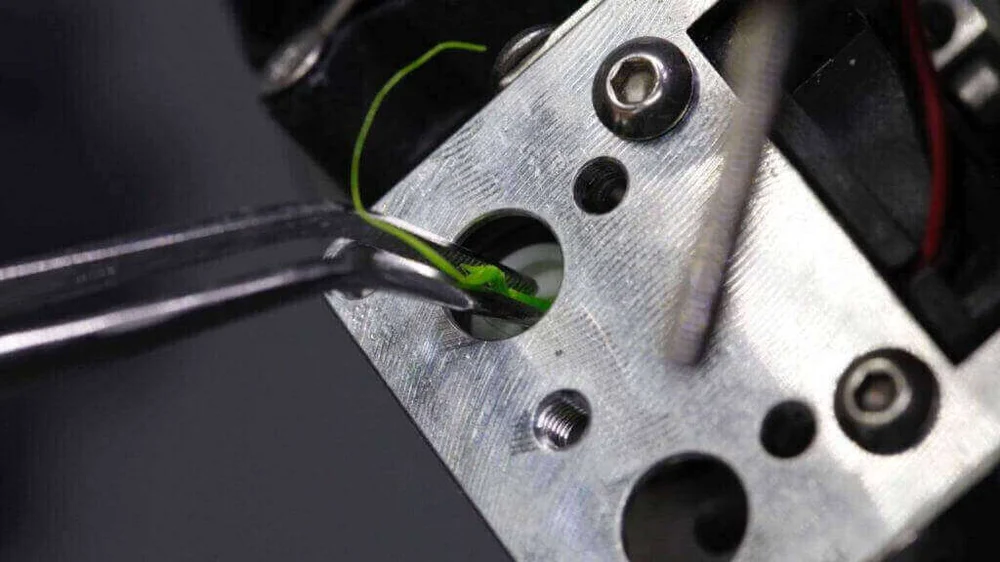
What’s the 3D Printing Problem?
You initiate a print job but whatever you try, nothing comes out of the nozzle. Extracting the filament and reinserting doesn’t work.
What’s Causing the 3D Printing Problem?
A small piece of filament has been left behind in the nozzle after changing spools, often because the filament has snapped off at the end. When the new filament is loaded, the piece of old filament that is left in the nozzle doesn’t allow the new filament to be pushed through.
A little printer maintenance can go a long way to reducing the chance of problems like a blocked nozzle affecting your extrusions. In fact you’ll often find that before a clog even appears, there is old carbonized filament sitting inside your nozzle. It can and will sit there for weeks or even months without you realizing, but there will be small signs in the quality of your prints.
The effects are often overlooked; such as small nicks in the outer walls, small flecks of dark filament, or small changes in print quality between models. These defects are often simply put down to the slight variants we come to expect from 3D printers, but really there could be something a little more sinister going on. A cleaning method known as the Atomic Pull or Cold Pull (which we detail below) can clear this up.
You’ll commonly see this if you frequently switch from a PLA to ABS, for example. A small amount of PLA is left in the nozzle, and it is heated beyond its normal melting point. That can mean it will carbonize and burn.
Likewise, switch between ABS and Nylon and again you’ll witness something similar. It’s not uncommon to see a wisp of smoke appear briefly as the new filament is fed through.
3D Printing Troubleshooting: Blocked Nozzle
3D PRINTING TROUBLESHOOTING TIP: UNBLOCK WITH A NEEDLE
If you’re lucky then unblocking can be a quick and easy process. Start by removing the filament. Then using your printer’s control panel (if it has one) select the “heat up nozzle” setting and increase to the melting point of the stuck filament. Alternatively, hook your printer up to a computer running compatible control software and heat the nozzle using that. For PLA set the temperature to 220 C. Once the nozzle reaches the correct temperature, use a small pin to clear the hole (being careful not to burn your fingers). If your nozzle is 0.4mm then you need a pin that is smaller; an airbrush cleaning kit works perfectly.
3D PRINTING TROUBLESHOOTING TIP: PUSH OLD FILAMENT THROUGH
If you find that the nozzle is still blocked then you may be able to push the filament through with another bit of filament. Start by removing the filament as before and then remove the feeder tube from the print head. Heat up the hot end to 220 C for PLA and then using another piece of filament to push this through from the top to try to force the stuck filament in the nozzle out. Usually if the new filament hasn’t succeeded in unblocking then the extra pressure you can exert by hand might just do the job. However don’t push to hard as you’ll risk bending the horizontal printer rods.
Once the end clears use a needle to push through the nozzle and a brush to clean any filament excess.
3D PRINTING TROUBLESHOOTING TIP: DISMANTLE AND REBUILD THE HOTEND
In extreme cases when the nozzle remains blocked, you’ll need to do a little surgery and dismantle the hot end. If you’ve never done this before then it’s a good idea to make notes and take photographs so you know where everything fits when you reassemble. Start by removing the filament, then check your printer’s manual to see exactly how to dismantle the hot end.
The Atomic Pull
3D PRINTING TROUBLESHOOTING TIP: ATOMIC PULL PART I – CHOOSE A MATERIAL
You can use ABS or Nylon for this, but over time we’ve found that the most consistent results come from Nylon due to its higher melting point. The filament also holds its shape far better. ABS is more common however, so we’ll use it here.
3D PRINTING TROUBLESHOOTING TIP: ATOMIC PULL PART II – REMOVE FILAMENT
Start by removing the filament that’s already in the print head in the usual way for your printer. Then remove the Bowden tube or release the direct drive, so that when the time comes you can manually feed the filament through.
3D PRINTING TROUBLESHOOTING TIP: ATOMIC PULL PART III – INCREASE THE NOZZLE TEMPERATURE
Increase the nozzle temperature to 240 degrees. We’re using ABS, but if using Nylon check the melting point temperature on the packaging. Leave it at this temperature for 5 minutes without pushing the filament through.
3D PRINTING TROUBLESHOOTING TIP: ATOMIC PULL PART IV – PUSH THE FILAMENT THROUGH
Slowly apply pressure to the filament until it starts to come out of the nozzle. Pull it back slightly and push it back through again until it starts to flow from the nozzle.
3D PRINTING TROUBLESHOOTING TIP: ATOMIC PULL PART V – REDUCE THE NOZZLE TEMPERATURE
Reduce the temperature to 180 degrees for ABS or 140 degrees for Nylon (you’ll need to experiment a little for your filament). Leave the printer at this temperature for 5 minutes.
3D PRINTING TROUBLESHOOTING TIP: ATOMIC PULL PART VI – EXTRACT THE FILAMENT
Pull out the filament from the head. When you look at the end you should see some black carbonized material at the end. Repeat the process until clean. If the filament won’t pull from the nozzle, increase the hot end slightly.
3D Printing Problem Checklist: Blocked Nozzle
- Heat the nozzle and clean with a needle
- Remove the feeder tube and try pushing the filament through with another piece of filament
- Dismantle the hot end and see if you can extract the filament blockage
- Try an Atomic Pull (Cold Pull)
Print Head Misses the Bed

What’s the 3D Printing Problem?
There’s really no missing this one. At its most severe the noise will instantly alert you that something is very wrong.
When the printhead misses the bed it will usually also have reached the limit of either the X or Y position. As the head tries to travel beyond it’s furthest point noise will be generated through slipping belts, grinding cogs, or the head simply trying to rip through the side of the printer.
It’s very unlikely that your printer will succeed in producing a print in this state. And while it’s easy to fix, it’s not a problem that can be overlooked or dealt with at a later time.
What’s Causing this 3D Printing Problem?
Misconfiguration, wrong printer selection or worn out or broken end stops are all common issues.
If the problem starts with a new printer then the likelihood is that something is amiss with the printer’s configuration. Run through the setup process again and ensure that you have the correct firmware version for your printer.
Accidentally selecting the wrong printer from a dropdown list in your slicer program can be a common cause for this 3D printing problem. For example, trying to print using Ultimaker Go using print files configured for the Ultimaker 2.
When you set up your printer ensure that you have specified the correct print volume, again either in the printer’s firmware or through software. If the printer thinks it has a bigger print platform than it has then it’s going to try to use it, even if it’s not there.
If your printer is usually fine and then the problem occurs suddenly, start by double checking your print preparation software. Something may have reset or been altered by an update! It’s not unusual for software to either revert to the default settings or to automatically select the latest printer version, even if that not the one you’re using.
And if all else looks fine then it could be that one of your end stops in the printer has stopped working.
If this happens it can all get very messy.
3D Printer Troubleshooting: Print Head Misses the Print Bed
3D PRINTING TROUBLESHOOTING TIP: CHECK SLICER FOR CORRECT PRINTER
Before trying anything else make sure that you have the correct printer selected in your printing software. All printers are different so even if the print bed of two printers are the same it’s highly unlikely the other dimensions and settings will match exactly.
3D PRINTING TROUBLESHOOTING TIP: UPDATE FIRMWARE
If you’ve just purchased the printer and this issue is happening make sure you have latest version of the firmware installed. Once updated run through the setup process and double check all settings, especially around the size of the print area are correct.
3D PRINTING TROUBLESHOOTING TIP: CHECK END STOPS
This will take a little more effort to diagnose. Watch the print head move. If it tries to push past the furthest point one of its axes, check that an end stop hasn’t disconnected. If all looks fine (and none of the above steps fixed the issue for you) then replacing the end stops with new ones should be your next step.
3D Printing Problem Checklist: Print Head Misses the Print Bed
- Check slicer for correct printer
- Update firmware
- Check end stops
Snapped Filament
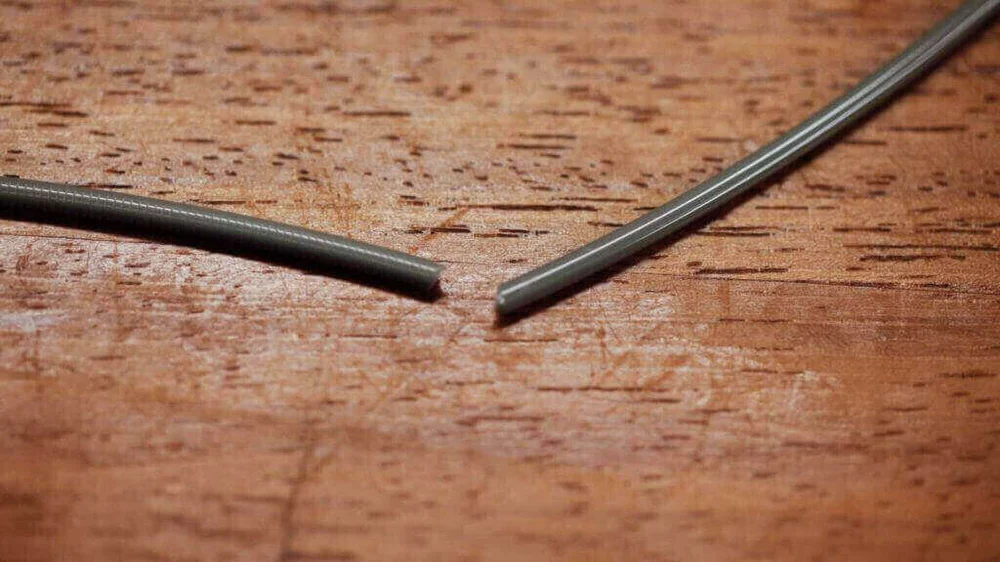
What’s the 3D Printing Problem?
The filament spool still looks full, and when you check there appears to be filament in the feed tube, but nothing’s coming out of the nozzle. This is more of an issue with Bowden feed printers than direct feed as the filament is hidden so breakages aren’t always immediately obvious.
What’s Causing the 3D Printing Problem?
Caused by a number of issues but primarily old or cheap filament. Although the majority of filaments such as PLA and ABS do last a long time, if they’re kept in the wrong conditions such as in direct sun light then they can become brittle. Then once fed into the printer no amount of adjustment is going to help.
Another issue is filament diameter, and this can vary through manufacturer and batch. Sometimes if the idler tensioner is too tight then some filament that still has a good amount of life left in it can snap under the pressure.
3D Printing Troubleshooting: Snapped Filament
3D PRINTING TROUBLESHOOTING TIP: REMOVE THE FILAMENT
The first thing to do is to remove the filament from the printer in the usual way. In the case of the Ultimaker select Maintenance and Change Material. As the filament will usually have snapped inside the tube you’ll need to remove the tube from both the extruder and hotend. Then heat the nozzle and pull out the filament.
3D PRINTING TROUBLESHOOTING TIP: TRY ANOTHER FILAMENT
If after reloading the filament it happens again, use another filament to check to see if it’s not just the old brittle filament that should be disposed off.
3D PRINTING TROUBLESHOOTING TIP: LOOSEN THE IDLER TENSION
If the new filament snaps check that the idler tensioner isn’t too tight by loosening all the way. As the print starts, tighten until there is no slippage of the filament.
3D PRINTING TROUBLESHOOTING TIP: CHECK THE NOZZLE
Check the nozzle isn’t blocked and give it a good clean.
3D PRINTING TROUBLESHOOTING TIP: CHECK FLOW RATE AND TEMPERATURE
If the problem continues check that the hot end is getting hot and to the correct temperature. Also check that the flow rate of the filament is at 100% and not higher.
3D Printing Problem Checklist: Snapped Filament
- Check the filament isn’t past its best
- Check the filament diameter
- Adjust the idler tension
- Check that the hot end is clear and reaches the correct temperature
- Set the flow rate to 100%
Stripped Filament

What’s the 3D Printing Problem?
Stripped or slipping filament can happen at any point of the print process, and with any filament. The result is that no filament is extruded from the hot end bringing your print to an abrupt end.
What’s Causing the 3D Printing Problem?
Blockage, loose idler tensioner, wrong hot end temperature, these are just a few of the common causes, but all are usually easy to correct. The result of the problem is that the knurled nut or toothed gear in the extruder is unable to pull or push the filament through the printer. As the motor spins the small teeth on the gear that would usually grip and feed the filament through the system, instead wear it away until there is no longer any grip, and the gear and filament slip.
3D Printing Troubleshooting: Stripped Filament
3D PRINTING TROUBLESHOOTING TIP: HELP FEED THE SYSTEM
If the filament has just started to slip, you can usually tell by the noise and the appearance of plastic shavings, then apply some gentle pressure to the filament to help it through the system. This will often help to get the machine printing smoothly again.
3D PRINTING TROUBLESHOOTING TIP: ADJUST THE IDLER TENSION
Start by loosing the idler, feed in the filament and tighten until it stops slipping. Filaments vary in diameter so although the idler will absorb some difference in diameter some filaments will require fine adjustment.
3D PRINTING TROUBLESHOOTING TIP: REMOVE THE FILAMENT
In most cases you’ll need to remove and replace the filament and then feed it back through the system. Once the filament has been removed cut the filament below the area that shows signs of slipping and then feed back into the system. If the filament has snapped it may be passed its usable best. Try it again and if it snaps again and you find the filament appears brittle discard and use another filament.
3D PRINTING TROUBLESHOOTING TIP: CHECK THE HOT END TEMPERATURE
If you have just inserted a new filament as the issue started, double check that you have the right temperature.
3D Printing Problem Checklist: Stripped Filament
- Help feed the system
- Adjust the idler tension
- Remove the filament
- Check the hot end temperature
FDM 3D PRINTING PROBLEMS: MY PRINT FAILED
Things were looking great, but for some inexplicable reason, the print has failed. It didn’t stick to the bed, or the filament just stopped extruding — regardless, this type of 3D printing problem could be one of many things.
Extrusion Stopped Mid-Print
What’s the 3D Printing Problem?
Sometimes, for any of a number of reasons, the hot end will stop extruding molten filament.
What Causes this 3D Printing Problem?
Typically this 3D printing problem is attributable to two parts of the printing process — either something is wrong with your filament supply, or there’s a problem with the hot end/nozzle itself. It could be as simple a case as your filament has run out. Some printers obscure the spool, so you never know! Or it could be too tight of an idler on your extruder resulting in stripped filament that isn’t being fed into the hot end.
Alternatively, you could have a blockage in your hot end, preventing any further filament from being extruded.
3D Printing Troubleshooting: Extrusion Stopped Mid-Print
3D PRINTING TROUBLESHOOTING TIP: CHECK YOU HAVE ENOUGH FILAMENT
A little obvious, but even the best of us have momentary lapses in concentration. Many slicers now give a material estimation for your prints, and judging that against the weight of your spool of filament and how much is left on it can give you a feeling for if there’s enough filament to complete your print.
3D PRINTING TROUBLESHOOTING TIP: CHECK FOR STRIPPED FILAMENT
Stripped filament can be responsible for a print failing mid-way through, and can be caused by a myriad of issues. Check out our dedicated 3D printing troubleshooting tip on how to deal with stripped filament.
3D PRINTING TROUBLESHOOTING TIP: CHECK FOR A CLOGGED NOZZLE
A nozzle caked in old burnt filament can cause a few different print issues, one of which is blocking any new extrusions from being laid down. Check out our dedicated 3D printing troubleshooting tip on how to deal with a clogged nozzle.
3D PRINTING TROUBLESHOOTING TIP: CHECK FOR SNAPPED FILAMENT
An issue that mainly affects Bowden style extruder setups, snapped filament can cause a disjoin between the extruder and hot end. Thankfully, it’s easy to diagnose and fix, but it may be a sign that your filament is past its best. Check out our dedicated 3D printing troubleshooting tip on how to deal with snapped filament.
3D Printing Problem Checklist: Extrusion Stopped Mid-Print
- Check You Have Enough Filament
- Check for Stripped Filament
- Check for Clogged Nozzle
- Check for Snapped Filament
Print Doesn’t Stick to Print Bed
What’s the 3D Printing Problem?
Losing a print due to it not sticking to the print platform is a common issue and one that’s usually relatively easy to resolve.
Unfortunately, a 3D print can break free at almost any time, from the first layer through to the last, which is especially infuriating.
Of course it’s not always the printer’s fault and if you’ve tried to print a model that only has a small amount of contact with the platform then undoubtedly that’s going to be the issue. Imagine you’re trying to print a plane and the only contact the model has with the print platform is the wheels. It’s therefore unlikely to print without some type of build plate adhesion and brim, and that’s before you even start to look at supports.
Luckily because this problem is so common there are many easy ways to solve it.
What’s Causing this 3D Printing Problem?
The most common cause is simply that the print just doesn’t bond to the surface of the print platform. The filament needs a textured base in order to adhere, so to solve the issue you’ll need to create a better bonding surface.
An unlevel print platform can be another major issue. If the platform is uneven then for some parts of the print the nozzle won’t be close enough to the platform to correctly extrude and bond the first layer.
Calibration can also be a major issue, over time the distance between the nozzle and platform can increase to the point where the initial layer is dragged rather than pushed into the print platform.
In all cases you’re likely to see a spaghetti of filament appear above your half formed model, just filament spaghetti or parts of your model dotted around the print platform.
3D Printing Troubleshooting: Print Doesn’t Stick to Bed
3D PRINT TROUBLESHOOTING TIP: ADD TEXTURE
To increase the chances that filament will bond to the platform you need to add another material to add texture. The most common solution is to apply a thin layer of stick glue to the print platform, which can then be easily washed away with hot water. Another alternative for PLA is to add decorators tape. For filaments that require a heated platform of 40º and above, there are a variety of special tapes now available which are a little more heat resistant.
3D PRINT TROUBLESHOOTING TIP: LEVEL THE PRINT BED
Every printer has a different process for print platform leveling, some like the latest Prusa models utilize an extremely reliable auto leveling system, others such as the Ultimaker have a handy step-by-step approach that guides you through the adjustment process. Refer to your printer’s manual for how to level your print bed.
3D PRINT TROUBLESHOOTING TIP: ADJUST THE NOZZLE HEIGHT
If the nozzle is too high then the filament won’t stick to the platform, too low and the nozzle will actually start to scrape the print off. Find the Z-axis offset option in your printer’s settings and make small adjustments — into the positive to raise the nozzle away from the bed, and negative to lower it closer.
3D PRINT TROUBLESHOOTING TIP: CLEAN THE PRINT PLATFORM
If you’re printing on a material such as glass, every so often it’s a good idea to give it a good clean, especially if you frequently apply glue. The grease from your fingerprints and the excessive build up of glue deposits can all contribute to the non-stickiness of the print platform.
3D PRINT TROUBLESHOOTING TIP: APPLY BUILD PLATE ADHESION
Some models will print fine without a brim, but smaller items and those with only a small footprint in contact with the platform will require some type of Build Plate Adhesion. These can be added in your slicer software- — look for “Brim” and “Raft”.
Brim will add a single layer of a specified number of perimeter lines radiating out from where your print makes contact with the print bed; it’s the least wasteful of the two, and in our experience is the better option, provided you don’t mind taking a knife to your print to trim the brim away.
Raft adds just that to your print. Depending on the parameters you specify, you will get a shadow of your print’s footprint, printed in thicker, better adhering layer. Your print is then printed as usual on top of this. Rafts tend to create a rough, unpleasant surface where it touches your print, and uses up more material than a brim. The benefit of a raft though, lies in being able to simply snap the part off.
3D PRINT TROUBLESHOOTING TIP: ADD SUPPORTS
As well as adding build plate adhesion, if your model has complex overhangs or extremities be sure to add supports to hold the print together during the process.
3D Printing Problem Checklist: Print Doesn’t Stick to Print Bed
- Add Texture
- Level the Print Bed
- Adjust the Nozzle Height
- Clean the Print Platform
- Apply Build Plate Adhesion
- Add Supports
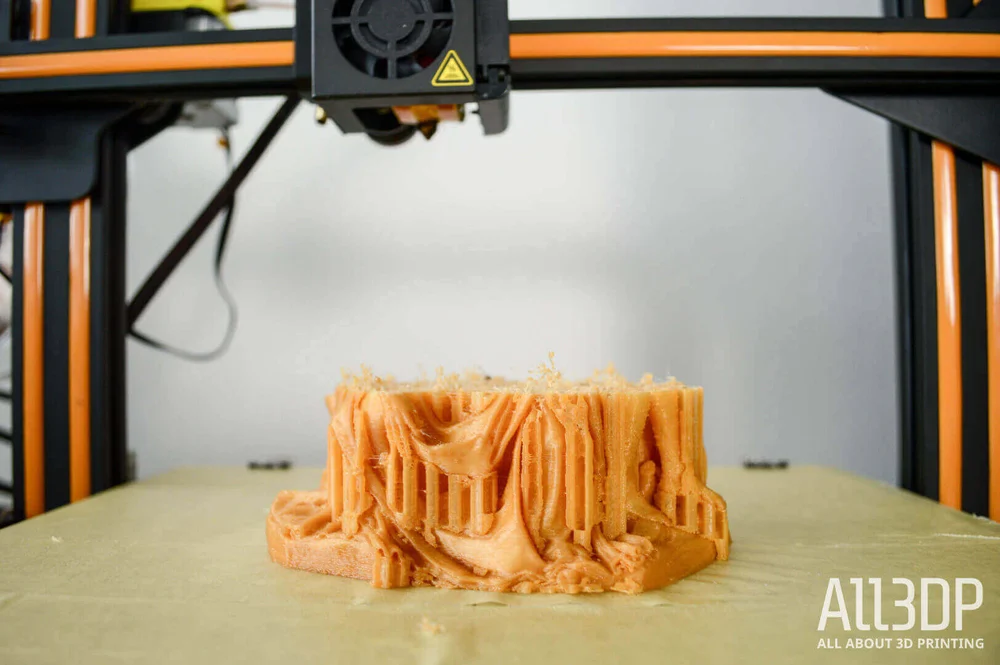
Supports Fell Apart
What’s the 3D Printing Problem?
Printing complex models will require a support or two, and whilst supports can be pain to remove, they’re unfortunately an essential part of modelling.
The job of a support is simple, it supports, but on occasion they fail leaving your model unsupported.
You’ll notice that as your print is extruded parts of the support structure will look uneven, cracks may appear or they’ll just start to look stingy.
Not only are the supports failing but the additional filament is ruining your model rather than ensuring it prints correctly.
What’s Causing this 3D Printing Problem?
Support structures are complex things and most slicer applications will provide you with several options. It’s all too easy to stick with the default settings, but this doesn’t guarantee success with your 3D printed overhangs. An important consideration is the type of support that will keep your model steady and supported throughout the print.
Lines and zig zags are generally easy to remove after the print has finished, but offer less rigidity during the print process. Triangles and grids offer more support but can be a pain to remove.
Take a simple bridge structure with thin uprights and then think about the supports. They will have a great deal of work to do keeping the model rigid, if you’ve opted for lines or zig zags then the likelihood is the model will move during the print process, breaking the delicate supports as it goes.
A rigid structure like a grid would be a better option.
Some slicing software enables you to print supports without platform adhesion. If this is the case then the small footprint of the support will struggle to bond directly with the print platform.
Often with tall models the length of the supports can be excessive and the thin structure is simply pushed to the limit. In these cases it’s important that you look at creating a physical support such as block. Under large overhangs, these can add robust support.
Supports can be a real hassle to remove so there is a tendency to reduce the density to as low as it will go. This can of course cause issues, if supports are load bearing you will need to increase the Support Density.
Old or cheap filament can be another issue, if the filament is past it’s best then when it’s extruded you may find that the filament may not sufficiently bond layer on layer, or the extrusion is untidy and cracked, leading to broken supports.
Finally watch your printer print. If the printer is moving or vibrating more than it normally does then check the nuts and bolts and just ensure that everything is tight. Once you’ve run through all the usual checks make sure to rerun the calibration process.
3D Printer Troubleshooting: Supports Fall Apart
3D PRINTING TROUBLESHOOTING TIP: SELECT THE CORRECT SUPPORTS
Look at the type of model you’re about to print. If there are large overhangs that connect sections of the model and these have good contact with the platform, try using lines or zig zag supports. If the model has less bed contact or needs much stronger supports, use grid or triangle supports.
3D PRINTING TROUBLESHOOTING TIP: ADD PLATFORM ADHESION
Make sure you have added some type of platform adhesion, such as a brim, so that the mounts have plenty of foundation to bond to.
3D PRINTING TROUBLESHOOTING TIP: INCREASE THE SUPPORT DENSITY
Try this as a last resort. Increasing the support density will offer your model a denser structure to rest on and will be less affected by any model movement, but will be much tougher to remove.
3D PRINTING TROUBLESHOOTING TIP: CREATE IN-MODEL SUPPORTS
Supports that are overly tall can be susceptible to weakness. By adding a tall block as part of your print that ends just below where the supports are required, this can give the supports a solid base without the need to print tall and weak.
3D PRINTING TROUBLESHOOTING TIP: CHANGE FILAMENT
Filament can become brittle as it reaches the end of its usable life span, and this usually shows in the quality of the supports. Swap the filament for a fresh reel and see if the problem improves
3D PRINTING TROUBLESHOOTING TIP: CHECK EVERYTHING IS TIGHT
Printer shakes and wobble can be a real issue. Give your machine the once over and make sure that everything is tight and re-calibrate if needed.
3D Printing Problem Checklist: Supports Fall Apart
- Use Correct Support Type
- Add Platform Adhesion
- Increase Support Density
- Create In-Model supports
- Use New Filament
- Check everything is tight
FDM 3D PRINTING PROBLEMS: MY PRINT LOOKS BAD
It’s successfully finished, but the 3D printing gods frown upon your ugly print. Here are the 3D printing problems which could be the cause.
First Layer is Messy

What’s the 3D Printing Problem?
The first layers of a print can often prove problematic. It could be that the print simply does not stick (which we covered with a different 3D printing troubleshooting tip, up top), or you’re finding unwanted lines that cause the bottom shell to have an unexpected look. Additionally, it’s entirely possible for any fine detail on the bottom of your print to congeal into a blur with little semblance of any surface design.
What’s Causing this 3D Printing Problem?
These 3D printing problems are typical signs that the print bed hasn’t been leveled properly. If the nozzle is too far away from the bed, the bottom surface often shows unwanted lines, and/or the first layer does not stick. If the nozzle is too close, blobs may be the result.
Where you find detail is becoming undefined and blurry, the chances are your print bed temperature is a little too high.
3D Printing Troubleshooting: First Layer is Messy
3D PRINTING TROUBLESHOOTING TIP: LEVEL THE PRINT BED
Every printer has a different process for print platform leveling. The latest Prusa models feature an extremely reliable auto leveling system, while others such as the Ultimaker have a handy step-by-step approach that guide you through the adjustment process.
3D PRINTING TROUBLESHOOTING TIP: LOWER BED TEMPERATURE
Try knocking the bed temperature down by 5 degree increments, until you hit that sweet spot of adhesion, without loss of detail.
3D Printing Problem Checklist: First Layer is Messy
- Level the print platform
- Lower bed temperature
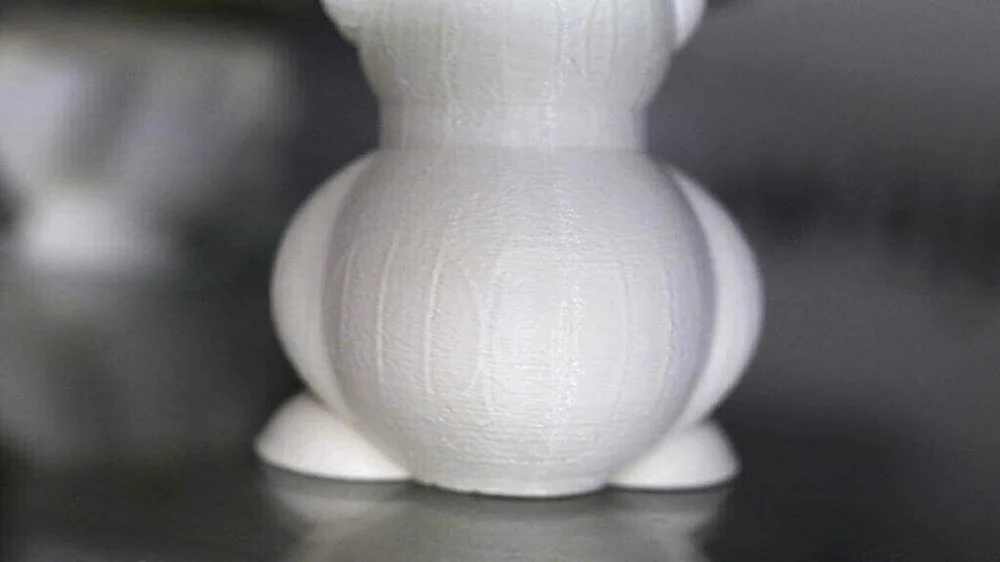
Print Bows Out at Bottom (Elephant’s Foot)
What’s the 3D Printing Problem?
The base of the model is slightly bulging outwards, an effect otherwise known as “elephant foot”.
What’s Causing this 3D Printing Problem?
This ungainly print defect can be caused by the weight of the rest of the model pressing down on the lower before they have properly cooled back into a solid – this is particularly an issue when your printer has a heated bed.
3D Printing Troubleshooting: Elephant Foot
3D PRINTING TROUBLESHOOTING TIP: BALANCE BED TEMP & COOLING
To stop elephant foot appearing in your 3D prints the base layers of the model need to be cooled sufficiently so that they can support the structure above. Apply too much cooling however, and you risk the base layers warping. Getting the balance right can be tricky, start by lowering the temperature of the print platform by intervals of 5 degrees, (to within +/- 20 degrees of the recommended temperature). If your Bottom / Top Thickness is set to 0.6mm then start the fan at a slightly lower height.
3D PRINTING TROUBLESHOOTING TIP: LEVEL PRINT BED
More often than not the majority of print issues can be traced back to the level of the print platform. Each printer has a slightly different technique for print platform leveling. Start by calibrating yours according to your printer manufacturer’s recommended procedure.
Try printing a calibration cube and watch how the printer lays the filament on the bed. From printing the cube you should easily be able to see if your bed is level from how evenly (or not) your layers are on the bed.
Similarly, you will be able to see if the nozzle is too close to the print platform and scraping through the molten filament, or too high and causing the filament to build up and blob.
3D PRINTING TROUBLESHOOTING TIP: RAISE THE NOZZLE
Just raising the height of the nozzle slightly can often help, but be careful too high and it won’t stick to the platform.
3D PRINTING TROUBLESHOOTING TIP: CHAMFER THE BASE
Another option is to chamfer the base of your model. Of course, this is only possible if you have either designed the model yourself or you have access to the original file. Start with a 5mm and 45º chamfer, but experiment a little to get the best result.
3D Printing Problem Checklist: Elephant’s Foot
- Balance print platform temperature and fan speed
- Level the print platform
- Check the nozzle height
- Chamfer the model base
Print Edges are Bending (Warping)

What’s the 3D Printing Problem?
At the base of the model, the print bends upwards until it’s no longer level with the print platform. This can also result in horizontal cracks in upper parts and cause your print to come unstuck from the print bed.
What’s Causing this 3D Printing Problem?
Warping is common as it’s caused by a natural characteristic of the plastic. As the ABS or PLA filament cools it starts to contract very slightly; the problem of warping arises if the plastic is cooled too quickly.
3D Printing Troubleshooting: Warping
3D PRINTING TROUBLESHOOTING TIP: USE A HEATED PRINT PLATFORM
The easiest solution is to use a heated print platform and to set the temperature to a point just below the plastics melting point. This is called the “glass transition temperature”. If you get that temperature right then the first layer will stay flat on the print platform. The print platform temperature is often set by the slicer software. You’ll normally find the recommended temperature for your filament printed on the side of the packaging or on the spool.
3D PRINTING TROUBLESHOOTING TIP: APPLY AN ADHESIVE TO THE PRINT BED
If you still find your print lifting at the edges then apply a tiny amount of stick glue evenly on the bed to increase adhesion.
3D PRINTING TROUBLESHOOTING TIP: TRY A DIFFERENT PLATFORM TYPE
Change your print bed to one that offers better adhesion. Manufacturers such as Prusa use a PEI (Polyetherimide) print surface that offers excellent adhesion without glue. XYZPrinting supply a textured tape in the box with some of their printers, basically a large sheet of masking tape, and again adding this works excellently, although only with nonheated print platforms. Zortrax 3D printers have a perforated print bed, models weld themselves to this surface eliminating the issue completely.
3D PRINTING TROUBLESHOOTING TIP: LEVEL THE PRINT PLATFORM
Print platform calibration can be another cause, run through the calibration process to check that the bed is level and nozzle height is correct.
3D PRINTING TROUBLESHOOTING TIP: INCREASE CONTACT
Increasing the contact between the model and bed is an easy fix and most print software has the option to add rafts or platforms.
3D PRINTING TROUBLESHOOTING TIP: ADJUST ADVANCED TEMPERATURE SETTINGS
If all else fails then you’ll need to take a look at your advanced print settings both on your printer and in your print software. Try increasing the print bed temperature by increments of 5 degrees.
In the slicer software take a look at the fan cooling, this is usually set so the cooling fans switch to full power at a height of around 0.5mm, try extending this to 0.75 to give the base layers a little more time to cool naturally.
Even if your printer has a heated print platform, it’s always recommended that you use glue and regularly calibrate the bed level.
3D Printing Problem Checklist: Warping
- Use a heated print platform
- Add an adhesive to the print platform
- Swap from glass to an adhesive print bed
- Calibrate print bed
- Add platforms or rafts
- Adjust advance the temperature and fan settings
Infill Looks Messy and Incomplete

What’s the 3D Printing Problem?
The internal structure of your print is missing or broken.
What’s Causing this 3D Printing Problem?
There are a number of reasons for the misprinting of the internal structure. The most common is incorrect settings within the slicing software, but it can also be due to a slightly blocked nozzle.
3D Printing Troubleshooting: Broken Infill
3D PRINTING TROUBLESHOOTING TIP: CHECK THE FILL DENSITY
In your slicing software check the infill density. A value of around 20% is normal; any less than this and you’re likely to have issues. For larger prints you may want to increase this to ensure that the model has enough support.
3D PRINTING TROUBLESHOOTING TIP: DECREASE INFILL SPEED
The speed at which the infill is printed can have a major effect on the quality of the structure. If the infill is looking week then decrease the infill print speed.
3D PRINTING TROUBLESHOOTING TIP: CHANGE THE INFILL PATTERN
Most slicing software enables you to change the internal structure. You can have a grid pattern, or triangle, honeycomb, and more. Try selecting a different option.
3D PRINTING TROUBLESHOOTING TIP: CHECK YOUR NOZZLE
It might be that there is a slight blockage in the nozzle. While the blockage doesn’t effect the printing of the thicker exterior walls, because there is less flow for the internal structure the filament is getting caught.
3D Printing Problem Checklist: Broken Infill
- Check and adjust the fill density
- Decrease the infill speed
- Try a different infill pattern
- Check your nozzle for blockages
Gaps Between Infill and Outer Wall
What’s the 3D Printing Problem?
When you look at the top or bottom of the print, you can see a slight gap between the infill and the outer perimeter walls.
What’s Causing this 3D Printing Problem?
Gaps between the perimeter and top layers used to be a common problem, but as printer accuracy has improved and the support for different materials extends, it’s now less of an issue than it was.
However the new wave of advanced materials are far less forgiving than the likes of PLA and ABS, and we’re starting to see a slight resurgence of the problem.
Gaps are caused by the filament used for the infill and outer walls not quite meeting and bonding. Handily, it’s one of the easiest things on this list to fix.
The most obvious cause of the problem is that the infill overlap is not set, or it’s set to zero. This means that the slicing software is actually telling the printer not to allow the two parts of the print to meet.
Another issue could be the order in which you have set the infill and outer walls to be printed. If you’re printing the perimeter first, then there is generally little or no overlap which can again cause the problem.
3D Printing Troubleshooting: Gaps between Infill and Outer Wall
3D PRINTING TROUBLESHOOTING TIP: CHECK THE INFILL OVERLAP
This is by far the most common issue and is really easy to resolve. In your slicing software locate the ‘Infill Overlap’ option and increase the value.
- In Cura this is set to 15% by default. Raise it to 30%.
- In Simplify3D you’ll find the option in ‘Edit Process Settings > Infill > Outline Overlap’. Again increase the value. This setting is directly linked to the extrusion width, so the % value will be a % of whatever you’re extrusion width is. When adjusting this setting always keep it below 50% or you’ll start to see the effects of the overlap in the outer perimeters of your print.
3D PRINTING TROUBLESHOOTING TIP: PRINT INFILL BEFORE THE PERIMETER SHELL
If you’re printing with a relatively thin outer wall the structure of the infill can show through. If this happens then you can switch the order by which the printer lays down the infill and perimeter layers. For example, in Cura check to see if you have ‘Infill prints after perimeters’ ticked.
3D PRINTING TROUBLESHOOTING TIP: INCREASE HOT END TEMPERATURE
Some of the latest advanced materials such as XT-CF20 are a little less forgiving when it comes to spreading due to the carbon fibers that make up part of their structure. When printing with these materials you may find that a slight 5-10º increase in hot end temperature makes all the difference.
3D PRINTING TROUBLESHOOTING TIP: LOWER PRINT SPEED
Okay, so you may be in a rush to get the printout, but printing at higher speeds can cause all sorts of issues if the printer isn’t perfectly calibrated. If you need to print quickly you can still avoid gaps by decreasing the speed of the top layer.
3D Printing Problem Checklist: Gaps Between Infill and Outer Wall
- Check the infill overlap
- Printing infill before the perimeter
- Increase hot end temperature
- Lower print speed
Infill is Visible from the Outside
What’s the 3D Printing Problem?
The final print looks fine but an outline of the internal support structure can be seen through the walls of the print.
What’s Causing this 3D Printing Problem?
The issue with ghosting happens due to the infill encroaching into the path of the perimeter. This effect is most visible when your print has thin walls. The problem is caused by the infill structure overlapping with the perimeter line as it’s being laid down. Although this ghosting is an issue it’s actually an important part of the printing process, as it helps the internal structure bond effectively to the external walls. Luckily it’s very easy to overcome.
Another cause of ghosting can be that you have set an incorrect wall thickness in relation to the size of nozzle that you’re using. In normal print conditions wall thickness should be directly related to the nozzle size, so if you have a 0.4mm nozzle the wall thickness should be a multiple of this: 0.4, 0.8, 1.2 and so forth.
3D Printing Troubleshooting: Infill is Visible from the Outside
3D PRINTING TROUBLESHOOTING TIP: CHECK THE SHELL THICKNESS
Make sure that the value you have selected for the shell thickness is a multiple of the nozzle size.
3D PRINTING TROUBLESHOOTING TIP: INCREASE THE SHELL THICKNESS
The easiest solution is to increase the shell thickness. By doubling the size it should cover any overlap caused by the infill.
3D PRINTING TROUBLESHOOTING TIP: USE INFILL AFTER PERIMETERS
Most slicing software will enable you to activate Infill prints after perimeters.
- In Cura open up the ‘Expert Settings’ and under the Infill section tick the box next to ‘Infill prints after perimeters’
- In Simply3D Click ‘Edit Process Settings’ then select ‘Layer’ and under ‘Layer Settings’ select ‘Outside-in’ next to the ‘Outline Direction’.
3D PRINTING TROUBLESHOOTING TIP: CHECK PRINT PLATFORM
Check around the model and if you see that the effect is more prevalent on one side than the other, the effect could be due to calibration. If so run through the usual calibration process.
3D PRINTING TROUBLESHOOTING TIP: PRINT SHELLS TO YOUR ADVANTAGE
Depending on the type of model that you’re printing you can use the internal and shell printing order to your advantage. When you want a high-quality print with a good surface finish where the actual strength of the model isn’t important, select print from the Outside-in. If however the strength of the print is paramount then select Print from in Inside-Out and double the wall thickness.
The reason for the difference in strength is that when you print from the Outside-in you eliminate the small amount of overlap that causes the ghosting issue, but this also means that the actual structure won’t create the same strength of bond between the internal and external structure due to the lack of overlap.
3D Printing Problem Checklist: Infill Visible from the Outside
- Check the shell thickness
- Increase the wall thickness
- Use infill after perimeters
- Check print platform and re-calibrate if necessary
- Print shells to your advantage
Cracks Have Appeared in Tall Objects

What’s the 3D Printing Problem?
There are cracks on the sides, especially on taller models. This can be one of the most surprizing issues in 3D printing as it tends to manifest itself in larger prints, and usually while you’re not looking.
What’s Causing this 3D Printing Problem?
In a print’s higher layers, the material cools faster. The heat from the heated print bed doesn’t reach that high, and because of this, adhesion in the upper layers is lower.
3D Printing Troubleshooting: Cracks In Tall Objects
3D PRINTING TROUBLESHOOTING TIP: EXTRUDER TEMPERATURE
Start by increasing the extruder temperature; a good start would be to increase it by 10ºC. On the side of your filament box you’ll see the working hot end temperatures, try to keep the temperature adjustment within these values.
3D PRINTING TROUBLESHOOTING TIP: FAN DIRECTION AND SPEED
Double-check your fans, make sure that they’re on and aimed at the model. If they are, try reducing their speed.
3D Printing Problem Checklist: Cracks In Tall Objects
- Check the hot end temperature and raise it in 10-degree intervals
- Check the position and speed of the cooling fans
Layers Don’t Line Up Well
What’s the 3D Printing Problem?
As the print is forming, there appear to be a few issues with the quality. Look closer and you see that the layers aren’t aligning quite as they should. Look at the internal support structure and again the pattern looks slightly out. The outer wall, rather than being smooth, features slight misalignments that cause an uneven face. It’s highly likely that the issue only affects the print in one direction; front to back or left to right.
What’s Causing this 3D Printing Problem?
Over time the parts of your 3D printer — such as nuts, bolts and belts — will become loose and require a tighten. The effect of misaligned layers is similar to the cause of the more pronounced effects of shifting layers and there is no doubt that there is a crossover. If left unchecked, this problem will eventually result in shifting layers, but as the issue starts the visual effect on the prints is far less pronounced and can look very different. The cause is usually linked directly to a loose belt.
3D Printing Troubleshooting: Layer Misalignment
3D PRINTING TROUBLESHOOTING TIP: CHECK THE BELTS PART I
Start by checking each of the belts are tight but not over tight. You should feel a little resistance from the two belts as you pinch them together. If you find that the top section of the belt is tighter than the bottom then this is a sure-fire sign that they need a tweak and tighten. Some printers, such as the Original Prusa i3, come with belt tensioners built into them. Others can be retrofitted with 3D printed ones. If neither of these is an option for you, you may have to get your hands dirty and manually tighten the belt.
3D PRINTING TROUBLESHOOTING TIP: CHECK THE BELTS PART II
The printer belts are normally just one continuous loop hooked around two pulleys. A common issue is that over time the belt can slip on one pulley and gradually gets tighter on the top compared to the bottom — or visa versa — and again this can cause misaligned layers.
3D PRINTING TROUBLESHOOTING TIP: CHECK THE RODS ARE CLEAN AND OILED
Over time debris can build up on the rods, causing odd patches of higher friction which in turn can affect the free movement of the head and again cause layer shifting. A quick wipe and re-oil of the rods usually solves the issue.
3D PRINTING TROUBLESHOOTING TIP: CHECK FOR BENT OR MISALIGNED RODS PART I
If you see the print head falter at certain points then it could be that one of the rods has become slightly bent. You can usually tell by switching off the machine so there’s no power going through the steppers and then move the print head through the X- and Y-axis. If you feel resistance then you know something is amiss. Start by seeing if the rods are aligned. If they are, remove them and roll them on a flat surface. If any are bent then it will be quite obvious.
3D PRINTING TROUBLESHOOTING TIP: CHECK FOR BENT OR MISALIGNED RODS PART II
Many printers use threaded rods rather than lead screws and although these do the job, they do have a tendency to bend over time. Don’t worry about dismantling your printer to see if they’re straight, simply use control software such as ‘Printrun’ to move the print head up or down. If one of the Z-axis rods is bent you’ll instantly see. Unfortunately, it’s almost impossible to accurately straighten a rod once it’s bent, but on the upside, it’s a good excuse to replace the old threaded rods for lead screws.
3D PRINTING TROUBLESHOOTING TIP: CHECK THE DRIVE PULLEYS
These are the usually connected directly to a stepper motor or to one of the main rods that drive the print head. If you carefully rotate the pulley you’ll see a small grub screw. Holding both the rod and the attached belt, give the belt a tug to force the pulley to turn. You should find that there is no slip between the pulley and stepper or rod. If there is tighten the grub screw and try again.
3D Printing Problem Checklist: Layer Misalignment
- Check the tension in the belts
- Check for skipped belts
- Check the rods are clean and sufficiently lubricated
- Check for bent or misaligned rods
- Check the drive pulleys
Some Layers are Missing
What’s the 3D Printing Problem?
There are gaps in the model because some layers have been skipped (in part or completely).
What’s Causing this 3D Printing Problem?
The printer failed to provide the amount of plastic required for printing the skipped layers. For infrequent skipped layers, this can be referred to as temporary under-extrusion. There may have been a problem with the filament (e.g. diameter variation), the filament spool, the feeder wheel or a clogged nozzle.
Alternatively, friction has caused the bed to temporarily get stuck. The cause may be that the vertical rods are not perfectly aligned with the linear bearings.
It’s also possible that there is a problem with one of the Z axis rods or bearings. The rod could be distorted, dirty or suffering from excessive oil.
3D Printing Troubleshooting: Missing Layers
3D PRINTING TROUBLESHOOTING TIP: MECHANICAL CHECK
It’s good practice to give your 3D Printer the once-over every now and again and the appearance of gaps in your 3D print is always a good sign that now is the time to give your 3D printer some love and attention. Start off by checking the rods and make sure that they’re all seated into either bearings or clips and haven’t popped out, shifted or moved even slightly.
3D PRINTING TROUBLESHOOTING TIP: ROD ALIGNMENT CHECK
Make sure that all rods are still in perfect alignment and haven’t shifted. You can often tell by switching off the power (or disabling steppers) and then gently moving the print head through the X and Y-axis. If there is any resistance to the movement then something is wrong and it’s usually pretty easy to tell if this is due to misalignment, a slightly bent rod or problem with one of the bearings.
3D PRINTING TROUBLESHOOTING TIP: WORN BEARING
When bearings go they usually let you know about it by creating an audible din. You should also be able to feel uneven motion in the print head and when printing the machine looks like it’s vibrating slightly. If this is the case unplug the power and move the print head through the X and Y to locate the region of the broken bearing.
3D PRINTING TROUBLESHOOTING TIP: CHECK FOR OIL
Lubricating the joints is easy to forget, but keeping everything well-oiled is essential to the smooth running of the machine. Sewing machine oil is ideal and can be purchased from almost any haberdashery at a relatively inexpensive price. Before you go applying liberally just check that the rods are clean and free of dirt and printing debris — a quick wipe of the rods before applying a fresh coat of oil is always a good idea. When all rods look clean just dab on a little, but not too much. Then use printer control software such as Printrun to move the head through the X and Y axis to make sure that the rods are evenly covered and moving smoothly. If you add a little too much oil don’t worry just wipe some off with a lint-free cloth.
3D PRINTING TROUBLESHOOTING TIP: UNDER-EXTRUSION
The final issue could be under-extrusion. Check out our dedicated 3D printing troubleshooting tip for under-extrusion here.
3D Printing Problem Checklist: Missing Layers
- Check over the mechanics and make sure everything is tight
- Double-check the printer’s construction and alignment
- Listen out for worn bearings and bent rods
- Add a little oil to keep things running smooth
Print Leans When it Shouldn’t
What’s the 3D Printing Problem?
As the print forms it starts to lean. Instead of being straight and true, vertical edges are printed at an angle, and this angle isn’t consistent throughout the print. The severity could be increasing and decreasing at different stages.
What’s Causing this 3D Printing Problem?
The cause of the issue is generally very simple; one of the pulleys attached to a stepper motor is slightly loose, or one of the belts is rubbing against something and stopping the full travel of the head. All you need to do to correct the issue is to make sure that none of the pulleys are slipping and the grub screws that hold the pulleys in place are all tightened.
Although this should be a quick and straightforward fix, one issue you may experience as you go to tighten the pulleys is that the small grub screws that tighten onto the shaft of the motor aren’t always that easy to access. Firstly diagnosing which pulley is causing the issue and then getting access to that pulley can be tricky and time-consuming.
3D Printing Troubleshooting: Print Leans When it Shouldn’t
3D PRINTING TROUBLESHOOTING TIP: CHECK X- AND Y-AXIS
If your print is leaning to the left or right then you have an X-axis issue. Back to front and you have a Y-axis problem. Once you’ve diagnosed which it is you can then check the belts and pulleys. If you have a printer such as the Prusa i3 then the process is pretty straight forward, as the steppers are directly connected to the main drive belt. For the Ultimaker and other printers, the process can be a little more tricky.
3D PRINTING TROUBLESHOOTING TIP: CHECK THE BELTS AREN’T RUBBING
Look around each of the belts and ensure that they’re not rubbing against the side of the machine or any other components. Also, check to see that the alignment of the belts is correct. If one is at a slight angle then this can cause issues.
3D PRINTING TROUBLESHOOTING TIP: TIGHTEN THE STEPPER MOTOR COUPLER GRUB SCREW
Once you diagnose which axis is causing the issue, use an Allen key to tighten the corresponding coupler’s grub screw that attaches to the stepper motor.
3D PRINTING TROUBLESHOOTING TIP: CHECK ROD PULLEYS
More complex machines such as the Ultimaker 2 have a series of belts and pulleys. The main X and Y rods at the top of the machine feature eight pulleys. Go around each of these on the affected axis and tighten the grub screws for each. It’s unlikely that these will cause any slip but if one is loose then a belt may misalign.
3D Printing Problem Checklist: Leaning Models
- Check X- and Y-axis
- Check the belts aren’t rubbing
- Tighten the stepper motor pulley grub screw
- Check rod pulleys and tighten
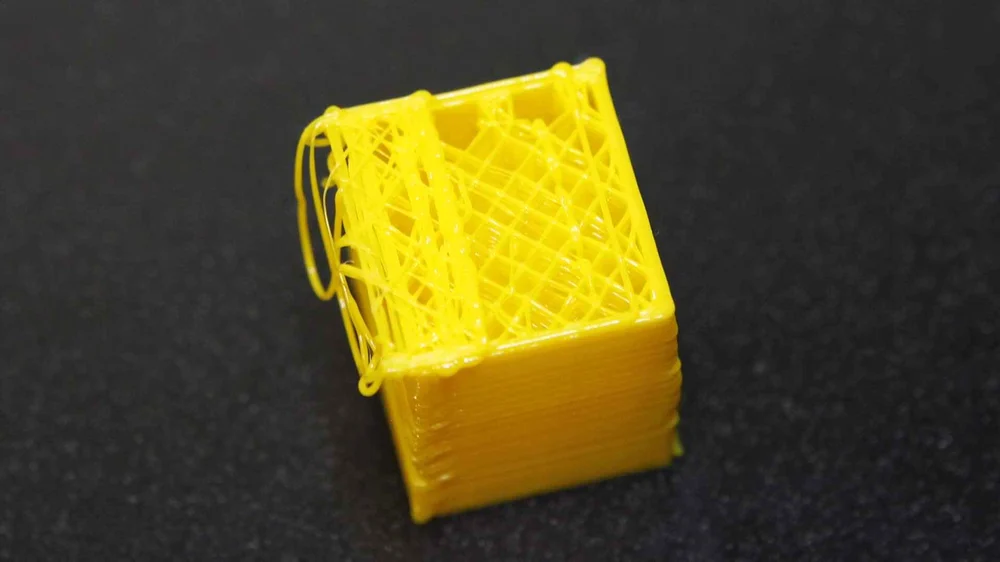
Overhangs are Messy

What’s the 3D Printing Problem?
You load your print into your slicing software and everything looks good. Hit print and you find that some parts of the model print absolutely fine, whilst other parts end up as a stringy mess. OK this might seem obvious and the issue of overhangs is often seen as a 3D printing rookie mistake. But it’s surprising just how often even experienced 3D printers are hit with an overhang issue.
What’s Causing this 3D Printing Problem?
The process of FFF requires that each layer is built upon another. It therefore should be obvious that if your model has a section of the print that has nothing below, then the filament will be extruded into thin air and will just end up as a stringy mess rather than an integral part of the print.
Really the slicer software should highlight that this will happen. But most slicer software will just let us go ahead and print without highlighting that the model requires some type of support structure.
3D Printing Troubleshooting: Overhangs are Messy
3D PRINTING TROUBLESHOOTING TIP: ADD SUPPORTS
The quickest and simplest solution is to add supports. Most slicing software will enable you to do this quickly.
In Simplify3D click Edit Process Settings > Support > Generate support material; you can the adjust the amount, pattern and settings. In Cura just select the desired support type from the Basic settings.
3D PRINTING TROUBLESHOOTING TIP: CREATE IN-MODEL SUPPORTS
Supports generated by software can sometimes be intrusive and result in support material getting stuck in impossible to remove places. Creating your own in your modeling application is a good alternative. It takes a bit more skill but can enable some fantastic results.
3D PRINTING TROUBLESHOOTING TIP: CREATE A SUPPORT PLATFORM
When printing a figure, arms and other extrusions are the most common areas that cause problems. Using supports from the print bed can also cause issues as they often have to span quite large vertical distances; for structures that are supposed to be easily removed and fragile, this distance is prime for causing problems.
Creating a solid block or wall under arms etc and then creating a smaller support between the arm and block can be a great solution.
3D PRINTING TROUBLESHOOTING TIP: ANGLE THE WALLS
If you have a shelf style overhang then an easy solution is to slope the wall at 45º so that the wall actually supports itself and removes the need for any other type of support.
3D PRINTING TROUBLESHOOTING TIP: BREAK THE PART APART
Another way to look at the model is to break it apart into separate prints. With some models this enables you to flip what would be an overhang and instead make it a base. The only issue with this is that you then have to find a way of sticking the two parts back together.
3D Printing Problem Checklist: Overhangs are Messy
- Add supports
- Create in model supports
- Create a support platform
- Angle the walls
- Separate the model into smaller prints
Surface Areas Beneath Supports are Rough

What’s the 3D Printing Problem?
You’ve printed a complex model with supports created with your chosen software. But when it comes to removing the structure, small remnants of material are left on the surface. When you try to sand or remove the remaining material, it ruins the overall effect of the model.
What’s Causing this 3D Printing Problem?
Supports are an essential part of 3D modelling and a subject that can divide opinion. Many models can actually avoid the need for supports completely with a little adjustment of the model to angle verticals, or with the addition of design integral support structures to the model. You may also be surprised by the full capabilities of your printer, with most being able to bridge 50 mm gaps and print angles of 50º without any support at all.
Software solutions such as Cura and Simplify3D are capable of producing outstanding support structures, and for the most part these automatically generated supports will far exceed the quality of any home grown solution. But although auto-generated supports do the job, they can be difficult to remove. Applying your own support structures is a neater solution, but you’ll need to delve into the settings of your software to tailor the supports to your models.
Depending on your slicing software, enabling supports will require the activation of a checkbox. There are plenty of associated options that enable you to fine tune the support structure, and minimize the effect that the structures will have on the surface of your models. However, as careful as you are with the support settings, the supports themselves will be bonded to your model, so will always leave some sort of trace mark.
The issue of surface finish when supports are used is a big one and the severity of the effect will change depending on the material types you use. A more brittle filament such as PLA is often harder to work and finish than a decent ABS.
3D Printer Troubleshooting: Surface Areas Beneath Supports Are Rough
3D PRINTING TROUBLESHOOTING TIP: CHECK SUPPORT PLACEMENT
Most slicing software will allow you choose whether your support structure is touching the build plate or “everywhere”. For most models “Touching the Build Plate” is sufficient. Choosing Everywhere will result in supports… well, everywhere. Which then means, in the context of this 3D printing troubleshooting tip, a rough surface finish all over your print.
3D PRINTING TROUBLESHOOTING TIP: CHECK THE CAPABILITY OF YOUR PRINTER
Quite often people use supports without realizing that their printer can bridge gaps and print relatively steep angles with ease. Most printers are capable of bridging gaps of 50 mm and printing angles of 50º without error. Create or download a test print to familiarize yourself with the true capability of your printer.
3D PRINTING TROUBLESHOOTING TIP: ADJUST THE SUPPORT PATTERN
Depending on the model type, a change in the support pattern could be all it takes for a better support-model interface; try switching from “Grid” to “Zig Zag”.
3D PRINTING TROUBLESHOOTING TIP: REDUCE SUPPORT DENSITY
In your slicer software switch the view to “Layers” and take a look through the support structure. Default software will usually apply a dense support structure. If you reduce this density the support will become weaker, but as long as your printer is finely tuned this shouldn’t be an issue. In Cura a support density of 5 can be used successfully and vastly reduces the effect of the structure on the model’s surface.
3D PRINTING TROUBLESHOOTING TIP: REDUCE PRINT TEMPERATURE
Double check the filament temperature range and adjust the hot end temperature to the minimum for the material. This may result in a weaker bond between the layers, but will also make it easier to remove the support structure.
3D PRINTING TROUBLESHOOTING TIP: DUAL EXTRUSION & SOLUBLE SUPPORT MATERIALS
An expensive solution, but if the majority of your prints use complex support structures then a dual extrusion printer such as the Ultimaker 3 or the Cel RoboxDual is really the only way to go. Water soluble support materials such as PVA have come into their own, and provide a convenient way to achieve complex prints without completely sacrificing surface finish.
Best of all, you can add supports to cavities that previously would have been impossible to remove standard print material supports from, meaning more complex prints are also within your grasp.
3D Printing Problem Checklist: Surface Areas Beneath Supports Are Rough
- Dual Extrusion
- Check support placement
- Check the capability of the printer
- Adjust the support pattern
- Reduce Support Density
- Use the lower end of the filament temperature
Print is Unusually Weak/Looks Wrong (Non-Manifold Edges)

What’s the 3D Printing Problem?
Parts of your print are missing or the final print is weak and falls apart despite the exterior quality of the print looking fine. Sections of the print look completely different from the print preview or the final print has geometry errors that make no sense.
What’s Causing this 3D Printing Problem?
Non-manifold edges are a common cause of misshapen or odd prints. Non-manifold edges are the edges of models that can only exist in the 3D space and not the physical world.
For example, if you have two cubes in the real world and try to overlap them directly, it’s physically impossible as the solid outer walls prevent the two objects from intersecting.
In the 3D world you can simply intersect the two, they still exist as individual objects, but the software we use distinguishes between them regardless of the perceived oneness as we look at them.
In order to get the two to print correctly, the objects need to be merged so that any inner walls are removed and an object with a single undivided inner cavity is left.
Another common cause is if you have an object such as a cube and delete one of the surfaces. You essentially have an object with a hole, it might look like a shape with five sides, but it only exists in the virtual 3D space, this is geometry with no physical form.
Although you can see the outer walls in the software, the walls that meet the hole only have dimensions on two axes. The third dimension which we see as the thickness of the wall is only illustrative and has no real physical dimension. When it comes to slicing the model the software does its best and in many cases will repair the hole. However, in more complex models, the effects can be interesting to say the least.
3D Printing Troubleshooting: Non-Manifold Edges
3D PRINTING TROUBLESHOOTING TIP: USE LATEST SLICER SOFTWARE
Most of the latest slicer engines all support the automatic fixing of non-manifold edges but it’s still good practice to ensure that your models are correctly formed and print ready.
3D PRINTING TROUBLESHOOTING TIP: FIX USING STL FILE REPAIR SOFTWARE
If you’re already using the latest slicer software then you might have noticed a notification telling you that your STL file features some non-manifold edges. Some software can fix this for you of course, and if you’re slicer can’t then there’s a good selection of STL file repair software that can be used on both desktop and the web. It’s a simple and easy task, just upload your file to your chosen software, let it identify any broken sections, then follow the instructions. If you didn’t get a notification on your slicer but your prints are coming out as a weird, messy blob this suggests you have some non-manifold edges in there. Try STL file repair software. It might not fix the problem, but it’s certainly something to try.
3D PRINTING TROUBLESHOOTING TIP: FIX ‘NON-MANIFOLD’ IN SIMPLIFY3D
In edit ‘Process settings’ click the ‘Advanced’ tab and select ‘Heal’ next to ‘Non-manifold segments.
3D PRINTING TROUBLESHOOTING TIP: USE THE LAYER VIEW
In your slicer software use the layer view to check through the model so you can see where the issues appear. A quick slide through the layers will often highlight an easy to fix problem.
3D PRINTING TROUBLESHOOTING TIP: USE MODELING SOFTWARE TO FIX ISSUES
One of the easiest ways to fix models with non-manifold edges is to use software; Programs such as Blender and Meshmixer both have features built in that will quickly enable you to highlight problems with your models and fix them prior to slicing.
3D PRINTING TROUBLESHOOTING TIP: MERGE OBJECTS
Really it’s better to fix your 3D models prior to importing them into your slicing software. To do this, make sure that when you have two objects that do intersect or overlap you choose the appropriate Boolean function to either intersect, merge or subtract.
3D Printing Problem Checklist: Non-Manifold Edges
- Keep your slicer software up to date
- Fix using STL file repair software
- “Fix Non-manifold” (in Simplify3D)
- Use the layer view to check for mistakes
- Use software like Blender or Meshmixer to fix issues
- Merge objects
Fine Detail Not Printing Correctly
What’s the 3D Printing Problem?
Your 3D printer is a finely tuned workhorse able to churn out prints one after another without issue. But then when it comes to a print with fine detail, your printer isn’t producing the results you expect.
Edges and corners that are supposed to be pin sharp and crisp have a defined curve and softness, and intricate details are far from perfect.
What’s Causing this 3D Printing Problem?
There are a number of issues that can affect the quality of printing when it comes to fine detail.
The most common cause of low detail prints is, of course, the layer height. If you have a low resolution (high layer height) set for your printer then you’re not going to be able to get silky smooth prints, regardless of how good your printer is.
Nozzle size is another obvious issue. There’s a very delicate balance between nozzle size and fine print quality. In a production environment, a 0.5mm nozzle is ideal. For general purpose a 0.4mm, and fine detail 0.4mm or smaller.
The smaller nozzle will also mean that your machine will need to be finely tuned as any issues will be amplified.
Nozzle temperature is all important, as your printer needs to be able to extrude the plastic smoothly. When it comes to detail make sure your nozzle is clean prior to starting, even the slightest build up of filament or a small blockage will highlight in the print.
Print speed will also have a huge effect on the detail; for detailed prints go as slow as you dare. You may have to adjust the fan speed to accommodate the increase in extrusion time. Some printers even benefit from the extruder fan being switched to its lowest setting (or even off).
Filament brands spend a fortune fine tuning their formulas to create a smooth flowing and setting filament. Although cheaper brands might look the same, the tolerances of diameter chemical composition can vary and this inconsistency will again be highlighted in the final print.
Finally check that the print platform is level. Even the slightest error in the level will have repercussions throughout the print when printing at high resolutions. Finding a good calibration print is an easy way of checking just how well your printer is tuned.
3D Printer Troubleshooting: Fine Detail Not Printing Correctly
3D PRINTING TROUBLESHOOTING TIP: INCREASE THE RESOLUTION
Increase the resolution — a tighter, lower layer height will give successful prints a smoother finish.
3D PRINTING TROUBLESHOOTING TIP: NOZZLE DIAMETER
The smaller the nozzle diameter the higher detail you can print. But a small nozzle also means lower tolerances so your machine needs to be highly tuned.
3D PRINTING TROUBLESHOOTING TIP: MAINTAIN YOUR PRINTER
Any additional friction from slightly misaligned rods or loose belts will be instantly apparent in your print. Ensure everything is tight and aligned.
3D PRINTING TROUBLESHOOTING TIP: CLEAN YOUR NOZZLE
Before starting a detailed print make sure that your nozzle is clean.
3D PRINTING TROUBLESHOOTING TIP: SLOW IT DOWN
Reduce your print speed — a nice slow extrusion is less prone to error.
3D PRINTING TROUBLESHOOTING TIP: USE QUALITY FILAMENT
Selecting the right material from a quality filament manufacturer is a key to good quality prints.
3D PRINTING TROUBLESHOOTING TIP: CHECK PLATFORM LEVEL
Run through your printers calibration procedure to check that the platform is level.
3D Printing Problem Checklist: Fine Detail Not Printing Correctly
- Low resolution
- Nozzle diameter
- Make sure everything is serviced
- Clean your nozzle
- Slow it down
- Use quality filament
- Check platform level
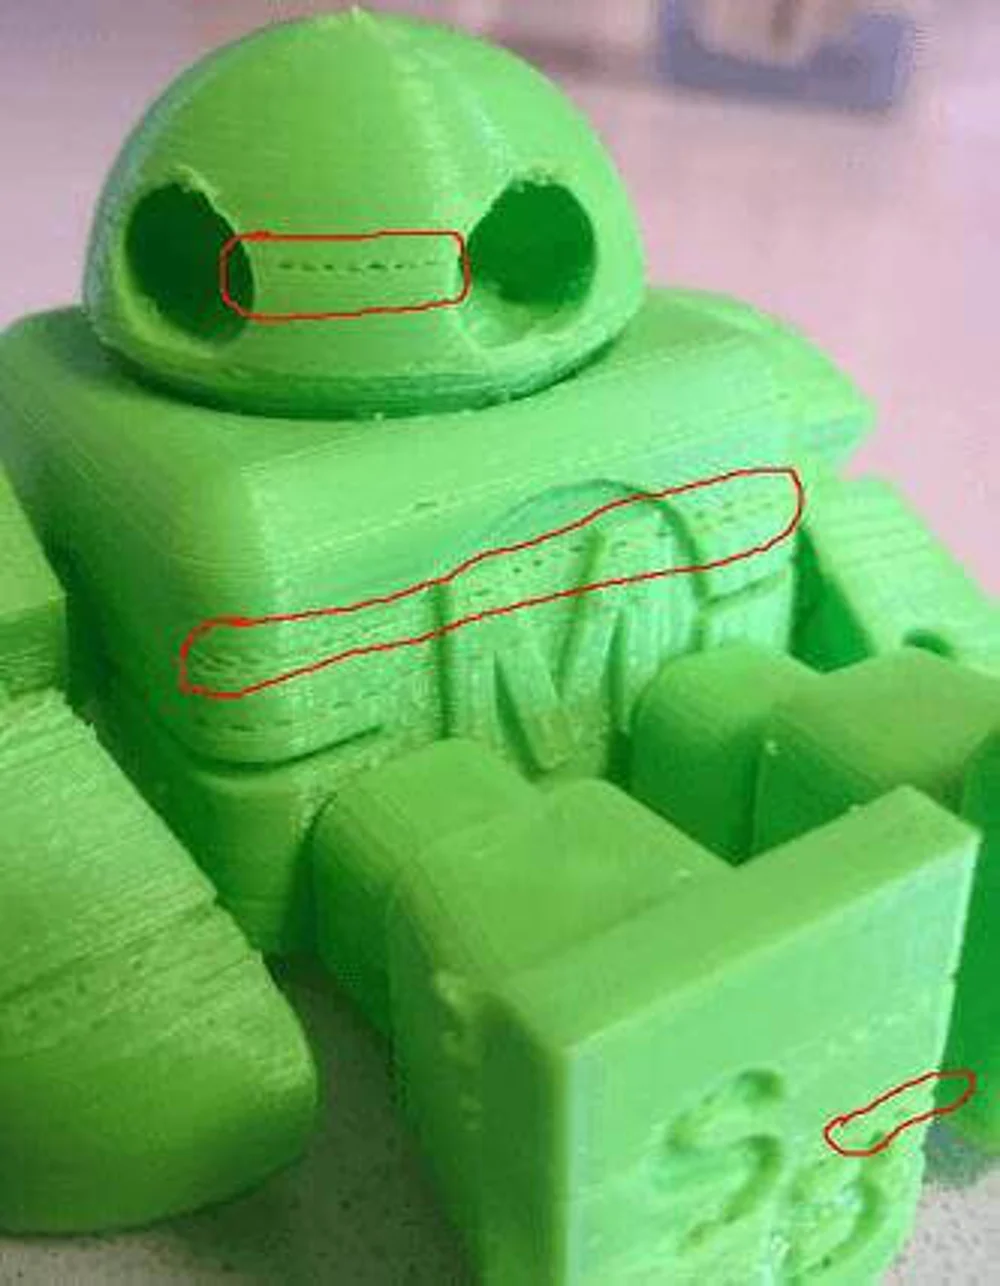
Ripples and “Echoes” in Print (Ringing)
What’s the 3D Printing Problem?
The effect of visual waves or rippling on the print surface is one of those minor and annoying problems that many of us simply overlook. It has a habit of coming and going, and there really does seem to be no consistant reason for the issue.
The effect is normally very subtle and appears as a wave or ripple through the surface of the print, it’s position and severity can also change.
Most people will simply overlook the problem. Other than a slight visual effect on the surface the effect of these ripples has little other effect on the quality of the final 3D print, except of course in the most severe of cases.
What’s Causing this 3D Printing Problem?
The issue of waves in your 3D prints is usually down to one of two things, and more commonly a combination of the two.
Vibrations and speed. 3D print manufacturers do an awful lot to their machines to make sure that the small vibrations created by the motors are kept to an absolute minimum. Lift up a printer like the Ultimaker 3 and you’ll see exactly what I mean, even the small Cel Robox Dual packs in some significant weight.
This weight helps to minimise vibrations through the machine but doesn’t completely eliminate it. Those small vibrations can travel through the furniture, floor boards or any surface you’ve seen fit to adorn with your printer.
The next time you start your 3D printer up take a look at the surface that it’s on, then as the printer prints check to see if the table is sturdy enough to properly support the machine.
Vibrations can also be amplified by poor maintenance and worn linear bearings. Regularly check that your printer is clean, free of fluff, grit and dirt, and remember to keep the rails oiled.
When the printer’s off check the quality of the linear bearings and make sure that the movement of the print head is smooth, you can do this by moving the head with your fingers. Make sure everything is cool before you start.
As you’re checking the maintenance make sure that all the bolts and bits within the machine are good and tight, especially if you built the machine yourself.
Waves will also be an issue if you try to print too fast, the simple solution here is to simply drop the print speed, this will solve the problem in the majority of cases.
If you still need to print fast then try increasing the flow and extrusion temperature.
Finally, and this is one for the more advanced users, and that’s firmware acceleration. This adjusts the speed of the head as it prints and changes direction, it’s function is to help prevent ringing. Here there are two functions that you should look at and this will change depending on the machine.
Look for acceleration and jerk, there are several values listed, start by lowering the jerk and then the acceleration during printing.
3D Printer Troubleshooting: Ripples and “Echoes” in Print (Ringing)
3D PRINTING TROUBLESHOOTING TIP: REDUCE VIBRATIONS
Make sure that the surface you use for your 3D printer is solid and as the printer prints there are no visual vibrations.
3D PRINTING TROUBLESHOOTING TIP: CHECK THE BEARINGS
Linear bearings wear over time, with the printer off check that all are still running smooth.
3D PRINTING TROUBLESHOOTING TIP: MAKE SURE EVERYTHING IS TIGHT
It’s amazing how one loose bolt can affect print quality, as part of your maintenance routine make sure everything is bolted and tight.
3D PRINTING TROUBLESHOOTING TIP: ADD OIL
Check all the rods are clear of dust and dirt and then add a drop of oil to ensure everything is well lubricated.
3D PRINTING TROUBLESHOOTING TIP: SLOW DOWN THE PRINT
Reduce the print speed.
3D PRINTING TROUBLESHOOTING TIP: ADJUST THE FIRMWARE ACCELERATION
One for advanced users only, check the printer’s firmware and adjust the values in the code for the acceleration and jerk, you’ll then need to upload the firmware back to your machine.
3D Printing Problem Checklist: Ripples and “Echoes” in Print (Ringing)
- Reduce vibrations
- Check the bearings
- Make sure everything is tight
- Add oil
- Slow down the print
- Adjust the firmware acceleration
Diagonal Scars on Print
What’s the 3D print problem?
Horizontal lines appear across the top layer of your print, usually diagonally from one side to another.
What’s causing this 3D print problem?
A 3D print is created by laying down successive layers, one after the other. As each layer is set the print head moves through the X and Y axis. Once the layer is complete the head lifts through the Z axis and returns to the start point to set down the next layer.
It is at this point that visible lines or scaring can occur. These can be caused by a number of printer settings, but in essence the problem is due to oozing of filament or the nozzle physically scratching the surface.
Combing is one of the major offenders. Combing confines the print head to the printed area of the model. If there is any excess filament, it oozes across the rest of the print. Alternatively, the head doesn’t lift high enough and the hot nozzle drags across the surface, leaving a scar.
Over extrusion is another less common cause, as the head lifts excess drags across the surface leaving a trace of filament. On larger flat surfaces you may see the diagonal line fade across the surface.
Too high a temperature is a less likely cause but with some cheaper or older filaments the residual heat of the nozzle can lead to filament oozing from the nozzle, again leaving a trail as the nozzle shifts.
3D Printer Troubleshooting: Diagonal Scars on Print
3D PRINTING TROUBLESHOOTING TIP: COMBING
Combing keeps the print head over the already printed areas of the model and therefore reduces the need for retractions. Whilst this increases print speeds it can cause the scaring. Switch combing off and in most cases this will clear the problem but expect longer print times.
3D PRINTING TROUBLESHOOTING TIP: RETRACTION
If you’ve switched off combing and the issue remains, try increasing the retraction amount. If the problem still persists then take a look at over extrusion or the nozzle temperature.
3D PRINTING TROUBLESHOOTING TIP: CHECK THE EXTRUSION
How you adjust the flow rate of the filament will vary depending on your printer. Using Cura and the Ultimaker series you’ll find the flow details on the machine in the material settings for the Ultimaker 2, on the Ultimaker 3 you’ll find them in the Custom settings in the Cura software.
Reduce the flow rate by 5% and print a calibration cube to check that the filament is extruding correctly and eliminates the issue.
3D PRINTING TROUBLESHOOTING TIP: NOZZLE TEMPERATURE
The tolerance of good quality filaments should negate the issue in principle, but if your filament has been sat around for a while, exposed to moisture or sunlight you may find that the filaments tolerances to temperature have reduced. Decrease the hot end temperature by 5º and try again.
3D PRINTING TROUBLESHOOTING TIP: Z-LIFT
Filament isn’t the only issue; if the head doesn’t lift high enough from the surface of the print then the nozzle itself can cause the scaring as it travels from one layer to another. On older printers you’ll need to re-calibrate if there are no Z-lift or Z-hop settings, otherwise increase Z-Hop or Z-Lift in 0.25mm increments.
3D Printing problem checklist: Diagonal Scars on Print
- Combing
- Retraction
- Check the extrusion
- Nozzle temperature
- Z lift
Print Looks Stringy and Droopy (Over-Extrusion)
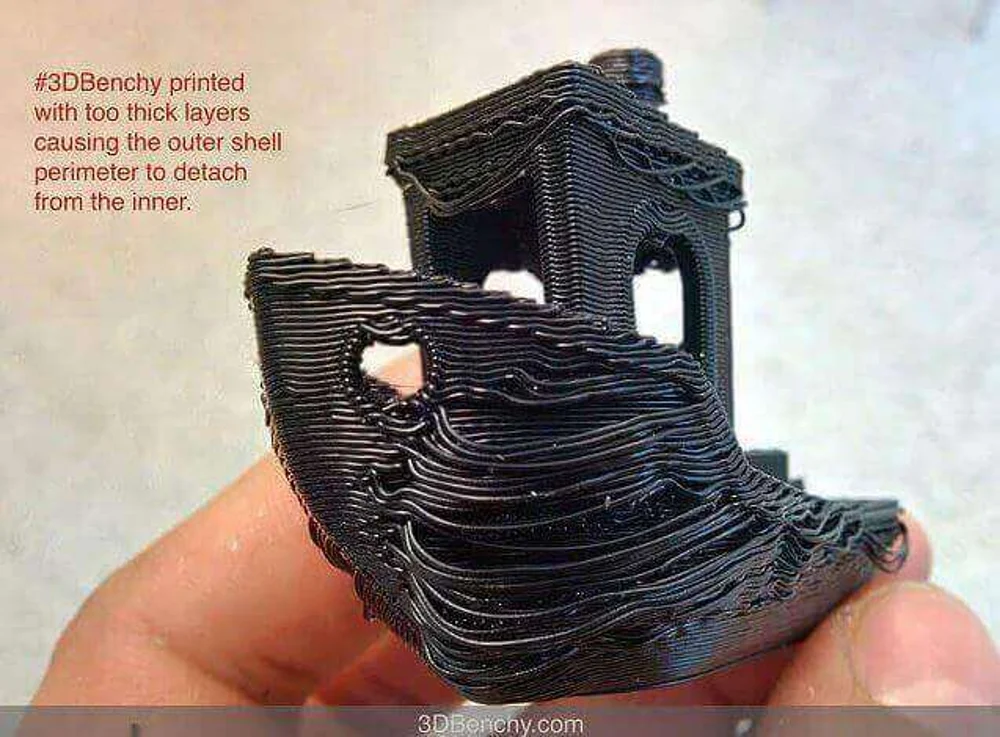
What’s the 3D Printing Problem?
Over-extrusion means that the printer supplies more material than needed. This results in excess material on the outside of the model printed.
What’s Causing this 3D Printing Problem?
Typically, the Extrusion multiplier or Flow setting in your slicing software is too high (see the section above)
3D Printing Troubleshooting: Print Looks Stringy and Droopy (Over-Extrusion)
3D PRINTING TROUBLESHOOTING TIP: EXTRUSION MULTIPLIER
Open your slicer software and check that you have the correct Extrusion multiplier selected.
3D PRINTING TROUBLESHOOTING TIP: FLOW SETTING
If that all looks correct then decrease the Flow setting in your printer’s software.
3D Printing Problem Checklist: Print Looks Stringy and Droopy (Over-Extrusion)
- Check you have the right extrusion multiplier settings
- Decrease the filament flow settings
Print Layers Look Uniformly Thin/Weak (Under-Extrusion)
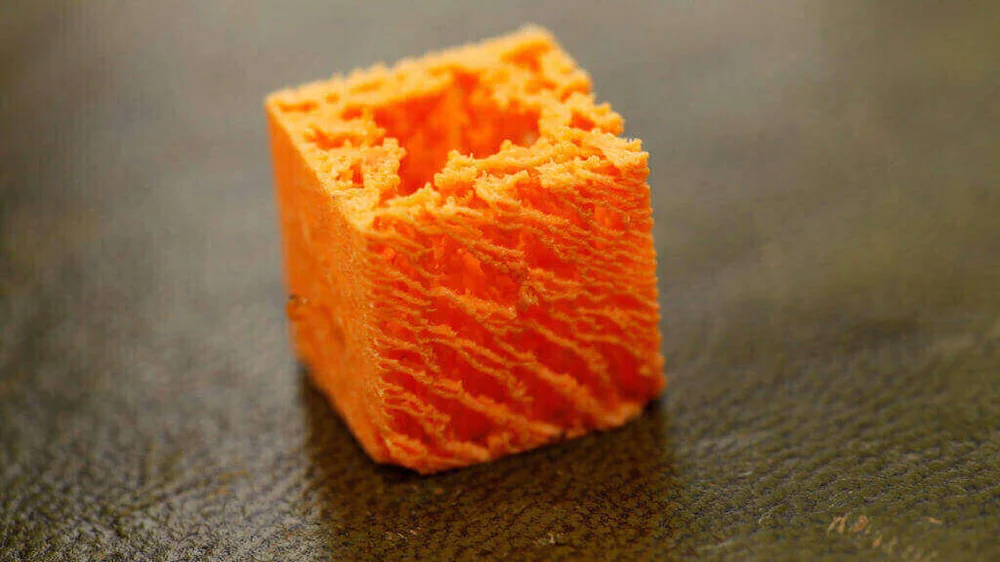
What’s the 3D Printing Problem?
Under-extrusion is the term given to the printer not supplying sufficient material for the print. Under-extrusion has many telltale signs — most significantly thin layers, unwanted gaps and even missing layers entirely.
What’s Causing this 3D Printing Problem?
There are several possible causes. First, the diameter of the filament used does not match the diameter set in the slicing software. Secondly, the amount of material that is extruded is too low because of faulty slicer software settings. Alternatively, the flow of the material through the extruder is restricted by dirt in the nozzle.
3D Printing Troubleshooting: Under-Extrusion
3D PRINTING TROUBLESHOOTING TIP: CHECK THE FILAMENT DIAMETER
Start with the simplest issue, have you set the correct filament diameter in the slicing software. If you’re unsure about the diameter the value along with the recommended temperature is usually printed on the box.
3D PRINTING TROUBLESHOOTING TIP: MEASURE THE FILAMENT
If you’re still not getting the results you want and filament flow is the issue, then use a set of calipers to double check the filament diameter. You should be able to tweak the filament diameter settings accurately in the slicer software settings.
3D PRINTING TROUBLESHOOTING TIP: CHECK THE HOT END FOR DEBRIS
After printing, most printers will lift the printhead away from the print base. Quickly check that the nozzle is clear from a build up of filament and dirt.
3D PRINTING TROUBLESHOOTING TIP: SET THE EXTRUSION MULTIPLIER
If there is no mismatch between actual filament diameter and the software setting, then then the extrusion multiplier (also referred to as the flow rate or flow compensation) may be too low. Each slicer application will handle this slightly differently but the principle is to increase this value in steps of 5% until you see the problem is gone.
3D Printing Problem Checklist: Under-Extrusion
- Check the filament diameter
- Use calipers to measure the filament diameter
- Check that the hot end is clear
- Adjust the extrusion multiplier in 5% increments
Print Looks Melted and Deformed

What’s the 3D Printing Problem?
Filament is surprisingly resilient to all types of misconfiguration, including overheating of the hot end. It’s for this reason of resilience that noticing your hot end is too hot isn’t always as easy as you’d think it would be.
A sign of this can be the appearance of uneven layers; when you take a closer look you can see that it’s not so much uneven as melted. Again our model shows this subtly on the cabin, and to a far greater effect on the chimney where it starts to look a little like wax running down a melted candle.
Overheating filament can also cause huge issues with accuracy especially when it comes to threadscrew holes you have printed. Finding that some holes are correct and others are too small is often an initial sign that the temperature could be too high.
What’s Causing this 3D Printing Problem?
Normally, having too hot a hot end or overheating is an easy fix. There needs to be a fine balance between melting the filament so that it will flow, and enabling the filament to solidify quickly so that the next layer can be applied to a solid surface. Before you go adjusting the temperature however, first make sure that you have loaded the correct material settings for your 3D printer (as part of the filament loading process). If you have, then it could be that you need to adjust the temperature just a touch.
3D Printing Troubleshooting: Print Looks Melted and Deformed
3D PRINTING TROUBLESHOOTING TIP: CHECK THE RECOMMENDED MATERIAL SETTINGS
This might seem obvious, but just double check that you’ve given the printer the correct details about the material. The latest filament temperatures range from between 180 – 260ºC or thereabout, so it’s surprising how easy it is to get this wrong.
3D PRINTING TROUBLESHOOTING TIP: DECREASE HOT END TEMPERATURE
In the printer or software settings decrease the hot end temperature. Depending on the severity of the overheating, drop the temperature in 5ºC intervals.
3D PRINTING TROUBLESHOOTING TIP: INCREASE PRINT SPEED
If the filament isn’t being discolored then you could try speeding up the print speed.
3D PRINTING TROUBLESHOOTING TIP: ADJUST FANS
Check that the cooling fans are directed at the hot end. Check that they’re in the right position and if possible boost their speed to increase airflow over the cooling filament.
3D Printing Problem Checklist: Print Looks Melted and Deformed
- Check the material settings
- Decrease the hot end temperature
- Speed up the print
- Check the fan position
Pits and Hollows in Top Layer (Pillowing)

What’s the 3D Printing Problem?
The top surface of the print shows unsightly bumps or even holes.
What’s Causing this 3D Printing Problem?
The two most common causes are improper cooling of the top layer and that the top surface isn’t thick enough.
3D Printing Troubleshooting: Pits and Hollows in Top Layer (Pillowing)
3D PRINTING TROUBLESHOOTING TIP: FILAMENT SIZE
Pillowing is an issue that can affect all 3D printers, however, it’s far more common on those using 1.75 mm filament. If none of the other tips below help, try switching to 2.85mm filament if you can.
3D PRINTING TROUBLESHOOTING TIP: CHECK THE FAN POSITION
Cooling can be a cause of pillowing. Typically, as the print starts your printer’s fans will be set to low or off, and after the first few layers they should kick into action. Check that the fans around your hot end start spin, especially toward the end of the print. If they appear to be functioning fine, then the issue could be that they are not directing sufficient airflow over your print. There are a variety of 3D printable mods to alter your print airflow.
3D PRINTING TROUBLESHOOTING TIP: SET FAN SPEED IN G-CODE
Another cooling issue happens when each successive top layer of molten plastic is applied. As it covers the inner support structure it needs to be cooled quickly to avoid falling into the holes between the supports. The speed of the fans can be adjusted in the G-Code.
A common G-Code for Fan On is M106 and is M107 Fan Off. By those control lines, you just need to set the Fan speed to maximum for those top layers.
For example, looking at the G-Code (generated in Cura for printing on a Prusa i3) for a 1cm x 1cm cube printed at 0.1mm layer height, we can see that there are 97 layers. Knowing that we have a ‘Bottom / Top Thickness setting’ of 0.6mm we can look back to ;LAYER:91 then in the line after add M106 S255. M106 sets the fan going and S255 sets it to full blast.
3D PRINTING TROUBLESHOOTING TIP: INCREASE TOP LAYER THICKNESS
The easiest solution is to increase the top layer thickness. Most applications will enable you to do this in the advanced section, under the ‘Bottom / Top Thickness setting’. You’re aiming for at least 6 layers of material normally and up to 8 for smaller nozzles and filament. If your layer height is therefore set to 0.1mm then set the ‘Bottom / Top Thickness setting’ to 0.6mm. If the effect of pillowing still exists then bump it up to 0.8mm.
3D Printing Problem Checklist: Pits and Hollows in Top Layer (Pillowing)
- Go large and increase the filament size
- Make sure the fans are up to speed and positioned
- Manually set the fan speed
- Increase the top layer thickness
Web-like Strings Cover the Print (Stringing)
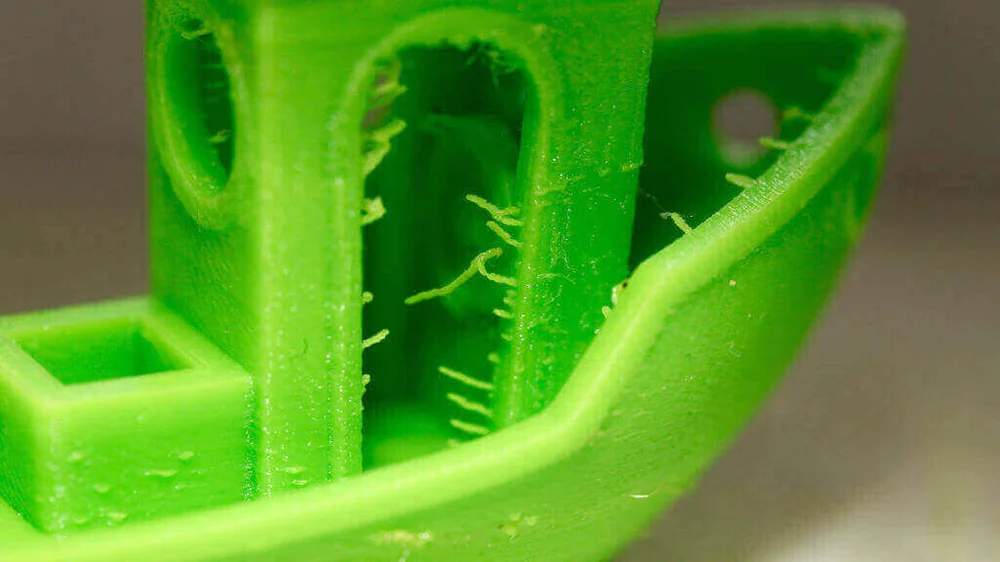
What’s the 3D Printing Problem?
There are unsightly strings of plastic between parts of the model.
What’s Causing this 3D Printing Problem?
When the print head moves over an open area (otherwise known as travel move), some filament has dripped from the nozzle.
3D Printing Troubleshooting: Stringing
3D PRINTING TROUBLESHOOTING TIP: ENABLE RETRACTION
Retraction is an important factor when it comes to quality of finish and can be enabled through most slicing software. Its function is pretty simple and works by retracting the filament back into the nozzle before the head moves. The idea is that it avoids molten filament from trailing behind the head creating thin strings in its wake.
Most applications such as Cura offer a one click activation option. This uses a set of default parameters and for the most part is perfectly adequate, but for fine tuning there are customizable options that give greater control. Adjusting the minimum travel of the head before retraction is activated, for example.
3D PRINTING TROUBLESHOOTING TIP: MINIMUM TRAVEL (MM)
Reducing the minimum travel is usually the quickest fix for stringing if the standard retraction isn’t doing the job. Drop the value in 0.5mm increments until the stringing has stopped.
3D PRINTING TROUBLESHOOTING TIP: JUST CUT THEM OFF
This isn’t the most elegant of solutions but simply taking a scalpel to the strings is quite often the quickest and easiest solution.
3D Printing Problem Checklist: Web-like Strings Cover the Print (Stringing)
- Enable retraction
- Adjust the minimum travel before retracting starts
- Just clean the print with a scalpel
Print Has Lost Dimensional Accuracy

What’s the 3D Printing Problem?
When you’re designing a product in your CAD application, the dimensions you’ve painstakingly planned need to be perfectly reproduced by your 3D Printer.
However when it comes to bolting your product together, you find that all that accurate measurement and design has gone to pot. Nothing aligns, the holes are the wrong size and nothing fits.
Print dimension accuracy is actually one of the few areas of 3D printing where it’s highly likely that your printer is absolutely fine. Before checking the printer for faults, double check that the dimensions of the 3D model are correct.
With that done, then you can look to the printer to find the cause.
What’s Causing this 3D Printing Problem?
Let’s start with the measurements and the most common problem. First of all check that you’re working in real world measurements; cm and mm are probably best, although inches are also a workable unit for 3D printing. Mix the two up between your 3D model and slicing engine, and you’ll quickly spot the error.
If all is fine with the unit selection, then double check the physical measurements of the parts. When it comes to measuring, always measure twice!
Now if you have separate prints that need to fit together, such as a male to female connector, or screw and hole, then make sure the insert is slightly smaller than the hole you’ve created for it.
For example if you have an M5 screw and you’ve created an 5mm diameter hole for it to go in, then it’s not going to fit (at least not without some muscle and determination). In order to solve this, increase the hole size by 0.1mm for a fine print and possibly 0.2mm for a low quality print. Print and try again. If it still doesn’t fit enlarge it a little more.
If the hole looks oval, the issue is not necessarily the hole’s size.
If you’ve created a low polygon shape, then the likelihood is that your hole is no longer round and instead has slightly straightened edges. When printing an object with holes, always ensure you keep a moderate polygon count to keep those smooth round holes for things to fit in.
The same goes for custom shapes that need to fit together. Reducing the polygon count of one object can cause all sorts of issues if the two sections have rounded edges that need to interconnect.
Once you’ve finished checking everything with the models dimensions, it’s time to turn your attention to the printer. The first few layers are all important when it comes to print accuracy. Print out a test cube 50mm x 50mm and use digital calipers to check the measurements; make sure you print the cube at the same layer height you’ll be printing your final model. Firstly check the overall height to see if it equals 50mm, if it does then all is fine on the Z-axis. If not, then carefully measure the top 20 layers — these should equal 20mm. If this is correct but the overall height is wrong, then it’s likely that the first few layers are causing the issue.
To resolve this, check the height of the nozzle from the print platform and that it’s within the margin of error for your printer in relation to the layer height. If your nozzle height is 1mm from the print platform and your layer height is 2mm, you may find too much filament is being laid down in that first layer and causing the issue. If this is the case, either recalibrate your printer and ensure the nozzle to platform distance is increased or reduce the layer height.
Now check the X and Y dimensions. If they’re approximately 1mm smaller than they should be but all proportions look correct, it could be due to filament thermal contraction. This is relatively common with ABS; in order to correct this, work out the percentage of error and increase the scale of the print to compensate. Using high quality filaments is the best way to avoid this.
Back to the hole and have a look inside; if the walls look smooth then everything is ok. If you see the layers protruding slightly then this could be a sign that the nozzle is too hot and the filament is oozing after it’s been laid down.
If the hole looks oval, then it could be that one of your belts is loose or there is a slight misalignment of the X- and Y- axes. Check all are tight and everything screwed into place as should be.
3D Printer Troubleshooting: Print Has Lost Dimensional Accuracy
3D PRINTING TROUBLESHOOTING TIP: CHECK WORKING UNIT OF MEASUREMENT
In your 3D printing application make sure you have the correct real world dimensions selected.
3D PRINTING TROUBLESHOOTING TIP: DOUBLE CHECK THE MEASUREMENTS
If you’re designing a part that needs to connect with other objects, double check your measurements and use a digital caliper.
3D PRINTING TROUBLESHOOTING TIP: OVER-SCALE SCREW HOLES
If you’re making a screw hole, create a virtual 3D M5 screw with a diameter slightly larger than it should be and use this to extract / create a boolean subtraction from the model you need the hole to appear in.
3D PRINTING TROUBLESHOOTING TIP: INCREASE POLYGON COUNT
Reducing the polygon count of your models can cause issues with the slightly flattened edges. Make sure you keep polygons within a reasonable count for smoother gradients and better fits.
3D PRINTING TROUBLESHOOTING TIP: TEST PRINTER ACCURACY WITH TEST CUBE
Use a 3D Print Calibration Cube to check the X, Y and Z dimensions of your print.
3D PRINTING TROUBLESHOOTING TIP: CHECK NOZZLE TEMPERATURE
Try reducing your print temperature if there are blobs and other stray extrusions on the inside of your print’s holes.
3D PRINTING TROUBLESHOOTING TIP: CHECK BELTS AND RAILS
Check over the belt tension and make sure all axis are straight and correctly aligned.
3D Printing Problem Checklist: Print Dimension Accuracy
- Check dimensions
- Double check the measurements
- Make sure parts fit
- Keep polygon count high
- Check nozzle temperature
- Check belts and rails
Print Offset in Some Places

What’s the 3D Printing Problem?
The lower and top layers shift so that you get a stepping effect through the print. Usually it’s quite subtle, but the above image shows a print with a more pronounced effect.
What’s Causing the 3D Printing Problem?
There’s a variety of reasons for shifting layers, and these can be as simple as someone knocking the printer during the print process. More complex causes can be bent or misaligned rods, or even the nozzle catching on the print and causing a slight shift in position of the platform.
3D Printing Troubleshooting: The Print Has Offset in Some Places
3D PRINTING TROUBLESHOOTING TIP: CHECK THE PRINTER HAS A STABLE BASE
Place the printer on a stable base and in a location where it will avoid being knocked, poked and generally fiddled with. Even a small nudge of the printer can shift the print base and cause issues.
3D PRINTING TROUBLESHOOTING TIP: CHECK THE PRINT BED IS SECURE
Many 3D printers use some form of detachable print bed. Although this is handy when it comes to removing prints and avoids damage to the printer, it also means that over time clips and screws can work loose. Make sure that when you reinstall the print platform it’s clipped or bolted tightly in place to avoid any slip or movement.
3D PRINTING TROUBLESHOOTING TIP: WATCH FOR WARPED UPPER LAYERS
A print’s upper layers can easily warp if cooled too quickly. As the layers warp they rise and can cause an obstruction to the nozzle as it moves. In most cases the print will release from the platform, but if it doesn’t the powerful stepper motors can push the print and platform around. If your prints are suffering from warping in the upper layers try reducing the speed of the fans slightly.
3D PRINTING TROUBLESHOOTING TIP: REDUCE PRINT SPEED
It is possible to speed up the print times for your machine by increasing temperature and flow. However whilst this may result in the filament flowing in the correct quality the rest of the machine may struggle to keep up. If you hear a clicking during printing this could be a sign that the printer is going to fast. If you do hear a click the first port of call is to check that the filament isn’t slipping, before you take a look at the actual printer speed. You can adjust your printer’s speed easily enough in any good slicing software.
3D PRINTING TROUBLESHOOTING TIP: CHECK THE BELTS
If layers are still shifting then it’s time to check the belts. A quick check is to just go around all belts and pinch the two together. The tension in each belt should be the same, if not then you’ll need to adjust the belt position to even out the belt tension. Over time the rubber belts will stretch (You can often tell if they do as they’ll start to slip on the drive pulleys), if there is quite a bit of play in the belts then it’s time to replace them with new ones. Over tight belts can also be an issue but this is usually only a problem if you’ve built the machine yourself. Some printers such as the Prusa i3 have belt tensioning screws that enable you to easily adjust the belt tensions.
3D PRINTING TROUBLESHOOTING TIP: CHECK THE DRIVE COUPLERS
These are usually connected directly to a stepper motor, and one of the main rods that drives the print head. If you carefully rotate the coupler you’ll see a small grub screw. Hold onto the rod and taking hold of the attached belt and then tug the belt and try to force the pulley to turn. You should find that there is no slip between the coupler and stepper or rod. If there is, tighten the grub screw and try again.
3D PRINTING TROUBLESHOOTING TIP: CLEAN AND OIL THE RODS
Over time debris can build up on the rods which means that at some points along their length they encounter an increase in friction. This can affect the free movement of the head and cause layer shifting. A quick wipe and re-oil of the rods usually solves the issue.
3D PRINTING TROUBLESHOOTING TIP: CHECK FOR DEFORMED RODS
If you see the print head falter at certain points then it could be that one of the rods has become slightly bent. You can usually tell by switching off the machine so there’s no power going through the steppers and then move the print head through the X- and Y- axes. If you feel resistance then you know something is amiss. Start by seeing if the rods are aligned, if they are then remove the rods and roll them on a flat surface. If any are bent then it will be quite obvious.
3D Printing Problem Checklist: The Print Has Offset in Some Places
- Check that the printer is on a stable base
- Check the print bed is secure
- Watch out for warped upper layers
- Printing too fast for your machine
- Check the belts
- Check the drive couplers
- Check the rods are clean and apply some oil
- Check for deformed rods
Bridges are Messy
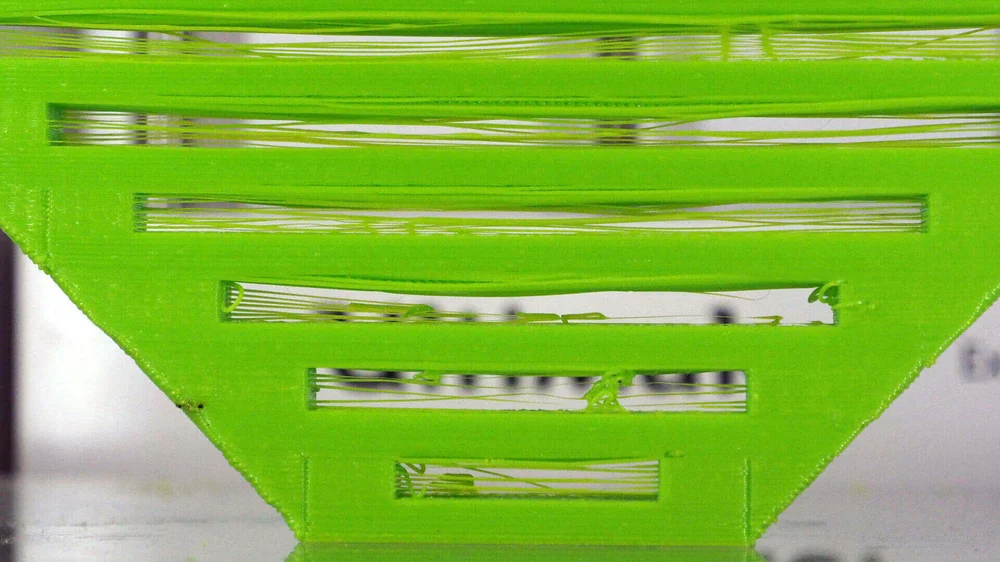
What’s the 3D Printing Problem?
Bridges are essentially a stretch of plastic that is extruded between two raised points. If you have two columns with a 5 cm gap, then the beam that sits on top between those two points with nothing below is the bridge.
Most filament is surprisingly resilient to bridging, and with a finely tuned printer the distance achievable when bridging can be surprising. However you know something isn’t quite right when your printer starts to fail to bridge even the smallest gap.
The most obvious sign is when the printer fails to successfully bridge gaps between 1 and 3 cm. The extrusion may be too thin, filament sags, or simply flows down the height of the bridge rather than across.
What’s Causing this 3D Printing Problem?
Getting to the bottom of bridging issues is usually pretty easy and much of the diagnosis comes through the look of the failed bridge.
It’s also worth noting that the way that different slicer applications handle bridging is very different, with applications such as Simplify3D having a special Bridge option that will adjust extrusion and cooling for the best results.
The most common related issue is that the gap you’re trying to bridge is just too big, this distance will vary with each printer and material. You can usually tell if the gap is too great as the filament will start to sag in the middle or collapse.
Cooling is another major issue, the filament needs to be cooled quickly in order for it to be able to support itself between the two columns.
Extrusion speed is equally important, if the print head moves to quickly then the speed and vibrations will inevitably cause instability before the filament has set.
Too high extrusion temperature will often highlight in bridging, again showing sagging of the filament. If the extruded filament is of different thicknesses then you know this is the issue.
3D Printer Troubleshooting: Bridges are messy
3D PRINTING TROUBLESHOOTING TIP #1: CHECK THE BRIDGING CAPABILITIES
You can make a test print with columns and bridges of different distances to check how far your printer will go, start with a 5cm gap and then increase, anything between 5 and 10 is good, 15 would be exceptional.
3D PRINTING TROUBLESHOOTING TIP #2: ADD SUPPORTS
A quick and easy fix is to simply add supports below the structure
3D PRINTING TROUBLESHOOTING TIP #3: INCREASE FAN SPEEDS
Boost the extrusion fan speed to ensure that the filament cools quickly, the faster the filament sets the larger the bridge it will be able to create.
3D PRINTING TROUBLESHOOTING TIP #4: DECREASE EXTRUSION SPEED
Fast extrusion is an absolute no when it comes to bridging, you need slow and steady as the filament needs to have time to set as the distance is bridged.
3D PRINTING TROUBLESHOOTING TIP #5: USE SIMPLIFY3D
This dedicated 3D print software features a bridging option and will automatically recognize any areas of your print that require greater cooling and slower extrusion speeds.
3D Printing Problem Checklist: Bridges are messy
- Check the bridging capabilities
- Add supports
- Increase fan speeds
- Decrease extrusion speed
- Use Simplify3D
FDM 3D PRINTING PROBLEMS: SOMETHING ELSE
You printed successfully and the print looks great, but there’s still a problem. Here are the 3D printing problems which don’t fit in any of the categories above.
Print is Stuck to Print Bed
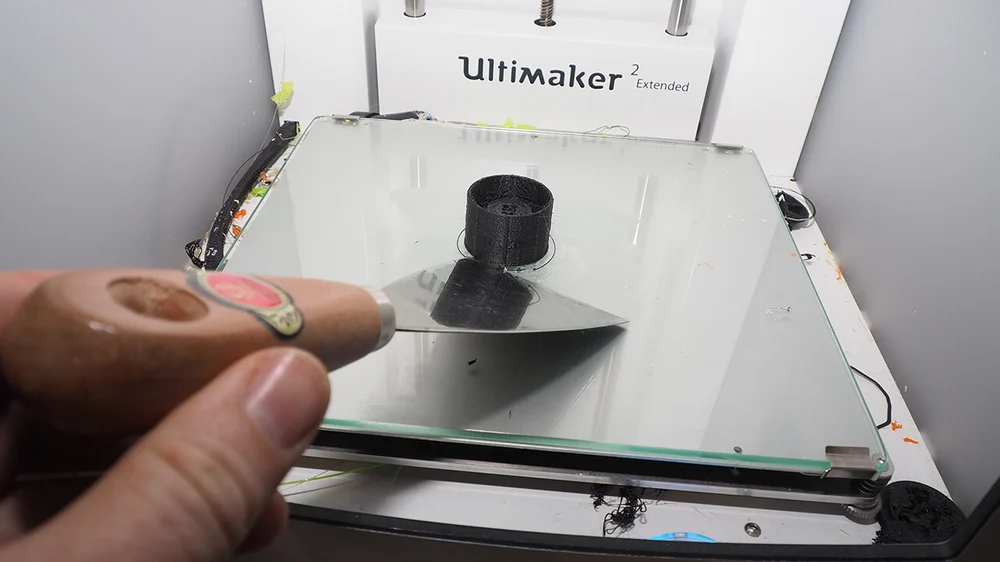
What’s the 3D Printing Problem?
Prints seemingly welded to the print platform is as common as prints not sticking at all. Annoyingly quite often you’ll experience both issues in one day, and usually by solving one you create the other.
The main fix to this 3D print issue is balance.
Spotting the problem is simple. Once the print has finished it just won’t budge. In fact it’s welded so firmly you could possibly lift the weight of the printer by the print (tempting as it may be, don’t).
What’s Causing this 3D Printing Problem?
When the filament is warm it’s designed to be tacky so that as each layer is extruded it will stick together. As the print base is warm the filament that makes contact will remain slightly tacky until completely cool.
A print with a large surface area that’s in direct contact with the base can be just plain stubborn to remove. It really does just bond with a suction-like effect.
Old print platforms can become overly textured with layers of glue or small pits in the glass act as anchors to the print. Over time this texture can create an almost unbreakable bond. Some print pltforms are perforated by design, and typically they give the most difficult to remove prints.
Cheap filament can also be the culprit for a ridiculous print bed bond. Although the filament melts fine, it doesn’t always solidify completely.
3D Printer Troubleshooting: Print Stuck to Print Bed
3D PRINTING TROUBLESHOOTING TIP: HAVE A LITTLE PATIENCE
You’ve waited hours for the print, so waiting a little longer for the print to cool down completely isn’t going to hurt. After some time cooling, it may release of its own accord. As the filament cools it solidifies, losing the tackiness that is needed for the layers to bond.
3D PRINTING TROUBLESHOOTING TIP: USE A PALETTE KNIFE
Many 3D printers come with them, but you can likely find one at any decent hardware store. If you’ve left it for an hour and the print is still stuck firm, release the build plate from the machine and place it onto a desk with something to support the print base from behind. Ideally a wall. Then carefully use the knife to work around the edge and prize the print free.
3D PRINTING TROUBLESHOOTING TIP: GIVE THE PRINT PLATFORM A CLEAN
It may not help with the present print, but if your print platform is clogged with glue then it’s probably time to give it a clean. Future prints may not exhibit the same unbreakable bond. If the print is still attached run it under hot (not boiling) water and gently use a palette knife to scrape off any surface glue. Leaving it to soak in hot water will generally release the print as well, but take care to only apply this tip to removable print bed surfaces.
After the print releases make sure the platform is cleaned and inspect for any pits in the glass. If there are then flip the glass over and use the smooth side. If both sides show signs of pitting buy a new one.
3D PRINTING TROUBLESHOOTING TIP: STICK IT IN THE OVEN
There are times when hot water just won’t budge a print, if you have a glass or other heat resistant platform with no plastic or electronics attached and it’s possible to remove it from the printer, pop it in the oven. Set the temperature to 100º and then use a pallet knife to see if you can move the print. If not increase to 120º and leave for five minutes and try again. Increase the temperature until you have removed the print or the print has melted and can be scraped away (ensure you wear heat proof gloves). The latter extreme will most likely be at the expense of sacrificing your print.
3D PRINTING TROUBLESHOOTING TIP: DON’T USE CHEAP FILAMENT
On so many levels cheap filament is a false economy. It can bond to your print platform in ways that no other material known to man can, and is perfectly suited to welding printheads and extruders together once cooled. The only real way to avoid the issue is to completely avoid cheap filaments.
3D PRINTING TROUBLESHOOTING TIP: MAKE SOME HOLES
This requires a little foresight, but by creating a few holes in the design of the print base you can avoid some sticking caused by too much surface contact and suction.
3D Printing Problem Checklist: Print is Stuck to Print Bed
- Try a little patience
- Use a palette knife
- Give the print platform a clean
- Stick it in the oven
- Don’t use cheap filament
- Make some holes
SLA 3D PRINTING PROBLEMS: NOTHING IS PRINTING
The 3D printing gods look unfavorably upon you. You’ve half an hour spent meticulously placing supports to try and ensure success, but now nothing is even sticking to the print plate. And the injustice of it all? You probably had to wait hundreds of layers to even tell.
Resin too Cold
What’s the 3D Printing Problem?
Much like some FDM 3D printing filaments, ambient temperature can play a big part in whether a photopolymer resin will set during the SLA printing process.
If your resin is too cold, it’s unlikely to set and, if it does, will set inconsistently, resulting in partial prints and poor plate adhesion.
What’s Causing this 3D Printing Problem?
Beats us. We think it’d take a chatty materials scientist to explain this, because there’s nary a whisper online about why this is the case. It is, because it is. Perhaps someone in the comments can explain it for us, but all we do know, is that a common cause of resin prints failing is the resin and ambient temperature surrounding the printing being too cool.
Temperatures as high as 25-30 degree Celsius can be necessary from some resins.
3D Printer Troubleshooting: Resin too Cold
3D PRINTING TROUBLESHOOTING TIP: MOVE PRINTER TO A WARMER ROOM
Easier said than done if you happen to live in a generally colder climate. Something as simple as moving the printer to a warmer room close to a source of heat could be enough to hit that sweet spot and solidify your resin prints into their “green” state (solidified, but not hardened/cured).
3D PRINTING TROUBLESHOOTING TIP: INVEST IN A CHAMBER HEATING SOLUTION
There’s very little out there in terms of dedicated resin 3D printer heating, but some industrious makers have turned to the fledgling (ha) community around home incubators for the solution. It’s possible to pick up a incubator heating kit that includes heater, fan, thermostat and power supply for around $50, though we’re sure home brew solutions are out there for less. This serves as a good starting point though.
SLA 3D Printing Problem Checklist: Resin too Cold
- Move printer to warm room
- Find a way to heat the chamber
Printing too Fast
What’s the 3D Printing Problem?
In SLA 3D printing, a UV light source, typically a laser, hardens photopolymer resin. Much like photographic film requiring a significant amount of exposure to light for the image to be captured, so too must the resin be exposed to the appropriate amount of UV light before it hardens.
What causes this 3D Printing Problem?
Underexposure, be it from the laser moving too fast or an underpowered laser (which we cover below), will result in nothing printing at all, or weak prints that are not rigid enough to withstand the peel force of your machine.
3D Printer Troubleshooting: Printing too Fast
3D PRINTER TROUBLESHOOTING TIP: DECREASE PRINT SPEED
Depending on the SLA printer you are using, it may be possible to slow the print speed in your slicing settings. Doing so could fix the issue of weak prints or no print, although we would advise checking the temperature of your resin first. The frequency of problems people encounter being fixed by warming things up make that the likely culprit for such an issue.
SLA 3D Printing Problem Checklist: Printing too Fast
- Decrease print speed
Underpowered Laser
What’s the 3D printing Problem?
Much like printing too fast can underexpose the resin, so too can using an underpowered laser.
What causes this 3D printing Problem?
Bit of a no brainer. Your laser power is too low. In order to polymerize the resin, there needs to be sufficient energy from the laser. And much like a laser tracing the model too fast will not transfer enough to the resin, neither will an underpowered laser.
3D Printer Troubleshooting: Underpowered Laser
3D PRINTER TROUBLESHOOTING TIP: INCREASE LASER POWER
If your printer’s settings allow for it (like on the Peopoly Moai), increasing the laser power by tiny amounts at a time can help you find the sweet spot for exposure using your current resin and print speed.
NOTE: While it might be tempting to just crank up the laser power if nothing is printing well, we would put this solution as the bottom priority on your checklist. Upping the laser power too high can result in “blooming” on your prints — exposing the areas around the pinpoint it is supposed to set, causing messy surface finish — and damage the interfacing layer inside your printer’s resin vat. Different resins can require different laser powers from your machines default, but play with laser power last (unless given recommended settings from the resin/printer manufacturer).
SLA 3D Printing Problem Checklist: Underpowered Laser
- Marginally increase laser power
SLA 3D PRINTING PROBLEMS: MY PRINT FAILED
Resin be damned, all was well but somewhere along the way the print Cronenburged hard. There are a number of possible causes: here’s what we have.
Prints Not Adhering to Print Plate
What’s the 3D printing problem?
Your support base isn’t sticking to the print plate. Either it’s partially peeling away, or separated completely and is left floating around the resin tank.
What causes this 3D printing problem?
There are a number or reasons this can happen. Firstly, it’s possible the way your SLA 3D printer repositions to the next printing layer generates more peel force than how you are printing can handle.
With bottom down SLA 3D printers, peel force is the suction effect exerted on prints every time the print plate and bottom of the resin vat separate to reposition. Depending on the mechanism by which your printer does this action, there are a few tricks you can do to minimize, or at least mitigate this pull.
Another factor that can affect a print’s adhesion is whether the print plate is sufficiently prepared. Bottom up SLA printers printing onto a flat metal plate stick well when the plate is finely textured, or rough even. Conversely, perhaps your interfacing layer in the resin vat has some ghosting which is hindering the laser in setting the resin.
Alternatively, it could be the classic culprit of the resin simply not being warm enough. You may be on the verge of acceptablility, but as the print progresses and the resin level lowers, a slight temperature fluctuation could cause the resin to stop setting.
3D Printer Troubleshooting: Prints Not Adhering to Print Plate
3D PRINTING TROUBLESHOOTING TIP: REPOSITION YOUR PRINT
If your printer utilizes a tilting resin vat as part of its mechanism (itself a design choice to help relieve peel force), this creates a gradiant across the print plate where said force goes from very strong, to weak.
Positioning your print in an area of the print plate that is under less peel force can go some way to helping your print get a good bond with your print plate, in addition to reducing the stress on taller parts that will be free standing or reliant upon supports.
3D PRINTING TROUBLESHOOING TIP: LEVEL VAT
Depending on your 3D Printer, it may be possible to auto- or manually re-level your vat or bed. A mainstay of 3D print troubleshooting for FDM 3D printers, it also applies with SLA 3D printers, too. If you are finding that only part of your print is sticking to the print plate, then it could well be that said part of the print plate is not tightly against your interface layer in the vat when the laser fires. Another telltale sign of this is flat disc of hardened resin stuck to your interface layer inside the vat after you’ve finished or cancelled the print.
Search for some kind of bed leveling instruction for your printer, or advanced calibration steps and give them a try.
3D PRINTING TROUBLESHOOTING TIP: CHECK TEMPERATURE
It’s possible your print setup is on the verge of printing successfully, but the resin hardening is just not quite there. If the resin is too cold, it could be that the resin is not setting well enough, and therefore does not adhere well to the print plate. Try heating the resin and print chamber in some way (repositioning the printer in a warmer room could do the trick).
3D PRINTING TROUBLESHOOTING TIP: CHECK RESIN VAT INTERFACE LAYER
Many SLA 3D printers utilize a thin layer of gel-like material (PDMS is a common one) on the bottom of the acrylic resin vat to serve as an interfacing layer. On bottom up resin printers — the common method in “cheaper” machines — the print plate pushes up on the interfacing layer to trap a thin film of resin for each layer’s setting. It is inevitable that, over time, ghosting and general wear and tear could lead to poor printing, making some areas of the print plate no longer viable to print on. The solution is to either: replace the interfacing layer with your own (Solaris Silicone is one oft repeated option), buy a new interfacing layer if available or, if not, a new vat. That, or continue to reposition your prints on non-damaged areas of your vat.
3D PRINTING TROUBLESHOOTING TIP: FILTER YOUR RESIN
Several prints in, you may find small set pieces of resin floating about inside your vat. These rogue rascals can get in the way and interfere with the laser curing fresh resin. It’s good practice to comb through your vat after each print not only to catch these particles and remove them, but to dislodge any set resin stuck to the bottom of your tank.
3D PRINTING TROUBLESHOOTING TIP: REMIX YOUR RESIN
If you’ve followed the above step and filtered your resin for print disrupting particles, but then left the machine alone for some days, there a chance the resin has settled, with the heavier pigment from colored resins settling into their own layer that will print inconsistently as the print proceeds.
3D PRINTING TROUBLESHOOTING TIP: SAND YOUR PRINT PLATE
Sometimes the plate shipped with an SLA 3D printer can be a little too smooth, meaning only in the most perfect of conditions will the print properly adhere to the plate. You can goose this in your favor by gently sanding the print plate with a medium grit sandpaper. Be sure to properly clean the plate afterwards, otherwise you’ll introduce a bunch of particles to the resin that will interfere with your prints.
SLA 3D Printing Problem Checklist: Prints Not Adhering to Print Plate
- Level your vat
- Reposition your model for printing
- Check the resin temperature
- Check vat interface layer
- Filter your resin
- Mix your resin
- Sand your print plate
A Section of the Print/Supports Detached or Moved
What’s the 3D Printing Problem?
At some point during the print, a chunk of the hardened resin has shifted, either separating completely or moving enough to interfere with and mess up the other parts of the print.
What causes this 3D printing problem?
As is often the case for disfigured SLA prints, the forces at play in the vat itself are likely the culprit.
It could be that what you are printing is incorrectly oriented to withstand the peel forces, resulting in distorting movements that cause parts or the supports to separate. Such movement in the part will cause subsequent layers to be formed on the vat interface, rather than the print itself, so you end up with two issues from the one failure (yaay).
Alternatively, maybe your print is correctly positioned, but your support structures just aren’t strong enough.
Or it could be that everything would print fine, except that you have a print with a large cross section that is messing things up with excessive peel force or, if hollowed, insufficient drainage to mitigate explosions (the actual term, though it’s not as dramatic as it sounds).
3D Printer Troubleshooting: A Section of the Print/Supports Detached or Moved
3D PRINTING TROUBLESHOOTING TIP: HOLLOW LARGE PRINTS
For models that feature a large surface area at any point of their printing, you should strongly consider hollowing them (and adding drainage holes) where possible.
This means that rather than forcing a large flat surface to pull away from the bottom of the resin vat with every layer change, you are instead having a thinner outline of the model detach each time.
This requires much less force, and is less likely to pull your print apart — though this works best providing you add drainage holes using your modeling/slicing software. Without holes added to the solid masses of your print, you will be trapping a reservoir of unset resin inside — an expensive waste and something that will defeat the point of hollowing in the first place.
3D PRINTING TROUBLESHOOTING TIP: STRONGER SUPPORTS
If your model looks good to print, but you suspect the peel force is still accountable for failed prints, the next step we would suggest is strengthening your supports. Bump up the width of the tips where the support meets the printed part by a fraction of a millimeter and add struts between them if you haven’t already.
You could also consider adding more supports, if you don’t mind the prospect of more post-processing clean up once the print is cured.
3D PRINTING TROUBLESHOOTING TIP: CHECK/SECURE PRINT PLATFORM
It’s possible that your printing platform is not properly secured. As the printer goes about its business stepping the platform layer by layer, slight variances in position from the platform jostling could cause layers to misalign and become separate (delaminate).
3D PRINTING TROUBLESHOOTING TIP: REORIENT YOUR PRINT
Oftentimes an SLA print issue can be resolved with better orientation of your model. Not only can this improve the quality of your prints, but it can reduce the stresses in the vat and increase the chance of model printing successfully.
For optimum model orientation, you should consider the following:
Positioning. Many, if not all bottom up SLA 3D printers feature some form of peel mechanism to separate the print plate from the bottom of the resin vat when repositioning on the Z-axis for the next layer. Depending on the method in which your printer does this, it’s possible the strength of this peel force changes across the area of your print plate. If so and this is known for your printer, you can increase the likelihood of the print surviving the forces by positioning it in an area subjected to weaker peel force.
Support overhangs. As with FDM 3D printing, severe overhangs need to have some form of support to print successfully. With some 3D models you can mitigate the need for some by angling your model, decreasing the overhang angles in the process and making them viable for printing without support.
Minium Points (or Minima). As with overhangs in need of supports, minimum points are isolated parts of your print that are not directly connected to the body of a print. Think of a person with their arms by their side printing the right way up — the fingertips would be considered minima, since they begin printing separate from the body, with the arms materializing on top and connecting at the shoulders. Such minima require supports, otherwise they are highly likely to break away and float free in your vat of resin.
Alternatively, you can eliminate the need to support minima with tactical model orientation (flipping the person to print head first removes minima, as the body tapers out to the arms and, finally, feet).
Cupping. the model you’re planning to print may feature voids facing into the print vat — especially so if it’s a large model that you have hollowed. Such a feature can cause a huge problem in excessive peel force for the print to overcome (in all likelihood messing the print up in the process).
If the “cup” is shallow, angling your print could be enough to minimize the cupping effect to non print-destroying proportions.
The alternative solution is to add drainage holes to the model in your preferred modeling software, which would allow the resin to flow through with each layer change.
SLA 3D Printing Problem Checklist: Part of the Print Detached/Moved
- Hollow large prints
- Add stronger supports
- Check/secure print platform
- Re-orient print
SLA 3D PRINTING PROBLEMS: MY PRINT LOOKS BAD
The printer has quietly hummed away for hours on end and successfully finished its print. Trouble is, said print looks like garbage.
Layers Have Separated (Delamination)
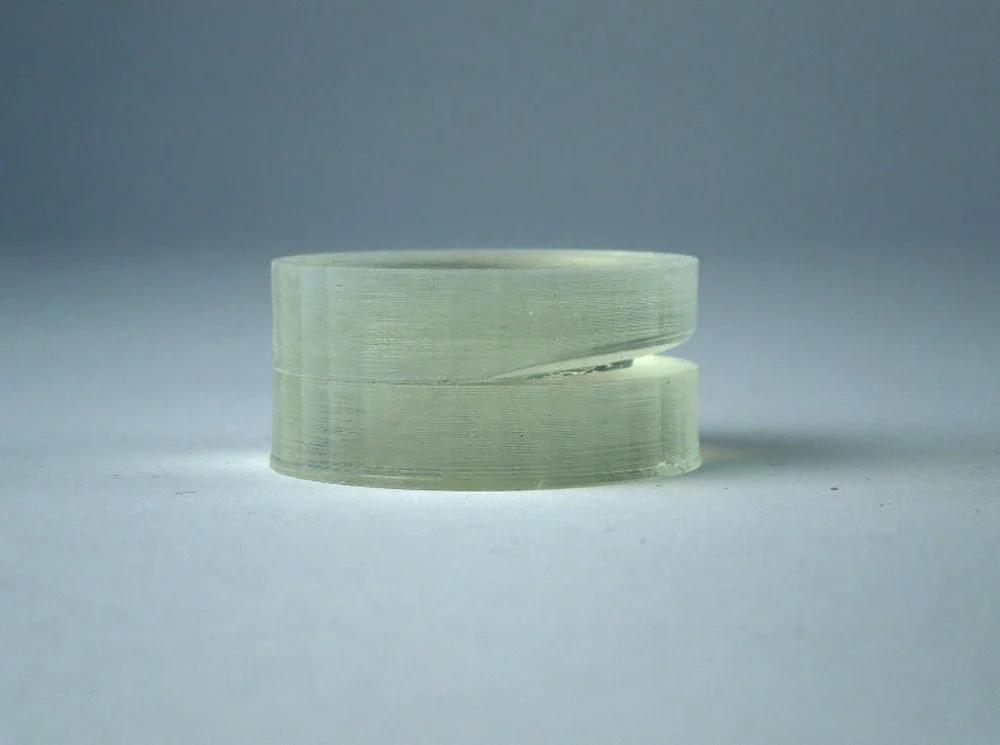
What’s the 3D Printing Problem?
There are areas of the print that have become somewhat frayed, like the print is pulling apart from the layers not bonding well/at all.
What’s Causing this 3D Printing Problem?
When the layers of an SLA print don’t bond well (known as delamination), there can be a couple of causes.
Firstly, it’s possible that you haven’t oriented your print well enough to avoid minima. These parts print in isolation from what it fixed to your print platform and as such detach, print sloppily layer by layer and generally just mess up prints. Don’t try them. Make sure all severe angles and points that are not directly connected to the main print at their highest point are supported.
Besides shifting unsupported parts, debris, poorly mixed resin and ghosting on the vat itself can be a cause of delamination. These are all easy to address.
Additionally, delamination could come after a successful print during the post-processing stage. If your material has particularly weak layer bonding, leaving the part in IPA for washing for too long could weaker the layers further and cause the part to break apart.
3D PRINTING TROUBLESHOOTING TIP: SUPPORTS!
Minima in your prints will mess up an SLA print when not supported. Make sure you generate supports for all severe angles and points that are not directly connected to the main print at their highest point. Oftentimes you can get creative with how you orient your print on the print plate in your support generation software to minimize the amount you need.
3D PRINTING TROUBLESHOOTING TIP: CHECK THE LASER’S PATH IS CLEAR
We’re lumping a few points into one here, since they’re all suggested for the same reason — allowing the laser to hit the resin unobstructed.
This means checking the resin you’re printing in is “clean” and debris-free (take a resin comb to it or pour it through a filter to sift out the tiny shards of green resin that may be left floating from previous prints).
Now you know your resin is clear and well mixed, the next culprit is likely to be at the bottom of your vat — the interfacing layer. If this isn’t the first print in your current vat, then check for ghosting on the interfacing layer in your resin vat. Faint markings from previous prints are no doubt visible, and over time these can become enough of an obstruction for the laser to cause weaker, or even failed prints.
If this is the case, time for a new layer in your vat (or, depending on your machine, a new vat altogether).
3D PRINTING TROUBLESHOOTING TIP: DON’T BATHE PARTS IN IPA FOR TOO LONG
What the header says. If you suspect your part of having weak layers bonding, washing it for too long in IPA can weaken it further. Restrict you IPA wash cycle to a minimum, quickly and gently agitating the unset resin off before rinsing in water.
SLA 3D Printing Problem Checklist: Layers Have Separated
- Supports!
- Check laser’s path for obstructions
- Minimal cleaning in IPA
Small Fins and Disks Attached to Print (Ragging)
What’s the 3D Printing Problem?
This flakes of set resin have incorporated into your print, giving an ugly surface finish with offshoots that are not part of the model.
What Causes this 3D Printing Problem?
The likely cause of these unwanted flakes in your prints is an unclear optical path. Sometimes the laser can become diffused, “leaking” to the resin outside of spot it is supposed to be setting.
Settled resin, resin clouded with large set particles from prior prints or a smudged or dirty planes between the laser and resin can also contribute to the problem.
3D Printing Troubleshooting: Ragging
3D PRINTING TROUBLESHOOTING TIP: FILTER YOUR RESIN
Eliminate any particles of set resin from past prints by passing it through a filter. Readily available from 3D printing stores, these paper and mesh filters capture large particles that might otherwise cloud your resin during the printing process.
3D PRINTING TROUBLESHOOTING TIP: MIX YOUR RESIN
If your resin has been standing for some days without action, it might have settled, with the pigments settling in a thicker layer than the photopolymer. Give the resin a mix, ensuring the pigment and photopolymer are evenly distributed. You can usually tell when this is done by the lack of streaks as you mix.
3D PRINTING TROUBLESHOOTING TIP: CHECK/CLEAN OPTICAL PATH
Depending on your machine, you may be able to access the transparent internal barrier protecting the laser/galvanometers. If you can, check that this is clear from dust, fingerprints and other detritus that may prevent the laser from passing clean through.
SLA 3D Printing Problem Checklist: Small Disks and Fins attached to Print
- Filter your resin
- Remix your resin
- Check/clean optical path
Source: https://all3dp.com/1/common-3d-printing-problems-troubleshooting-3d-printer-issues/