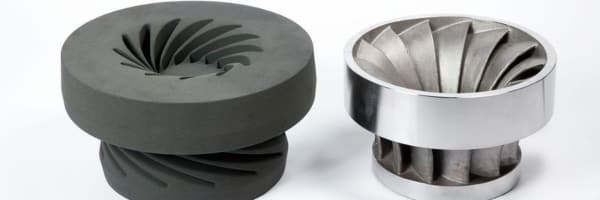
Sand Casting is a cost-effective technique for the production of complex components from practically any metal alloy, that can benefit from 3D printing.
This combination is extremely popular among manufacturers who need to produce large parts in the shortest lead time possible.
So, if you are interested in learning about Sand Casting and how 3D printed molds can help your business, you are in the right place.
Sand Casting, as its name suggests, is a type of casting process that uses a mold made from special sand as a negative impression for producing the desired component.
Today I will explain how you can reduce up to 75% of the costs of Sand Casting by leveraging 3D printing.
If you are not familiar with the casting process, don’t worry. We will explain it soon.
What is Casting?
The casting process is one of the oldest metal manufacturing techniques.
Nonetheless, many of the objects we use in our daily life are produced with the Casting Process.
Although the technique at its core has essentially remained the same, it evolved to become more precise and automated.
One of the innovations to the process is the possibility of 3D printing molds. We will come back to this later in the article.
The process itself is rather straightforward.
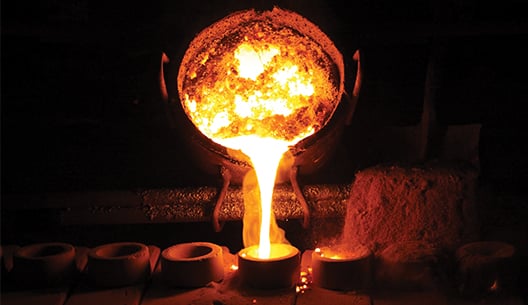
The liquified form of a metal material is poured into a mold of the desired shape of the part.
The metal will solidify into the shape given by the mold.
Once that happens, the object is ready for extraction, which is the last step of the process.
And voilà. A casting is ready.
By definition, casting is an object that was created by pouring liquified material into a mold.

Types of Casting Process
Over time the process has evolved to different types of methods of fabrication.
Each has its advantages and disadvantages.
The most common types of casting processes available nowadays are:
- Sand Casting
- Investment Casting
- Plaster Casting
- Die Casting
What are the steps in the Casting Process?
The steps in the casting process are very similar for each type of technique currently available.
There are variations in the steps involved, however, the basic operations are:
Pattern Making
A pattern is a physical model that is used to make the mold and replicates the exterior of the casting.
Several materials can be used to make the patterns.
In many cases, the interior of the component needs to be hollow – think of pipe fittings, for example.
That requires the creation of additional patterns called cores.
Core Making
- It must be strong enough to resist the turbulence caused by the molten material;
- Good hardness;
- High permeability so that the gases formed during the casting process can easily escape.
- Able to resist the high temperatures from the molten material.
- Weak enough to break while the molten material cools down and shrinks, facilitating its removal after solidification.
- Smooth surface finish.
- Minimum gas generation when exposed to the molten material.
Molding
The process of developing the mold that will receive the molten metal.
It consists of multiple operations that are essential to forming the mold around the pattern.
The mold is contained in a flask. The flask is a frame consisting of two parts: a cope and a drag.
The flask around the pattern is filled with the molding sand, after which the pattern is removed.
The gating systems, channels that allow the molten material to enter and flow through the mold, are positioned in the drag. It is also the drag that receives the cores.
The sprue, the channel used to introduce the molten material into the mold, is placed in the cope.
Then, to close the mold, the cope is put on top of the drag. Both parts are clamped together.
Melting and Pouring
Melting is the process of converting the solid metal material into a liquid state so that it can be poured into the mold.
The process is performed at an extremely high-temperature in a heating chamber called a furnace.
These chambers are designed based on multiple factors but mostly according to the type of material and fuel that will be used to achieve the required temperatures – which can go over 1600°C.
Exposing metals to such extreme temperatures usually generates harmful gases that can cause defects in the casting.
These gases are removed as the molten material is refined.
This crucial step also purifies the metal material by extracting other unwanted elements without modifying its chemical structure.
After refining, the molten material is ready to be tapped into the ladle.
Ladles are vessels used by foundries for safely transporting and pouring molten metals into the mold.
The metal is poured into the mold and is left to cool down until it reaches room temperature.
When the material is solid again it will go through a process called shakeout.
Shakeout separates and removes the sand from the casting by vibrating the molds.
Cleaning
Now, the casting is ready and freed from the mold.
The gating systems and remaining residual materials are removed.
The excess materials trimmed.
Post-processing treatment may be done to improve the appearance and surface of the casting.
And finally, the casting is inspected for quality control.
What is Sand Casting?
Sand Casting is the most common technique for manufacturing metal castings.
According to Dr. TV Ramana Rao, professor of Mechanical Engineering at Osmania University in India, who teaches Metal Casting and CAD/CAM, the technique accounts for over 70% of all castings produced.
The Sand Casting process is known for its versatility.
After all, it can produce castings of all sizes and weights with exceptional complex geometries using the majority of metals.
The main characteristic of the Sand Casting technique is that it uses sand as the molding medium.
The significant cost reduction achieved by using sand for making molds instead of other materials is a great advantage.
Especially when we take into consideration that mold making costs account for a big chunk of the expenses on other casting techniques.
The nature of sand, however, means that the molds used in the process are expendable and non-reusable.
It is impossible to keep a sand mold intact when removing a casting.
On the other hand, Sand Casting is ideal for high melting temperatures metals such as titanium, steels, and nickel.
It is the only casting method that can handle these materials.
It is not surprising that the technique is the first choice for the production of economical small series of parts in the aerospace and automotive industries.
If you are wondering how is it possible to use sand as the mold material, hold on. I am getting there.
Sand Mold Materials
Making a sand casting mold usually requires the following 4 components:
Base Sand
The base sand is the type of sand used to make the mold in its pure state.
For it to hold together, a binding agent is required.
The base sand also makes the core.
The most common types of base sand are:
- Silica Sand
- Olivine Sand
- Chromite Sand
- Zircon Sand
- Chamotte Sand
Binders
The binding agents are responsible for gluing the sand particles together.
The most common types of binders are:
- Clay and water
- Oil
- Resin
- Sodium Silicate
Additives
These are responsible for improving the mold in regards to surface finish, strength, cushioning and refractoriness.
Parting Compounds
A liquid or fine powder to facilitate the removal of the pattern from the mold.
Advantages of Sand Casting
The main advantages of Sand Casting are:
- It can be used to manufacture parts in nearly all metal materials, including those with a high-melting-point;
- Easy to scale;
- Complex geometries with thin-wall sections;
- Castings of all sizes and weights, and;
- Low production cost.
Limitations of Sand Casting
The main limitations of sand casting are:
- High volume production requires a high degree of automation for mold making;
- A lower degree of accuracy than other methods, and;
- Rough surface finish usually requires post-processing treatment.
The reinvention of Casting with 3D Printing
The ability to 3D print molds for sand casting is a game-changer.
The inclusion of additive manufacturing as a method for making molds is reinventing the casting process and solving some of its limitations.
This hybrid model provides a real competitive advantage over the traditional production process due to its economic and design benefits.
The 3D printing technology used for creating molds and cores from sand is known as Binder Jetting.
Binder Jetting printers build parts layer-by-layer, using a binder to bond and strengthen each layer.
The most common sand materials used in this process are Silica and Zircon.

Added benefits of 3D Printing molds for Casting
The main benefit is the cost reduction enabled by 3D printing.
We estimate that, on average, our customers save 75% of the cost involved in mold making.
Another benefit is that while conventional techniques can take up to several weeks for making the molds and cores, 3D printing molds only takes a few days and can be automated.
This also means there is more room for improvement and design changes.
After all, the production of molds and cores with 3D printing only requires a CAD file.
The complexity of the geometries and its accuracy is also much higher with 3D printing.
As for the size, parts can be as large as 400 x 200 x 100 cm.
How will you make your next metal part?
Now I would like to hear from you:
Will you consider sand casting with 3D printing next time you need to make your metal parts?
Let us know and get in touch with us for more information or upload your 3D model to get a quote for a 3D printed mold.
And, if you liked this article, don’t forget to share it with your network.